6-30
DCR-PC350/PC350E
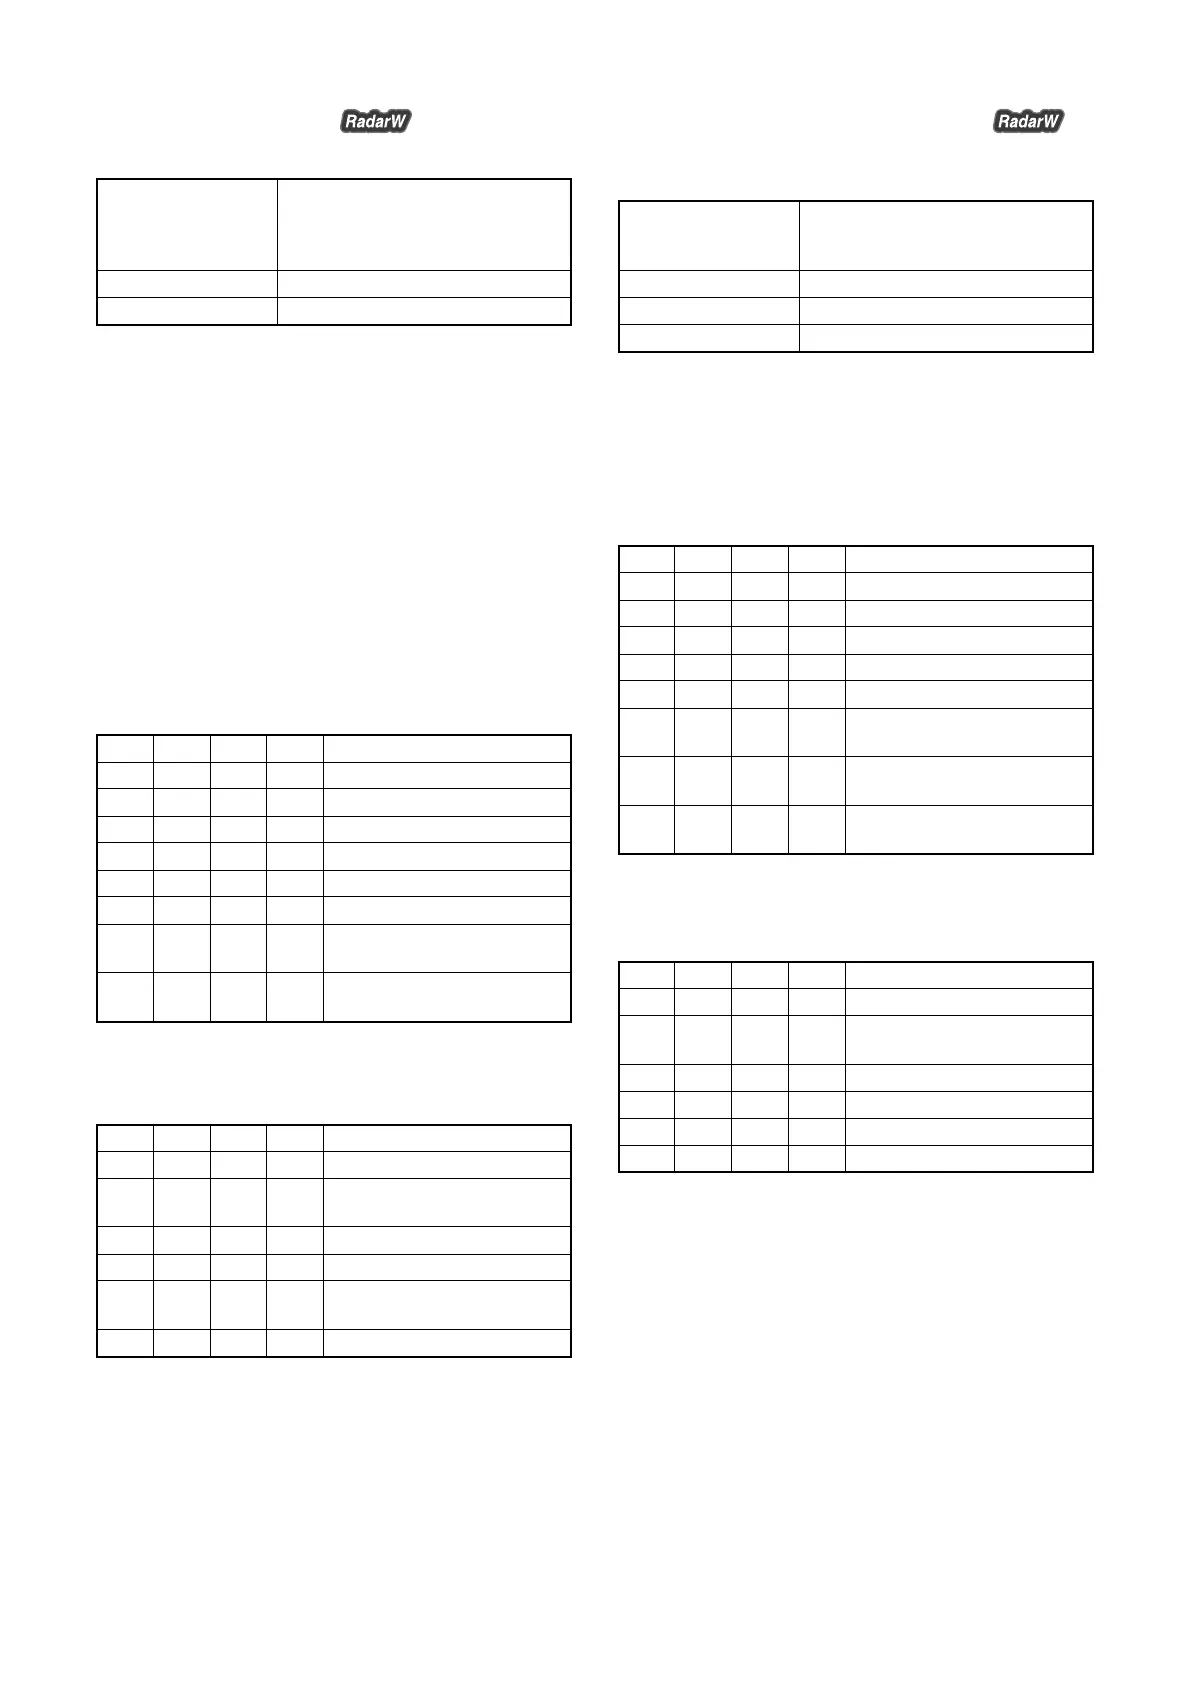
11. ND ON/OFF Adjustment
Adjustment to reduce the difference in the amount of light when
the ND filter is on and when the ND filter is off.
Subject Clear chart (All white frame with
zoom WIDE end) (Note1)
(0.4m (PTB-450) or 0.16m (PTB-
1450) from the front of the lens)
Adjustment Page 19 (Note2)
Adjustment Address 28
Note1: Shoot the clear chart with the zoom WIDE end. And adjust the
direction of the camera so that the chart is located in the center of
the screen.
Note2: When reading or writing the 19 page data, select page: 0, address:
10, and set data: 01, then select 9 page. The 19 page can be chosen
by this data setting.
After reading or writing, reset the data of page: 0, address: 10 to “00”.
Note3: Check that the data of page: 6, address: 02 is “00”. If not, to page:
6, address: 01, set data: 00, and press the PAUSE button.
Switch setting:
1) POWER....................................................... CAMERA-TAPE
2) NIGHT SHOT..................................................................OFF
3) ZOOM .................................................................... WIDE end
4) FOCUS.................................................................. MANUAL
5) DIGITAL ZOOM (CAMERA SET menu) ......................OFF
6) STEADY SHOT (CAMERA SET menu) ........................OFF
Adjusting method:
Order Page
Address
Data Procedure
1 0 01 01 Set the data.
2 0 10 00 Set the data.
3 6 65 AE Set the data.
4 6 C9 10 Set the data.
5 F A1 Memorize the data.
6 F A1 C0 Set the data.
7 6 01 71 Set the data, and press PAUSE
button.
8 6 02 Check that the data changes to
“01”. (Note4)
Note4: The adjustment data will be automatically input to page: 19,
address: 28.
Processing after Completing Adjustments:
Order Page
Address
Data Procedure
1 0 10 00 Set the data.
2 F A1 Set the memorized data, and
press PAUSE button.
3 6 65 00 Set the data.
4 6 C9 00 Set the data.
5 6 01 00 Set the data, and press PAUSE
button.
6 0 01 00 Set the data.
12. Picture Frame Setting (All White Frame)
When performing “Auto White Balance Standard Data Input”, “LV
Standard Data Input”, “Auto White Balance Adjustment” and “White
Balance Check”, set the picture frame to “All white frame”.
Subject Clear chart (All white frame)
(1.0m (PTB-450) or 0.4m (PTB-1450)
from the front of the lens)
Measurement Point Video terminal of AUDIO/VIDEO jack
Measuring Instrument TV monitor (Under scan mode)
Specified Value Whole of the screen is white
Switch setting:
1) POWER....................................................... CAMERA-TAPE
2) NIGHT SHOT ..................................................................OFF
3) FOCUS.................................................................. MANUAL
4) DIGITAL ZOOM (CAMERA SET menu) ......................OFF
5) STEADY SHOT (CAMERA SET menu) ........................OFF
Setting method:
Order Page
Address
Data Procedure
1 0 10 00 Set the data.
2 6 90 70 Set the data.
3 6 91 02 Set the data.
4 6 92 00 Set the data.
5 6 93 46 Set the data.
6 6 01 79 Set the data, and press PAUSE
button.
7 Check that the whole of the
screen is white.
8 Perform the following
adjustments.
How to release the picture frame setting:
After completing “Auto White Balance Standard Data Input”, “LV
Standard Data Input”, “Auto White Balance Adjustment” and “White
Balance Check”, release the data setting.
Order Page
Address
Data Procedure
1 0 10 00 Set the data.
2 6 01 00 Set the data, and press PAUSE
button.
3 6 90 00 Set the data.
4 6 91 00 Set the data.
5 6 92 00 Set the data.
6 6 93 00 Set the data.