4. Turn on the MI70 indicator (time and date are requested at first startup). MI70 detects
the probe and proceeds to show the measurement screen. The parameters measured
by probe will start to show valid measurement results after a few seconds.
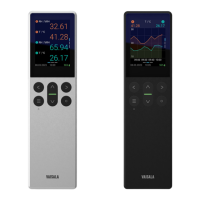
8.6 MI70 Indicator Parts
Figure 28 MI70 Indicator Parts
1 Charger socket
2 Function buttons . The functions
change according to what you are doing
with the indicator.
3 Arrow buttons:
Move up in a menu
Move down in a menu
Enter a sub-menu
Return to previous menu level
4 Power On/O button
5 Battery compartment at the back of the
indicator
6 Two ports (labeled I and II) for
connecting probes and instruments.
To open menus, press an arrow button and then press the shortcut buttons. To activate a
function shown above the shortcut button, press the shortcut button. To navigate in the
menus, press arrow buttons.
8.7
Holding and Saving the Display
With the Hold/Save function, you can freeze a certain display reading. This reading can be
saved in the MI70 memory and it will be available even after MI70 is disconnected from the
transmitter.
1. In the basic display, select Hold/Save. Alternatively, select Main menu > Display >
Hold/Save display > Hold.
2. Press Save.
Chapter 8 – Operating with MI70 Indicator
87

 Loading...