Do you have a question about the vision microsystems VM1000C and is the answer not in the manual?
Describes the five buttons and their functions in different modes (normal, fueling, setup).
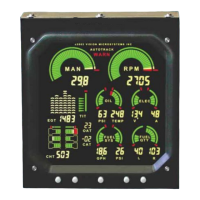
The display is the primary interface for engine instrumentation and optional measurements.
Adjusts display brightness using a photocell and manual settings.
Details the analog and digital tachometer display and its use for monitoring engine speed.
Explains the engine hours counter feature which displays total accumulated engine hours.
Describes the analog and digital manifold pressure display for precise power settings.
Explains the warning alert that activates when engine redline is reached.
Describes the percent power display and calibration, including warning alerts.
Displays oil pressure and temperature continuously in graphic and digital areas.
Details the digital and graphic oil pressure display and its warning alerts.
Describes oil temperature display, its alerts, and monitoring system performance.
Introduces the fuel computer system, warnings about improper use, and fuel pressure monitoring.
Describes fuel pressure display, its graphical representation, and behavior.
Explains the warning alert that flashes if fuel pressure falls outside specified limits.
Lists and describes the five available fuel flow computer modes (ADD, GPH/LPH, REM, BRN, HRS).
Describes specific fuel flow computer modes: ADD, GPH/LPH for fuel flow, and REM for fuel remaining.
Describes additional fuel flow computer modes: HRS for hours remaining, BRN for fuel burned.
Provides step-by-step instructions for adding fuel to the computer's electronic tank.
Describes display of all cylinder information graphically and digitally for easy identification.
Explains the warning alert that flashes if Cylinder Head Temperature limit is exceeded.
Describes EGT display, system testing of probes, and disallowed peaking mode.
Explains EGT over-temperature alerts that cause display to flash.
Describes selecting different EGT probes (E1, E2, etc.) for display.
Step 1: Stabilize engine parameters (temps, throttle, RPM) for peak EGT.
Step 2: Lean mixture smoothly to identify the peak EGT value.
Step 3: Adjust mixture differential value according to leaning mode (rich or lean of peak).
Describes voltage and amperage monitoring with graphic and digital readouts.
Explains voltage and amperage warning alerts for out-of-limit conditions.
Lists recommended scenarios for using Autotrack: Climb, Cruise, Descent.
Provides steps for activating and operating the Autotrack system.
Explains how Autotrack alerts deviations from captured points.
Provides practical examples of Autotrack alerts for climb and cruise scenarios.
Describes the Flight Data Recorder system for logging engine data.
Covers USB and Serial download methods for flight data.
Step-by-step guide for downloading flight data via USB.
Step-by-step guide for downloading flight data via serial connection.
Continues detailed steps for USB data download, including software interaction.
Describes display of Outside Air and Carburetor Air Temperatures in Celsius.
Introduces the fuel level system, its operation, and associated warnings.
Explains the low fuel level warning system that signals when a minimum level is reached.
Describes the TIT system, its display, and the need for initial configuration.
Introduces the EC100 system, providing categories of easily accessed information.
Lists and describes EC100 system categories: Aircraft, Checklists, Voicnote, Engine Info, Clock, Emergency Checklists, ECAS.
Details specific functions like Voicnote, Engine Info, Clock, Emergency Checklists, and ECAS.
Details on uploading custom checklists to the VM1000C via PC.
Steps for setting up custom voice prompts for the EC100 system.
Describes how to mount the main VM1000C indicator unit to the panel.
Details on installing the EC100 system, its cable connections, and audio setup.
Instructions on how to route the wiring harnesses through the firewall.
Explains the markings on the factory assembled wiring harness for cylinder identification.
Detailed steps for installing Exhaust Gas Temperature probes in exhaust stacks.
Details for installing Turbine Inlet Temperature probes.
Detailed steps for installing Cylinder Head Temperature probes onto engine cylinders.
Instructions for replacing existing CHT probes with supplied VM probes.
Detailed steps for installing Outside Air Temperature probes in recommended locations.
Details for installing Induction Air Temperature and Compressor Discharge Temperature probes.
Details for installing Carburetor Air Temperature probes near the butterfly valve.
Instructions for installing the oil temperature sensor/transducer on the engine.
Details for installing the oil pressure sensor using a flexible hose.
Details for installing the fuel pressure sensor for carbureted and injected engines.
Details for installing the RPM sensor.
Details for installing the ammeter shunt for charge/discharge configuration.
Describes the ammeter configuration where the shunt is in the battery positive line.
Describes the load meter configuration where the shunt is between alternator output and main bus.
Details for installing the capacitive fuel level sender.
Further details and notes for capacitive sender installation, including probe cutting and mounting.
Additional notes and considerations for capacitive sender installation, including bushing and end supports.
Details for installing the resistive fuel level sender and connecting it.
Steps for connecting resistive fuel level senders, including calibration.
General instructions for installing the fuel flow transducer, including notes on mounting and orientation.
Mounting, orientation, and hose connection details for the fuel flow transducer.
Instructions for routing transducer wires through the firewall, away from heat.
Describes methods for configuring VM1000C parameters: PC software or built-in menus.
Introduction to the PC-based configuration utility for managing VM1000C parameters.
Steps to install the VisionConfig software on a PC.
Explains serial port usage and transfer modes (download/upload) for configuration.
Steps to use the VisionConfig software for downloading and editing VM1000C configuration.
Details the settings within the Aircraft Information tab, including aircraft number and flight ID.
Describes configuring engine parameters, selecting transducers, and setting engine limits.
Setting specific gauge parameters like High Red, Yellow, High Green, and Low Green values.
Selecting fuel units (gallons/liters) and entering the Fuel Flow K-Factor.
Configuring communication parameters for ports used with other aircraft instruments.
Controlling brightness, datalog interval, and temperature units for gauges.
Uploading configuration changes from the PC back to the VM1000C unit.
Parameters for using the program via the command line interface.
Overview of using the device's internal setup menus for configuration.
Essential initial setup procedures that must be accomplished first.
Lists and details of mandatory configuration items like Engine Code, Clock, and Engine Hours.
Further details on mandatory setup items including Ignition, Fuel Pressure Type, and Fuel Units.
Describes optional setup parameters such as Backlight, GAMI HP constant, and Amps Sensor Type.
Details parameters for Percent Power, Manifold Pressure, and RPM.
Details parameters for Volts, Amps, Fuel Computer, Fuel Pressure, and CHT.
Details parameters for EGT and TIT, including range marks and tolerances.
Steps for performing fuel level calibration for each tank.
Options for fuel level calibration alarms and erasing previous calibration data.
Configuring baud rates for serial communication ports A and B.
Configures RS232 output modes, download/upload functions, and test messages.
Steps to calibrate percent power on the ground, including engine horsepower settings.
Steps to calibrate percent power in the air, adjusting for outside air temperature.
Explains primary and secondary calibration methods for single or dual fuel tanks.
Step-by-step guide for calibrating each fuel tank, from unusable fuel to full.
Pinout details for the P1 connector, listing probes and functions.
Pinout details for the P3 connector, listing MAN, RPM, and Oil Pressure functions.
Pinout details for the P4 connector, listing Fuel Flow and GPS functions.
Pinout details for the P2 connector, listing EGT and CHT probes.
Pinout details for the P5 connector, listing Fuel Pressure, Fuel Quantity, and Amps functions.
Diagram showing the arrangement of connectors (P1-P5) on the rear of the instrument.
Website and email address for obtaining technical assistance and support.
| Brand | vision microsystems |
|---|---|
| Model | VM1000C |
| Category | Measuring Instruments |
| Language | English |