Parameter Details
12
12.2 A: Initialization Parameters
YASKAWA SIEPC71061753C GA500 Technical Manual 495
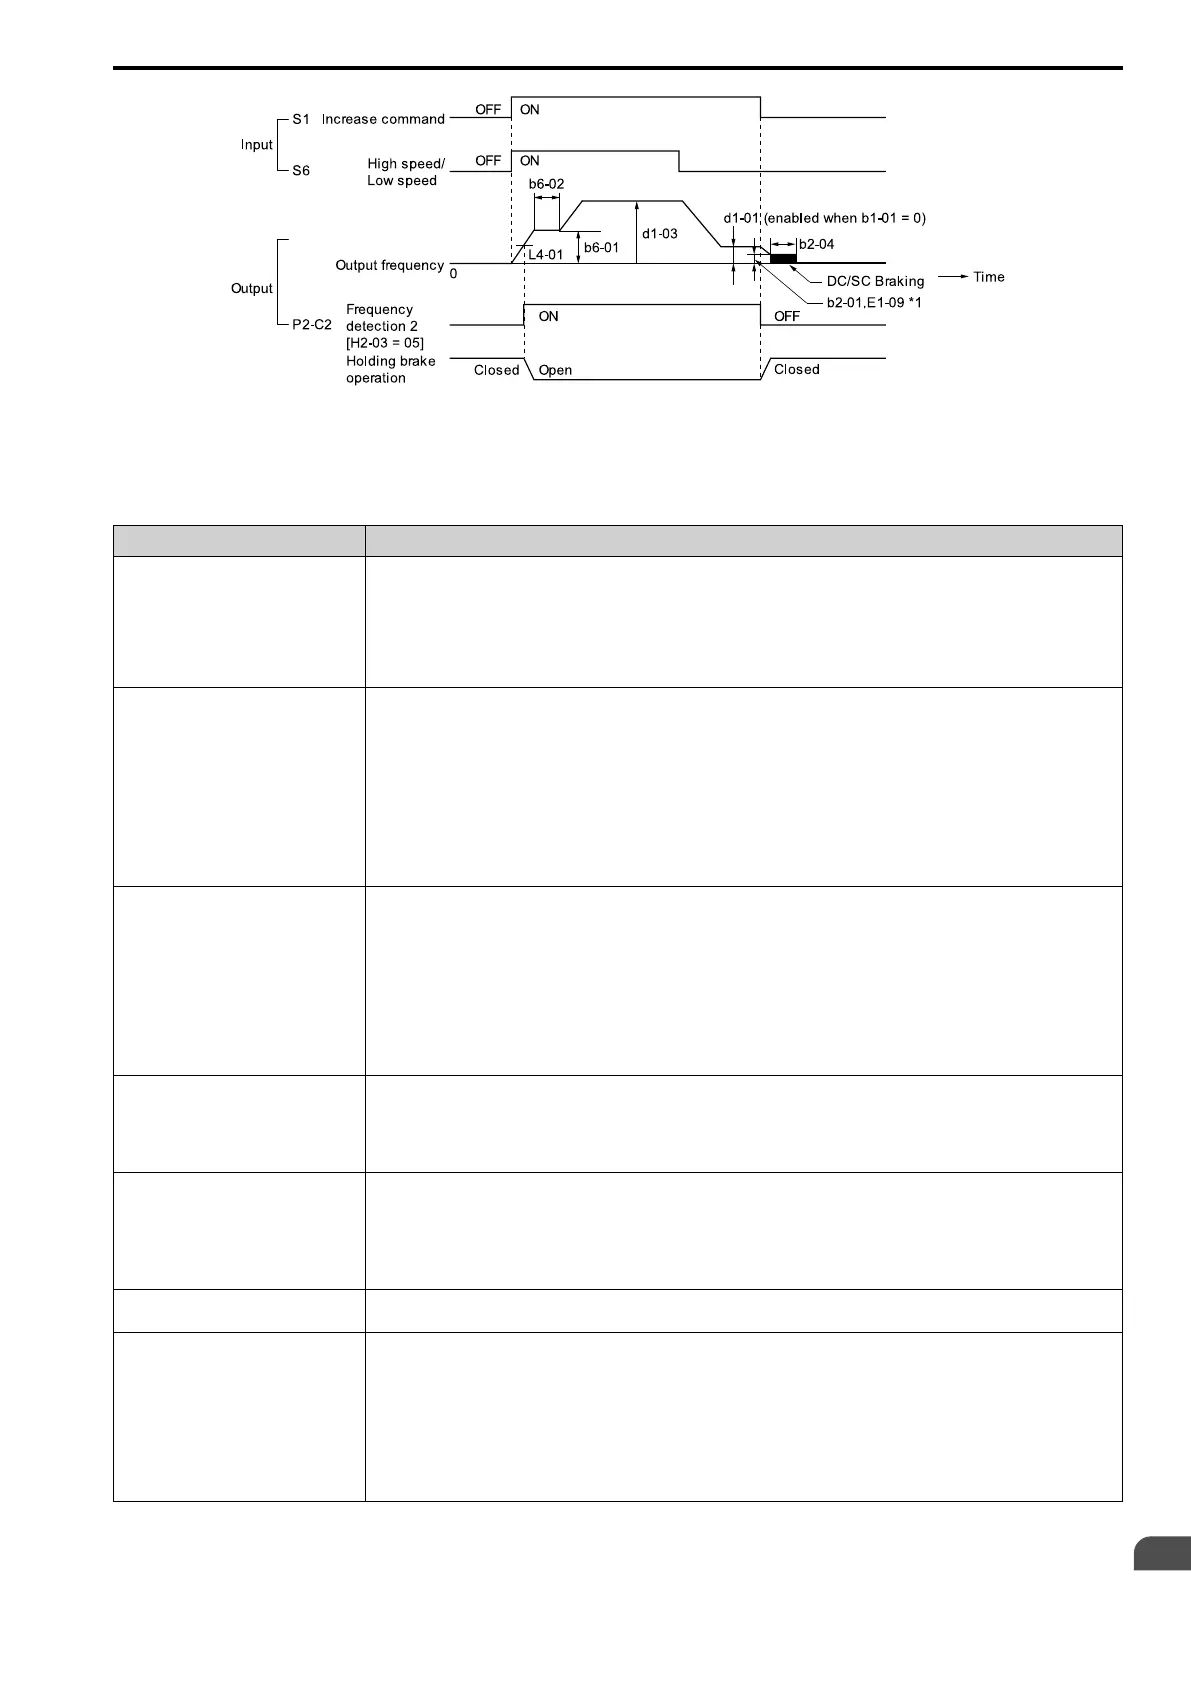
Figure 12.3 Holding Brake Open and Close Sequence Time Chart (V/f, OLV)
*1 Start braking from the higher set frequency between b2-01 [DC Injection/Zero SpeedThreshold] or E1-09 [Minimum Output
Frequency].
Notes on when Using Other Functions
Function Precautions
Stall Prevention during Deceleration When you connect a braking resistor to discharge the regenerative power to the drive, set L3-04 = 0 [Stall Prevention during Decel
= Disabled].
Note:
If L3-04 = 1 [General Purpose], it is possible that the drive will not stop in the set deceleration time. Do not change the default
settings of these related parameters:
• L3-01 = 1 [Stall Prevention during Accel = Enabled]
• L3-05 = 1 [Stall Prevention during RUN = Deceleration Time 1 (C1-02)]
Auto-Tuning for Induction Motors
• When A1-02 = 2 [Control Method Selection = Open Loop Vector], Auto-Tune the motor before you operate the drive.
• Disconnect the drive from the motor to do Rotational Auto-Tuning.
• Auto-Tuning runs automatically for approximately 1 minute. Do not do Auto-Tuning with the motor engaged in the elevator
system.
Note:
• If you cannot disconnect the motor from the machine, do Stationary Auto-Tuning. During this time, the drive automatically
measures the necessary motor data. If the motor test report or the motor nameplate is not available, use Stationary Auto-Tuning.
Do Stationary Auto-Tuning for Line-to-Line Resistance for better torque characteristics at low speeds in the V/f Control mode.
• When you do Stationary Auto-Tuning, the drive energizes the motor and the motor stays stopped.
• To Auto-Tune a specialized motor, for example a wound motor, prepare a motor test report before Auto-Tuning and make sure
that the motor parameter E2-xx is not too different than the value in the test report.
Auto-Tuning for PM Motors
You must set the motor data in the drive to run a PM motor.
• When you use a PM motor recommended by Yaskawa
Input the motor code in E5-01. E5 and other related motor parameters will be automatically set to the optimal values.
• When you use a non-Yaskawa PM motor
Do Auto-Tuning.
– When the motor nameplate or motor test report is available, enter the PM motor parameters directly with PM Motor Parameter
Settings.
– If the motor nameplate or motor test report is not available, and the motor cannot rotate, do PM Stationary Auto-Tuning.
– If the motor nameplate or motor test report is not available, and the motor can rotate, do PM Rotational Auto-Tuning.
Braking Resistor Overheat Protection When you use a braking resistor that is not the optional Yaskawa braking resistor unit (LKEB-series), this function uses the thermal
overload relay to detect braking resistor overheat. Load a sequence program that turns OFF the drive input power supply when the
braking resistor overheats.
Note:
Refer to page 62 when you load the sequence circuit.
Continuous Operation
Do not use the momentary power loss continuous operation function and the Auto Restart function. If you use these functions, there
is a risk that the motor will coast to a stop if the brake is open when there is a momentary power loss and the drive is operating or if
there is a fault.
Set the these parameters:
• L2-01 = 0 [Power Loss Ride Through Select = Disabled]
• L5-01 = 0 [Number of Auto-Restart Attempts = 0]
Torque Limit The motor rated torque sets the value for L7-01 to L7-04 [Torque Limit]. If there will not be sufficient torque during start up, replace
the drive with a larger capacity drive and set the torque limit between 200% and 300%. The L7-01 to L7-04 default setting is 200%.
Input/Output Phase Loss Protection,
Overtorque Detection
To stop a fall because of phase loss, set these parameters:
• L8-05 = 1 [Input Phase Loss Protection Sel = Enabled]
• L8-07 = 1 [Output Phase Loss Protection Sel = Fault when One Phase is Lost]
• L6-01, L6-04 = 1 to 8 [Torque Detection Selection 1/2 = oL @ Speed Agree - Alarm only to UL @ RUN - Fault]
• L6-02, L6-05 [Torque Detection Level 1/2]
• L6-03, L6-06 [Torque Detection Time 1/2]
Note:
Use precautions, for example fall detection, on the machine side.
 Loading...


