Pannoramic SCAN II 2.2.0 User’s Guide 5.2.2 Microscope Control Panel
Dilate mask
Adjust the slider to enlarge or decrease the scanned area. To switch to manual mode click the top left
corner of the button and the required value can be entered in the box .
Preview Toolbar
This section is located at the bottom of the preview image.
• Save scanmap – Click this icon to save the currently selected areas to scanmap.
• Position – To position the specimen holder that holds the current slide, click Position
sample and then click on the area of interest on the preview image. This will define the Live
image that you can access from the Live view .
• Union – Add the selected areas to the preview. Mark area for scanning based on the
shape selected in the Preview Toolbar. This area will not be scanned.
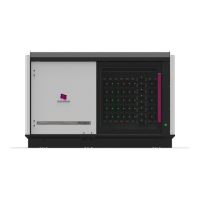
• Erase – Delete selected areas from the preview image. Deselection is made based on
the selected shape from the Preview Toolbar. This area will not be scanned.
Figure 47 – Not scanned selection
January 24, 2020 - Rev. 2 3DHISTECH Ltd. 89(156)