Do you have a question about the Brother ULT-2002D and is the answer not in the manual?
Specific electrical safety guidelines for users in the UK, Eire, Malta, and Cyprus.
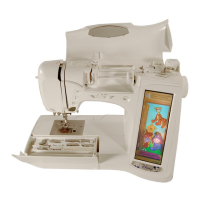
Highlights the advanced features of the sewing machine, including sewing advisor and automatic tension.
Describes the 107 pre-programmed utility stitches for garment construction and mending.
Details the ability to sew alphabet patterns, decorative stitches, and cross stitches.
Explains the manual's organization and recommended reading order for different functions.
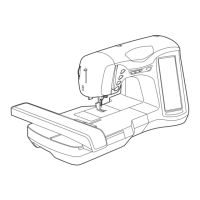
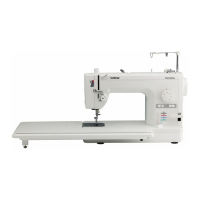
Identifies and explains the main components and operational parts of the sewing machine.
Lists and describes accessories provided and optional items available for purchase.
Covers essential operations like connecting power, using the LCD, threading, and bobbin winding.
Provides guidance on basic sewing procedures, including initial setup and trial stitches.
Explains how to adjust stitch width, length, and thread tension for various sewing patterns.
Covers settings for automatic reinforcement stitching and automatic thread cutting.
A table summarizing utility stitch patterns, required presser feet, uses, and twin needle compatibility.
Guides on selecting and sewing various utility stitches, including using the sewing type selection key.
Details specific stitches like Straight, Basting, Zigzag, Elastic Zigzag, Overcasting, Quilting, Blind Hem, etc.
Explains how to select and browse different categories of character and decorative stitch patterns.
Guides on adjusting, editing, and creating custom stitch patterns using machine functions.
Covers saving and retrieving custom stitch patterns, managing memory, and handling full memory issues.
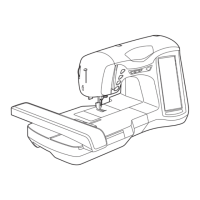
Covers essential setup steps before starting embroidery, including unit attachment and pattern selection.
Outlines the fundamental steps for preparing the machine and starting an embroidery project.
Explains how to choose patterns from memory, cards, disks, and manage them.
Covers attaching stabilizer, inserting fabric, and attaching the embroidery frame for successful embroidery.
Guides on positioning, sewing, adjusting thread tension, speed, and revising patterns.
Introduces the various editing functions available for embroidery patterns, such as combining and resizing.
Guides on selecting patterns for editing and using core editing functions like moving, rotating, and deleting.
Covers combining multiple patterns, including decorative, character, and frame patterns.
Provides steps for fine-tuning patterns after editing and saving them to memory or disk.
Guides on how to create custom stitch designs using a grid and coordinate system.
Details the process of inputting and modifying stitch data points to create custom patterns.
Covers storing custom stitch designs in memory and retrieving them.
Provides instructions for safely replacing the sewing machine's light bulb.
Covers cleaning the LCD screen, machine casing, and the race and shuttle for optimal performance.
Explains how to clean the floppy disk drive heads to ensure proper data reading.
Guides on adjusting screen brightness and touch panel response for optimal visibility and usability.
Explains how to use the built-in troubleshooting feature and interpret error messages for problem resolution.
Provides a table of common problems, their causes, solutions, and corresponding page references for quick reference.
Lists the technical specifications of the sewing machine and embroidery unit.
| Thread Tension Control | Automatic |
|---|---|
| Needle Threading System | Automatic |
| Automatic Needle Threader | Yes |
| Drop Feed | Yes |
| Speed Control | Yes |
| Presser Foot Pressure Adjustment | Yes |
| Free Arm | Yes |
| LED Lighting | Yes |
| LCD Display | Yes |