Home
Car-O-Liner
Welding System
CTR9
Page 24 (C-Tong Holder Assembly)
Car-O-Liner CTR9 - C-Tong Holder Assembly
121 pages
Manual
Save Page as PDF
To Next Page
To Next Page
To Previous Page
To Previous Page
Loading...
Car-O-Liner Group AB
CTR9
24
49023, EN - rev. 4, 2020-01
3.3.1
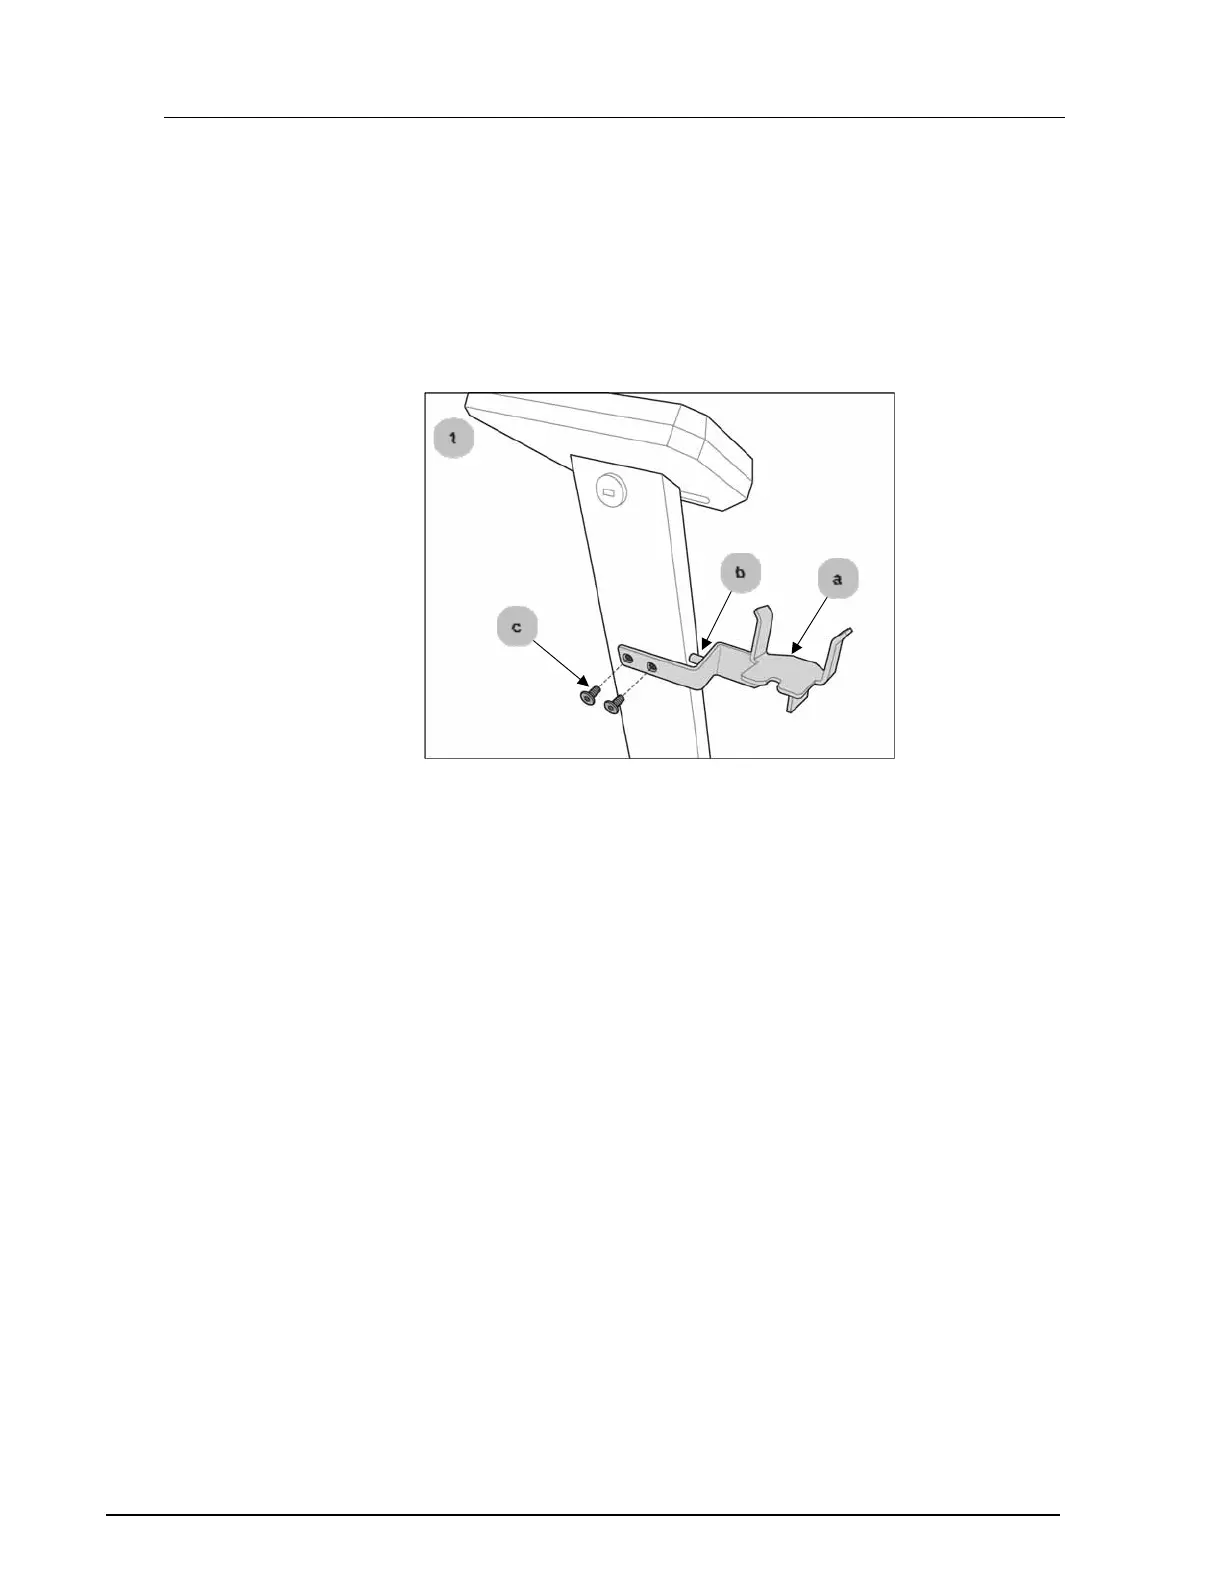
C-Tong holder assembly
Fit the C-Tong holder as
follows:
1
Fit the C-Tong holder [a] onto the panel column by inserting
rod [b] and tighte
ning the two hex/allen screws [c].
23
25
Table of Contents
Main Page
Default Chapter
4
Table of Contents
4
1 Introduction
7
General
7
Welder Overview
8
Marking
9
2 Safety
10
General
10
Warnings and Important Notices
10
Safety Signs
17
Placement of Safety Signs
18
Safety Devices
19
Cooling
19
Overheat Protection
19
Hazards from Elecromagentic Disturbances
20
3 Installation
22
General
22
Packaging and Delivery Inspection
22
Welder Assembly
23
C-Tong Holder Assembly
24
Connection of Electrical Supply
25
Grounding Risk
27
Connection of Air Supply
28
Connection and Disconnection of the Welding Cable
29
Filling of Cooling Liquid
31
Draining the Cooling System
32
C-Tong Transformer Gun
33
Rotating the C-Tong Gun
34
Rotating the C-Tong Handle
36
C-Tong Accessories: Electrode Yokes
37
C-Tong Accessory: A-Tong (Optional)
38
Multi Function Gun (Optional)
39
Support Arm
40
Working with the C-Tong Hanging from the Support Arm
41
Moving the Machine with Support Arm
42
Transport
43
Storage
44
4 Operation
45
Before You Begin Welding
45
Starting the Welding Machine
46
Using the C-Tong Trigger Button
47
Calibrating the Welder
48
C-Tong LED Indicators and Reset Button
49
Preparing the C-Tong for Welding Operation
50
Changing the C-Tong Electrode Yoke
50
Changing the C-Tong Electrodes
53
Changing the C-Tong Electrode Caps
55
Converting C-Tong to A-Tong
57
Changing and Aligning the A-Tong Electrodes
62
Changing the A-Tong Electrode Caps
63
Setting the A-Tong in Horizontal or Vertical Position
65
5 Welding Menu
67
Control Panel and Display
67
General
67
Fully Automatic Mode
68
6 Welding Modes
68
Auto 1 Mode
69
Auto 2 Mode
70
Manual Mode
71
Pre Pulse - for Burning off Coatings
72
Using Edge Welding Caps
74
Weldlogger (in CTR9 Welder and Optional PC Software)
75
Activate Weldlogger
75
Vehicle Sections List
76
Check Previous Log Files from the "Weldlogger
77
Delete Unsatisfactory Welding
78
Save Log Files to USB Memory
79
Optional: Print from Weldlogger PC Software
80
Turning off Cooling Water When Changing Electrodes
81
User Settings
82
Multi Function Gun Settings
83
Installing the Multi-Function Gun
84
Fitting the Multi-Function Gun
85
Grounding the Welding Object When Using Tools (Except Single Spot)
86
Select Required Tool
87
Single Spot Welding
88
Dent Puller - for Washers and Triangular Pulling Eye
92
Screw 6 MM
93
Screw 5 MM
94
Clip Rivet
95
Stitch Welding and Welding of Zig Zag Wire
96
Carbon Rod and Stamp Electrode Shrinking
97
Ending the Multi-Function Gun Program
98
A-Tong Settings
99
Auto 1 Mode
99
Auto 2 Mode
100
Manual Mode
100
Performing Nugget Strength Tests
101
Service
102
7 Service and Maintenance
102
Maintenance
103
8 Troubleshooting
105
Fault Tracing Table Welder Unit
106
Display Information Messages
109
9 Dismantling and Salvage
111
10 Technical Specifications
112
11 Electrical Diagram
116
Multi Function Gun and Accessories Box
118
12 Spare Parts and Accessories
118
13 CTR9 Electrodes Chart
120
Related product manuals
Car-O-Liner CTR12000
53 pages
Car-O-Liner CR510
64 pages
Car-O-Liner CR530
64 pages
Car-O-Liner CR500
64 pages
Car-O-Liner CM 193
84 pages
Car-O-Liner CMI 161
82 pages
Car-O-Liner CM Series
84 pages
Car-O-Liner CMI 300 Pulse Boost
92 pages