CTR9 Car-O-Liner Group AB
49023, EN - rev. 4, 2020-01 69
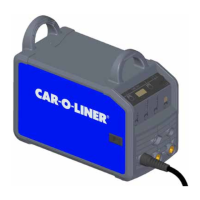
6.2 Auto 1 mode
In Auto 1 mode all values are automatically set, except the total material
thickness which has to be manually set.
1. Set the "Auto 1" mode by pressing the "Auto/Man" button.
With this button you can toggle between "Auto 1", "Auto 2"
and "Manual" modes.
2. Set the material thickness by pressing the "up/down" buttons.
3. Material thickness is displayed.
4. Select tool by pressing the "Change tool" button.
5. Selected tool is displayed, in the given example the C-Tong.
6. Pre pulse - select type of coating (see section 6.5 Pre pulse)
7. Succesfull welding! If welding is faulty, a red box with "X" is
displayed. A buzzing sound and red ligth in the handle display also
helps to indicate a faulty welding.
8. Displayed electrode force (daN) and air pressure (bar).