16
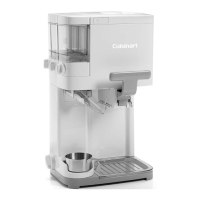
underneath the product, but at a 45-degree angle, to the front of the unit. Align the hole in the
unit, with the dispensing hole in the handle and turn clockwise towards you, until the handle
is in position. (Fig.2)
4. Slide the toppings chute into the space provided, underneath the topping containers. Be sure
to slide it all the way in, until it stops. (Fig.3)
5. Place the drip tray on the base, under the dispenser. Put the lid, with the mixing paddle, over
the ice cream bowl and push down, until it clicks securely into place. To remove the lid, push in
the two side tabs. (Fig.4)
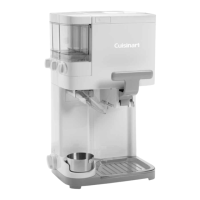
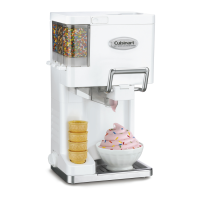
B. MAKING SOFT SERVE ICE CREAM AND FROZEN YOGHURT
Assemble the Soft Serve Ice Cream Maker and ll the topping containers, with the desired
toppings.
NOTE: Do not place liquids in the topping containers.
Prepare your ice cream recipe. The maximum capacity is 0.8 - 0.9L of ice cream mixture, as the
ingredients will increase in volume during the churning process. For best results, use pre-chilled
ingredients and prepare ingredients in a container, from which it’s easy to pour.
Add the freezer bowl to the machine, when you are ready to start churning.
NOTE: The bowl will begin to defrost quickly so use it immediately after removing from the
freezer.
Turn the power dial to the ON position and the mixing paddle will begin to turn. Add the ice
cream mixture to the bowl by pouring through the opening in the lid.
Note: Before pouring the mixture into the bowl, please make sure the dispensing handle is locked
in place and the handle is in the upright position.
Using a pre-chilled ice cream mixture, the ice cream will be ready in approximately 25 – 30
minutes. The timings will depend on the recipe and volume of the dessert you are making.
NOTE: Set a timer for 15 minutes and check the consistency to determine when to dispense.
Always keep the mixing paddle churning, when dispensing ice cream.
Dispensing Soft Serve Ice Cream or Frozen Yoghurt
When the ice cream is ready, the paddle must continue churning whilst dispensing. Hold an ice
cream cone or bowl a few centimetres below the ice cream chute and pull down the handle. Turn
the cone or bowl, as you dispense, to swirl ice cream. When nished lling the cone or bowl, push
the handle back up to stop the ow of ice cream.
NOTE: To test the ice cream consistency, pull down the handle and dispense a small amount of
soft ice cream into a bowl. If the consistency is too runny, pour back into the bowl and continue
churning. Checking every few minutes, until the desired results are achieved.
NOTE: Most cone sizes will t, but taller cones will need to be tilted when dispensing the ice
cream.
Turn the topping dispenser dials to add the toppings / mix ins of your choice.
To avoid making a mess, when dispensing toppings, ensure the cone or bowl is held closely to
the chute.
NOTE: The knob may be dicult to turn if the toppings are too sugary.
NOTE: Sugary toppings should not be left in the containers when the machine is not being used,
as moisture will get into them, causing them to stick together. It is advised that the containers
should only be lled with what will be used and emptied each time, to avoid this problem.
Serve quickly, once the ice cream has reached the desired consistency, making sure the machine
is on and churning, while dispensing the ice cream.