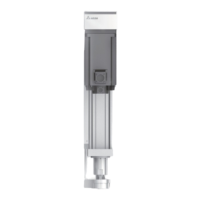
ring
proofing of mis-assembled
Make sure not seal the O ring.
5. Insert the internal wire into the Part A by using Allen wrench (Φ3mm) to fix the
internal wire. (torque 3N・m)
6. Fix Part A of the AC plug, then turn part B to assemble Part A to B. In the meantime,
hold the cable when tighten the part B.
7. Tighten the part B with part D by the instruction of Table 4-4.
For example : For the case of cable with 38mm
2
CV (diameter is Φ25mm), please
tighten be torque 12N・m.
Connect the proofing of mis-assembled of the plug with the inverter correctly, then tighten
by ring. Please double check if the AC plug does connect with the inverter correctly.
26
Wiring

 Loading...