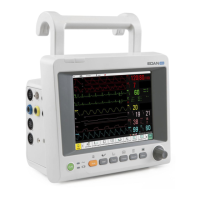
M3 Vital Signs Monitor User Manual System Menu
- 36 -
NOTE:
1. If you set the item to ON, after restarting the monitor, this item will store data
automatically, otherwise you will have to manually store data.
2. If formatting is failed, try again. Restart the monitor and retry the formatting, or
contact the service personnel of the manufacturer if formatting is failed repeatedly.
INTERVAL: set the storing interval by this item, it can be set to 1S, 5S, 10S, 30S, 1MIN or
5MIN.
MANAGEMENT: select BROWSE to browse data stored before.
- DELETE ALL: Select this item to delete all the data stored before. The dialog box displays:
All records will be deleted, OK?
Select YES to delete all the data.
- UP-DOWN: Select this item, then turn the page by pressing the UP or DOWN button to
browse data.
- SEARCH: Search data by patient ID, date and time.
- RETURN: Select this item to return to the previous menu.
Select the single item data in DATA BROWSER menu; press OK to display the f menu.
The user can select to browse the TREND TABLE, TREND GRAPH or ALARM LIST.
The user can select DELETE to delete the single item data; or select the RETURN to return to
the previous menu.
NOTE:
The data which is being stored cannot be browsed in real time. Before searching data,
you should turn off the Data Store function at first.
4.13 Sleep Mode
Entering the Sleep Mode
Select SYSTEM MENU > SYSTEM SETUP > STANDBY and configure the item to ON. Then
you will see the dialogue after pressing the switch for less than 1s: Enter sleep mode, yes?
Select YES to enter the Sleep mode.
NOTE:
When the SYSTEM SETUP >STANDBY is OFF, or the monitor is in DEMO mode, or
there is any inputting signal, pressing the ON/OFF button cannot make the monitor enter
the sleep mode.