Epson Artisan 800/Epson Stylus Photo PX800FW/TX800FW/Epson Artisan 700/Epson Stylus Photo PX700W/TX700W Revision C
ADJUSTMENT Adjustment without Using Adjustment Program 241
Confidential
5.3.3 PF Timing Belt Tension Adjustment
This section describes PF Timing Belt tension adjustment.
Purpose
This adjustment is made when the PF Timing Belt is removed, re-installed, or
loosened. Confirm that the belt tension is proper when the PF Timing Belt is installed.
Things to be used
Tension gauge
Plas
tic Tweezers
Standard value
7±1N
Adjustment procedure
1. Move the carriage to the home position.
2. Set t
he following parameters to the tension gauge:
• Weight: 0.9
• Width: 3.0
• Span: 73
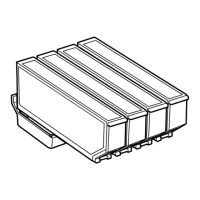
3. Bring the microphone closer to the center of the Timing Belt. (See Fig
ure 5-43
(p.24
1))
4. Press the “MEASURE” button on the Tension gauge and flip the Timing Belt with
plastic tweezers.
Figure 5-43. Preparation
5.
Repeat the steps three times and make sure all the measured values are within the
standard. If not, turn the Spacer around or over so that another letter (2, 4, or 1 ) comes to
the upper left, and carry out the measurement again. (See
“ 4.2.4.14 PF Motor ” (p.150)
)
Figure 5-44. Spacer
Flip the belt as weak as the tension gauge can measure it.
Be careful not to damage the Timing belt when fl
ipping it with
the plastic tweezers.
Be careful not to let the microphone touch the Timing Belt when
flip
ping the belt.