Proceed as follows:
• Loosen the electrical and pneumatic connections
(see section "Removing components from valve loca-
tions").
• Loosen the CP terminal from the fastening surface.
Proceed in the reverse sequence to that described in
the sections "Fitting onto a wall", "Fitting onto a hat
rail" or "Fitting with feet" in the chapter "Fitting".
• In the case of CP valve terminals with CP, AS-i or
MP connections, remove the appropriate cover (see
section "Removing components from valve locations").
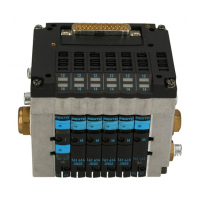
• Place the CP terminal on the left-hand end plate.
Loosen the outer tie bolts max. 1 turn (see Fig. 5/1).
You thereby avoid overloading the centre tie bolt.
• Then loosen the centre tie bolt and remove it.
• Unscrew the outer tie bolts.
• Remove the end plate from the CP terminal. Make
sure that the other components on the CP terminal
remain together.
• Place the right-hand end plate on the CP terminal
and insert the tie bolts.
5. Maintenance and conversion
5-16 CPV... 9802
 Loading...