Maintenance
CAUBRATION
Press the range button for the range to be calibrated.
The 8840A then prompts for a low reference source
for that range. (See Table
6-12.)
(Dufing High-
Frequency AC Calibration, the 8840A prompts only
for a high reference source. In this case, proceed to
step 4.)
Apply the requested reference source and press
STORE. The display will blank briefly and then
prompt for a high reference source. (See Table 6-12.)
Apply the requested reference source
and press
STORE. The display will blank briefly, and the
8840A will then begin taking readings in the selected
range so that you may verify the calibration. The CAL
annunciator remains on.
To continue, select another range. You may restart
any of the calibration procedures by pressing the
appropriate function button, the
A/D
button, or the
HF
AC button.
6-18.
VERIFYING CALIBRATION
When you complete certain
parts
of the calibration proce-
dure, the 8840A automatically begins taking readings so
that you can verify the calibration is correct. (It is recom-
mended that you do so.) The
CAL
annunciator remains lit.
The 8840A continues to take readings until you select
another calibration procedure or exit the calibration mode.
Specifically, the 8840A begins taking verification readings
after:
1.
Completing
AD
Calibration.
2.
Completing Offset and Gain or High-Frequency AC
Calibration.
3.
Completing the calibration of an indwidually selected
range.
While the 8840A is taking verification readings, certain
buttons are active or function differently:
If you just completed the Offset
and
Gain
or High-.
Frequency AC Calibration for an entire function (not
just one range), the range buttons
can
be used to
change ranges in order to verify all ranges were
calibrated correctly.
If you just calibrated
an
individually selected range,
pressing another range button
begins
the Offset and
Gain Calibration procedure for the new range.
You can use the
RATE
button to verify the calibration
at other reading rates.
CAUTION
It
is
still possible to erase the calibra-
tion memory while the
8840A
is taking
verification readings.
6-'I
9.
ERASING CALIBRATION MEMORY
The 8840A allows you to erase some or all of the correc-
tion constants stored in calibration memory (U220). It is
recommended that you erase the entire calibration memory
before beginning calibration if the calibration memory
is
replaced or accidentally altered. The capability of erasing
particular
parts
of the memory is mainly intended as a
troubleshooting aid to the technician.
CAUTION
Once the calibration memory is erased,
the
8840A
must
be recalibrated.
To erase all or
part
of the calibration memory, proceed
as
follows:
1.
Press the front panel
ERASE
button. The display
should show the erase prompt "cl" (for "clear").
If
you
do not press another button within 1-112 seconds, the
8840A returns to its previous state.
2.
To complete an erasure, press one of the following
buttons within
1-112
seconds of pressing the ERASE
button:
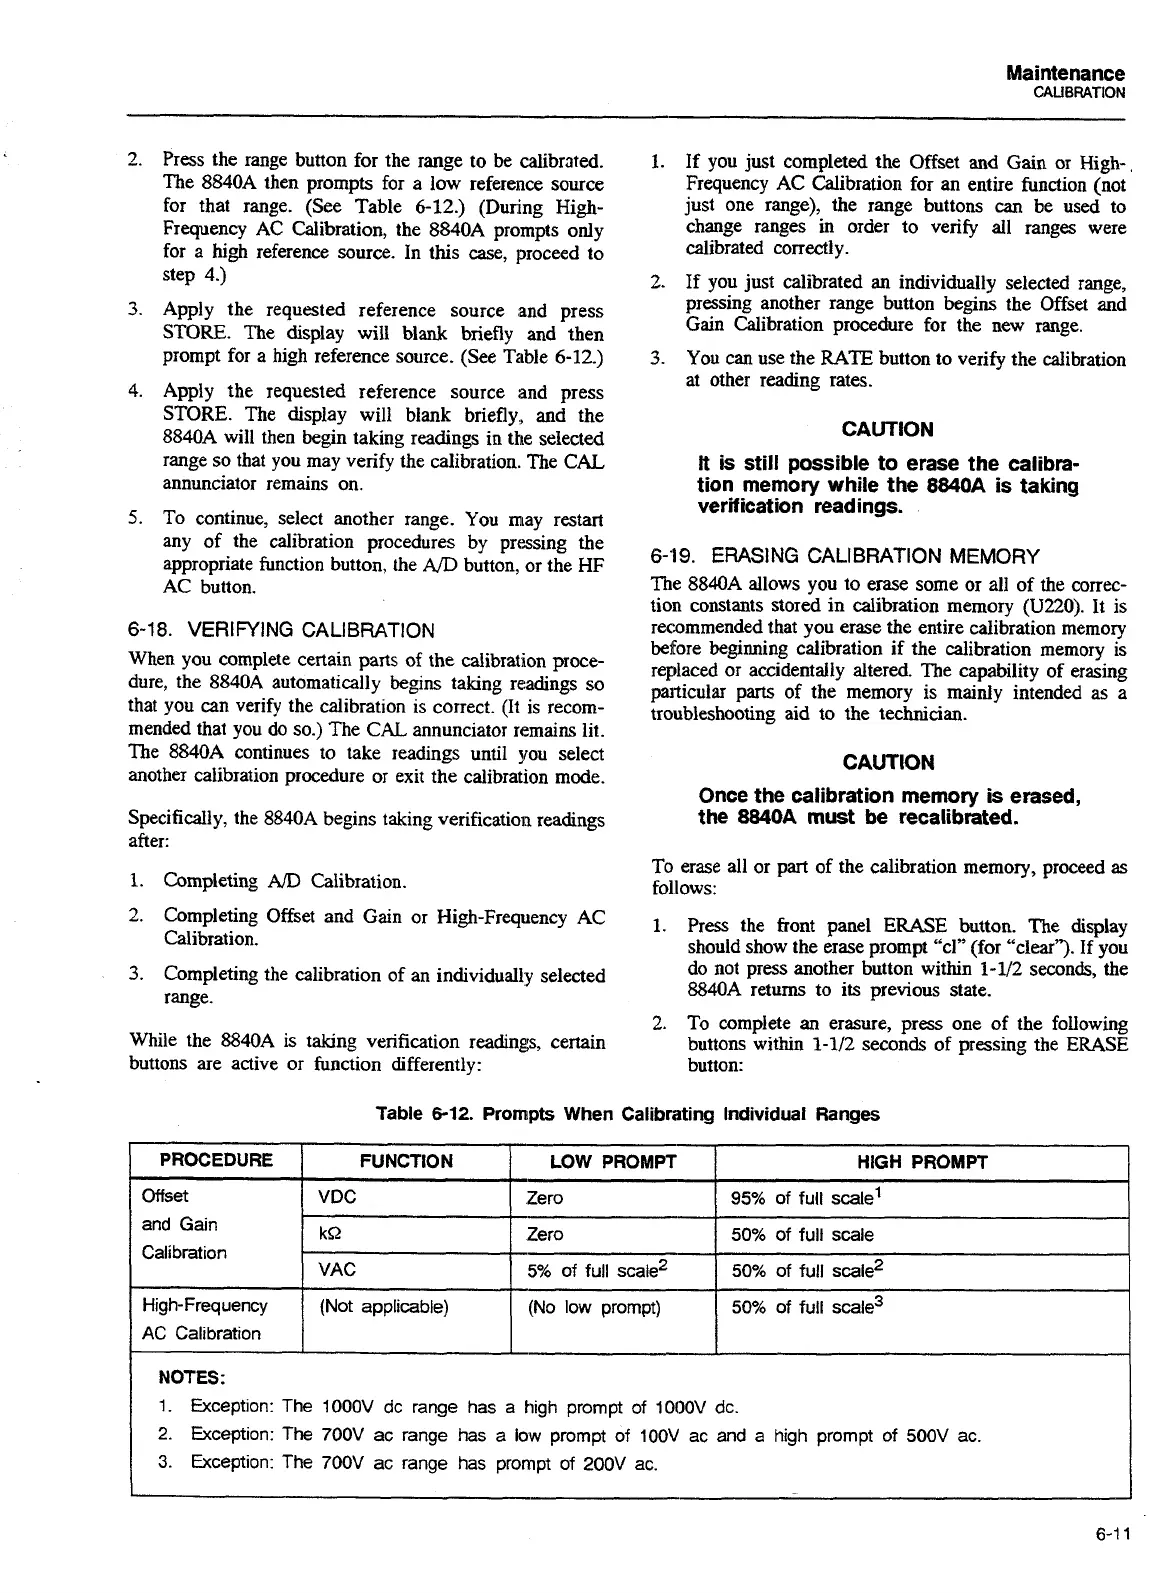
Table
6-12.
Prompts
When
Calibrating Individual Ranges
I
AC
Calibration
I
I
I I
PROCEDURE
offset
and Gain
Calibration
High-Frequency
1
NOTES:
I
1
1.
Exception:
The
1000V
dc range
has
a high prompt of
1000V
dc.
I
FUNCTION
VDC
k&
VAC
(Not applicable)
2.
Exception:
The
700V
ac range
has
a
low prompt of
100V
ac and a high prompt of
500V
ac.
3.
Exception:
The
700V
ac range has prompt of
200V
ac.
LOW PROMPT
Zero
Zero
5%
of full scale2
(No low prompt)
HIGH PROMPT
95%
of full scale1
50%
of full scale
50%
of full scale2
50%
of full scale3
Artisan Technology Group - Quality Instrumentation ... Guaranteed | (888) 88-SOURCE | www.artisantg.com