Maintenance
TROUBLESHOOTING
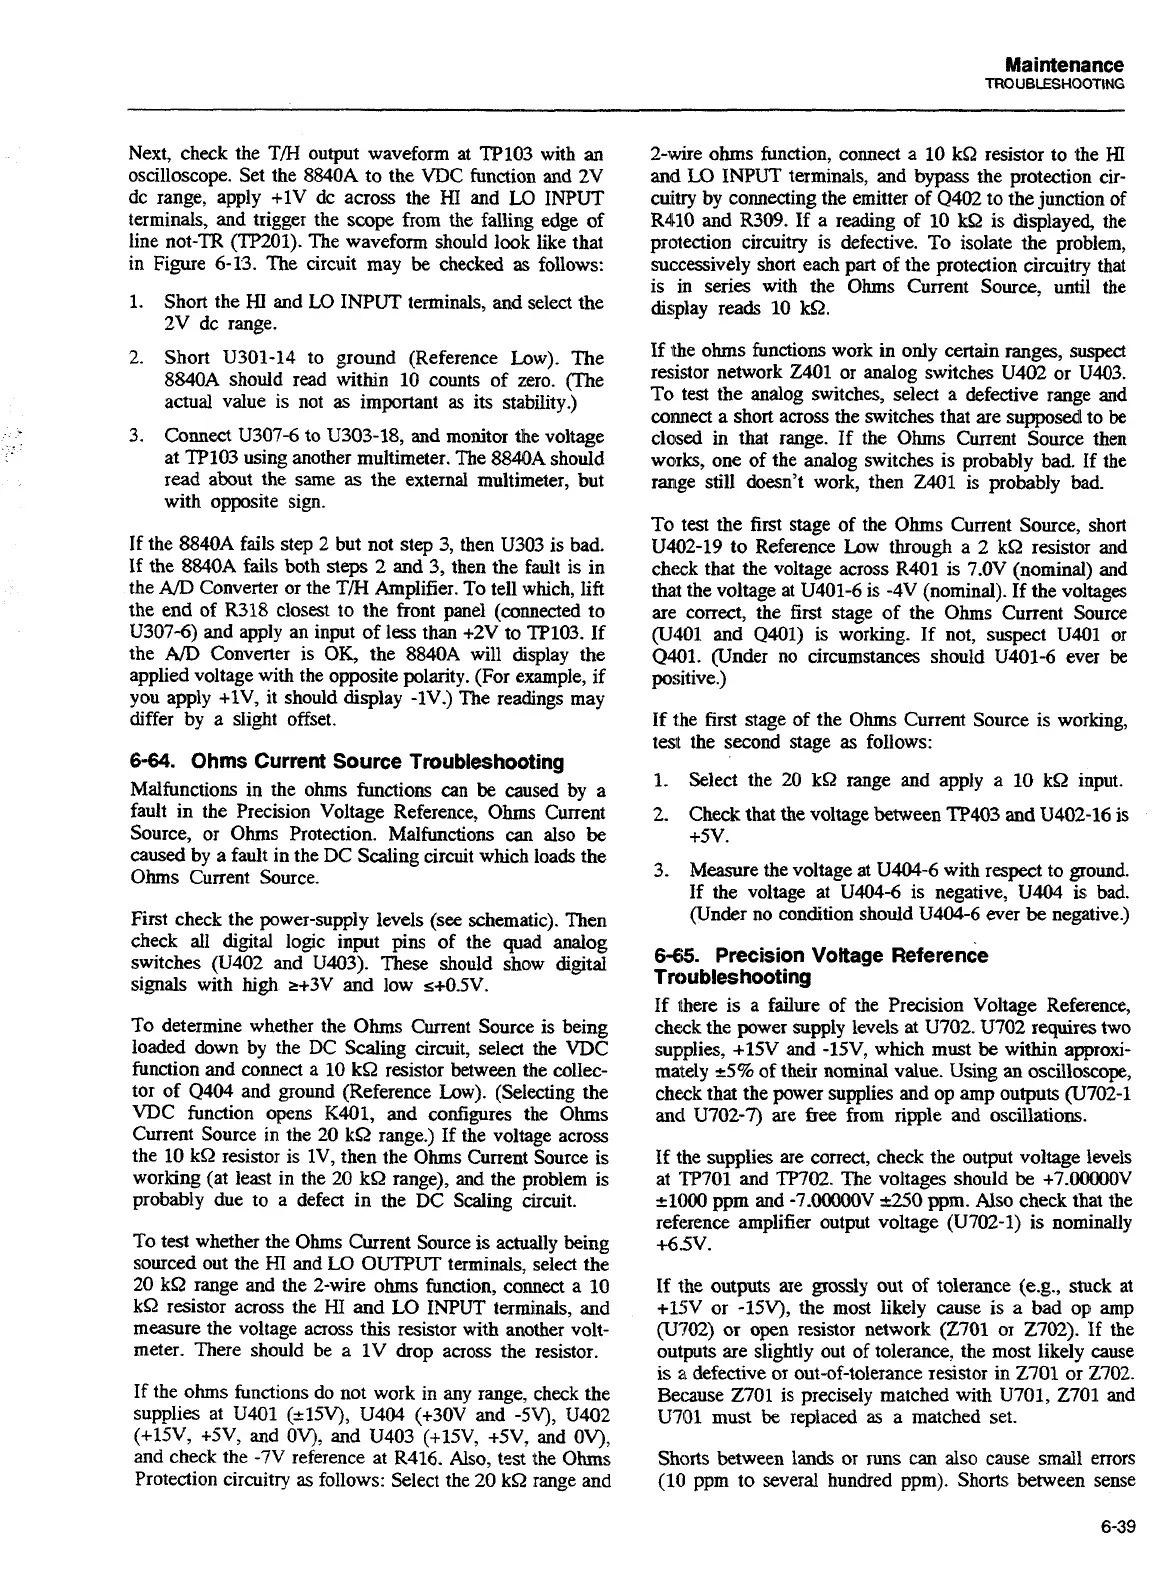
Next, check the T/H output waveform at TP103 with an
oscilloscope. Set the 8840A to the VDC function and 2V
dc range, apply +lV dc across the
HI
and LO INPUT
terminals, and trigger the scope from the falling edge of
line not-TR
(TP201). The waveform should look like that
in Figure 6-13. The circuit may
be
checked
as
follows:
1.
Short the
HI
and LO INPUT terminals, and select the
2V dc range.
2. Short U301-14 to ground (Reference Low). The
8840A should read within 10 counts of zero. (The
actual value is not
as
important
as
its stability.)
3.
Connect
U307-6 to U303-18, and monitor the voltage
at TP103 using another multimeter. The 8840A should
read about the same
as
the external multimeter, but
with opposite sign.
If the 8840A fails step 2 but not step 3, then U303 is bad.
If the 8840A fails both steps 2 and
3,
then the fault is in
the
AID
Converter or the T/H Amplifier. To tell which, lift
the end of R318 closest to the front panel (connected to
U307-6) and apply an input of less than +2V to TP103. If
the
AID
Converter is OK, the 8840A will display the
applied voltage with the opposite polarity. (For example, if
you apply
+1V, it should display -lV.) The readings may
differ by
a
slight offset.
6-64.
Ohms Current Source Troubleshooting
Malfunctions in the ohms functions can
be
caused by a
fault in the Precision Voltage Reference, Ohms Current
Source, or Ohms Protection. Malfunctions
can
also
be
caused by a fault in the DC Scaling circuit which loads the
Ohms Current Source.
First check the power-supply levels (see schematic). Then
check all digital logic input pins of the quad analog
switches
(U402 and U403). These should show digital
signals with high
r+3V and low s+0.5V.
To determine whether the Ohms Current Source is being
loaded down by the DC Scaling circuit, select the
VDC
function and connect a 10 kS2 resistor between the collec-
tor of Q404 and ground (Reference Low). (Selecting the
VDC function opens
K401, and configures the Ohms
Current Source in the 20 kS2 range.) If the voltage across
the 10 kS2 resistor is lV, then the Ohms Current Source is
working (at least in the 20
kQ range), and the problem is
probably due to a defect in the DC Scaling circuit.
To test whether the Ohms Current Source
is
actually being
sourced out the
HI
and LO
OUTPUT
terminals, select the
20
k0
range and the 2-wire ohms function, connect a 10
kS2 resistor across the
HI
and LO INPUT terminals, and
measure the voltage across this resistor with another volt-
meter. There should
be
a 1V drop across the resistor.
If
the ohms functions do not work in any range, check the
supplies at U401 (+15V), U404 (+30V and -5V), U402
(+15V,
+5V,
and OV), and U403 (+15V, +5V, and OV),
and check the -7V reference at R416. Also, tst the Ohms
Protection circuitry
as
follows: Select the 20 kS2 range
and
2-wire ohms function, connect a 10 k& resistor to the
HI
and
LO
INPUT terminals, and
bypass
the protection cir-
cuitry by connecting the emitter of Q402 to the junction of
R410 and
R309. If a reading of 10 kQ is displayed, the
protection circuitry is defective. To isolate the problem,
successively short each part of the protection circuitry that
is
in
series with the Ohms Current Source, until the
display reads 10 kQ.
If the ohms functions work
in
only certain ranges, suspect
resistor network 2401 or analog switches U402 or U403.
To test the analog switches, select a defective range and
connect a short across the switches that are supposed to
be
closed in that range. If the Ohms Current Source then
works, one of the analog switches is probably bad. If the
range still doesn't work, then 2401 is probably bad.
To test the first stage of the Ohms Current Source, short
U402-19 to Reference Low through a 2
kQ resistor and
chcxk that the voltage across R401 is 7.OV (nominal) and
that the voltage at U401-6 is -4V (nominal). If the voltages
are correct, the first stage of the Ohms Current Source
(U401 and Q401) is working. If not, suspect U401 or
Q401. (Under no circumstances should U401-6 ever
be
positive.)
If the first stage of the Ohms Current Source is working,
test the second stage
as
follows:
1.
Select the 20 kQ range and apply a
10
kQ input.
2. Check that the voltage between TP403 and U402-16 is
+5v.
3.
Measure the voltage at U404-6 with respect to ground.
If the voltage at U404-6 is negative, U404
is
bad.
(Under no condition should U404-6 ever
be
negative.)
6-65.
Precision Voltage ~eference
Tn,ubleshooting
If there is a failure of the Precision Voltage Reference,
check the power supply levels at U702. U702 requires two
supplies,
+15V and -15V, which must
be
within approxi-
mately
25%
of their nominal value. Using an oscilloscope,
check that the power supplies and op amp outputs (U702-1
and U702-7) are free from ripple and oscillations.
If the supplies are correct, check the output voltage levels
at 'I'P701 and
TWO2
The voltages should
be
+7.00000V
~1000 ppm and -7.00000V
+A0
ppm. Also check that the
reference amplifier output voltage (U702-1) is nominally
+6.5V.
If the outputs are grossly
out
of tolerance (e-g., stuck
at
+15V or -15V), the most likely cause is a bad op amp
(U702)
or
open resistor network (2701 or 2702). If the
outputs are slightly out of tolerance, the most likely cause
is
a
defective
ox
out-of-tolerance resistor in 2701 or 2702.
Because 2701 is precisely matched with U701, 2701 and
U701 must
be
replaced
as
a matched set.
Shorts between lands or runs
can
also cause small errors
(10 ppm to several hundred ppm). Shorts between sense
Artisan Technology Group - Quality Instrumentation ... Guaranteed | (888) 88-SOURCE | www.artisantg.com