Rev. 5 – Jun 2020 Page 40 of 91
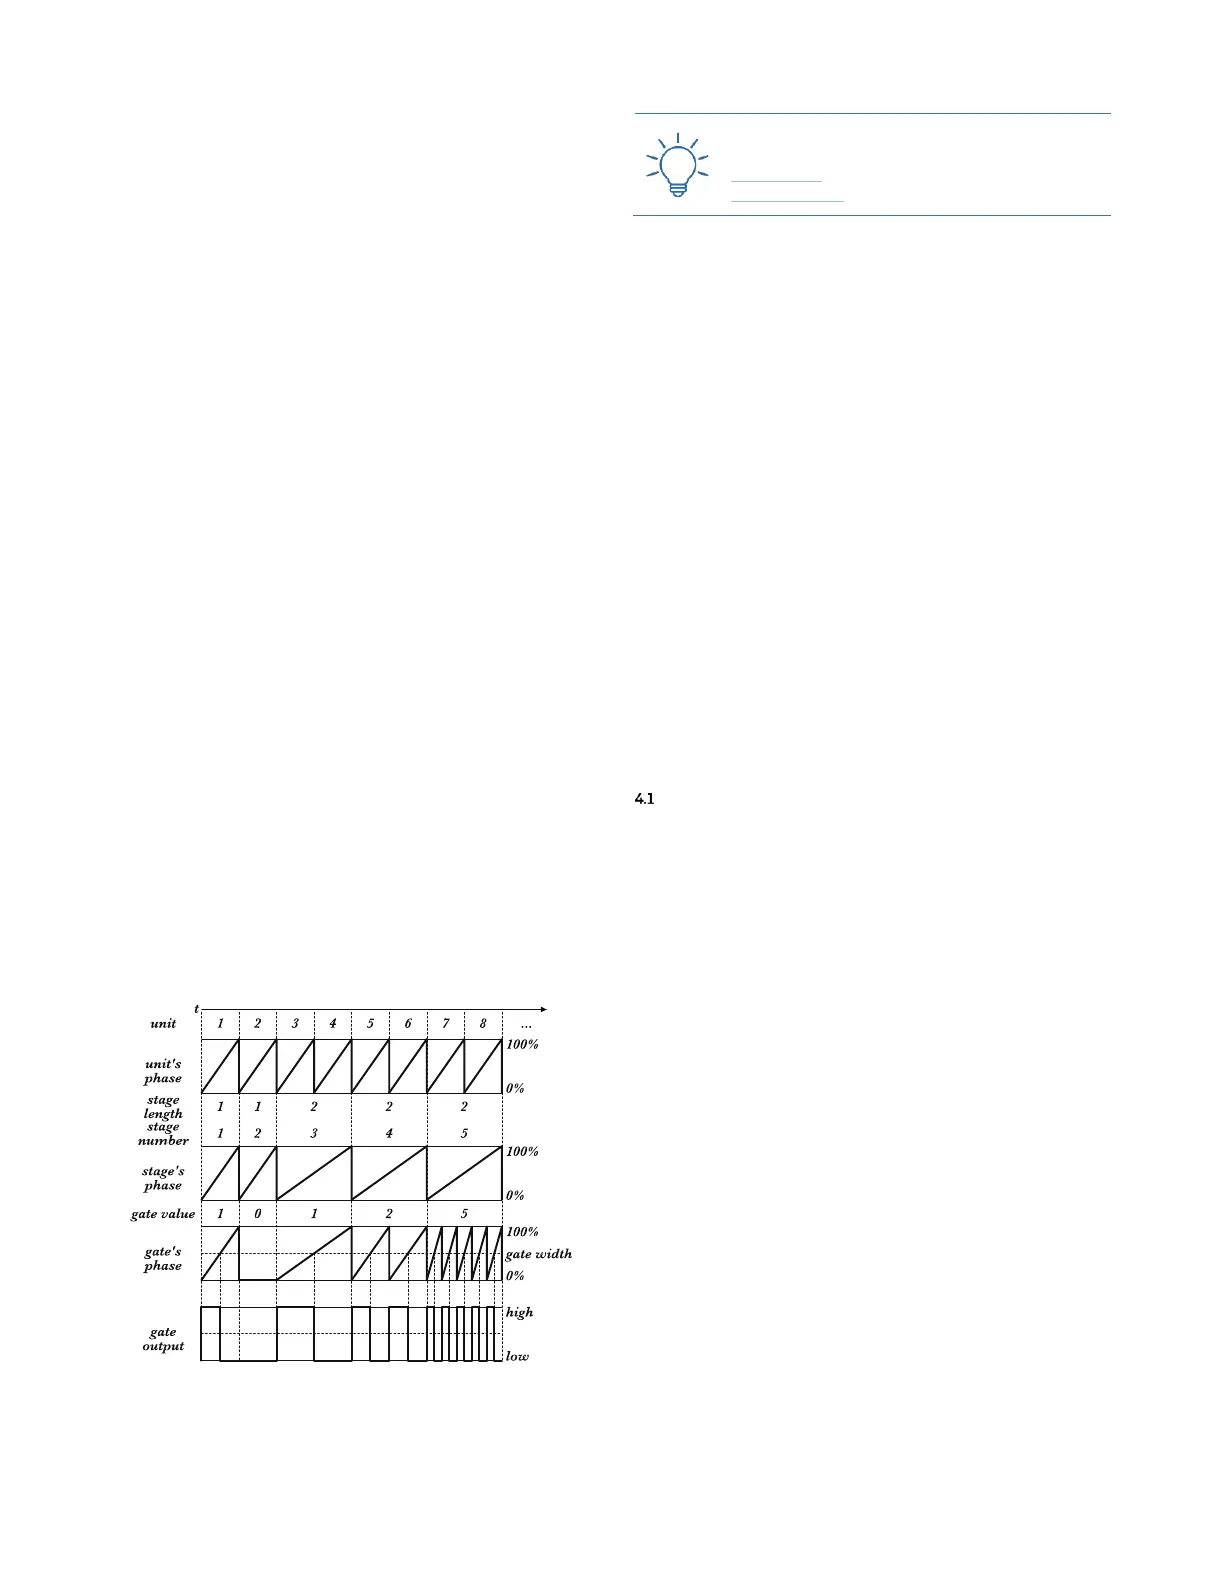
The first Stage Color is called Gate Length. Gate Length is
available by default once a channel (GATE A or GATE B)
is selected, indicated by a blue Stage LED (A.3). In this
mode, the encoder sets the gate length, which is the por-
tion of the overall stage in which the gate stays high. 17
lengths are available, indicated by the 16 LEDs of the
Stage Arc. If no yellow LEDs are lit, the gate will remain
low for the whole stage duration, which is the equivalent
of a musical pause. By rotating the encoder clockwise, the
gate length will be progressively increased, until all the 16
yellow LEDs are lit: in this position, the gate will remain
high for the whole stage duration and it will be tied to the
next stage's gate. With the blue stage color selected, the
Variation parameters set by the blue and green layers will
modify the gate duration.
The second Stage Color, called Gate Number, is accessed by
pushing the Stage Encoder (A.1) once, and it is displayed by
a green Stage LED. In this mode, the encoder sets the
number of gate events that will be generated within the
overall stage length, which is basically a ratcheting effect.
Again, 17 options are available, displayed by the 16 LEDs
of the Stage Arc. If no yellow LED is lit, the gate will re-
main low for the whole stage duration, which is the equiv-
alent of a musical pause. By rotating the Stage Encoder
clockwise, the gate value will be progressively increased,
until all the 16 yellow LEDs are lit. 1 LED means that 1
gate will be generated, and so on until 16 fast gates are
outputted.
This division is performed by USTA based on the stage
duration set by the length parameter, therefore, if the
gate number is 2, the individual gates will have different
spacing and duration according to the stage length.
With the green stage color selected, the Variation pa-
rameters set by the blue and green layers will modify the
gate numbers, thus creating a different number of gates
(ratchet pattern).
Figure 49: Gates in Repeat (green Color).
By default, with the green color the gate length is the
50% of the time between two consecutive rising edges; it
is possible to change this setting in the Track Menu (see
above, §3.2), under the Gate Width % option.
The third Color, called Skip, is accessed by pushing the
stage encoder a second time, and it is displayed by a red
Stage LED. In this mode USTA will not generate any gate
signal for the whole duration of the stage: it is the equiv-
alent of a musical pause.
An identical effect can be obtained by setting the Gate
Value to 0 (= no led on the LED Arc) either in the blue or
green color; the Skip color, however, is useful in case you
want to momentarily de-activate a stage while perform-
ing, while still retaining its specific Gate Value.
4 QUICK EDITING
Here are the functions that USTA provides to facilitate
the compositional process. They are achieved through
the three grey buttons to the left of the display, called Mod
Buttons.
SET ALL AND SHIFT ALL
When in edit mode, the first two buttons allow you to
edit multiple stages at the same time. Push them before
rotating the stage encoders and hold throughout the op-
eration.
The topmost button, called Set All (B.1), allows you to
set all stages in a pattern to the value of stage being edited,
regardless of their original values. It can be held while
editing values (rotating the Stage Encoder – A.1) or colors
(pushing the Stage Encoder), for CVs, Gates, and Length. It
is also possible to hold the Set All button while setting
Track Menu options through the Navigation Encoder (B.14):
in this way, the setting will be applied to all the four tracks
at the same time.
The second button, called Shift All (B.2), works similarly,
but shifts all the stages by the same amount as the one
being edited, thus transposing their values. Like Set All,
this button works both for values (rotating the Stage En-
coder) and colors (pushing the Stage Encoder). While shifting
colors, all the following stages will change from one color
to the next one relative to their previous setting.
It is possible to change the Shift All behavior in the Project
Menu (see above, §3.1) through the All Edits option: select
From to edit all the stages after the one which is being ed-
ited (it is particularly useful for quickly writing melodic
lines); select All to edit all the stages of a pattern, including
those before the one being edited.