Rev. 5 – Jun 2020 Page 42 of 91
track is paused, this combo will pause all the other ones
within the group.
Hold Set All to set all the tracks of the Master Track Group
like the one currently selected: if it is paused, all the re-
lated tracks will pause; if it is playing, all the related tracks
will play. Each modification will happen after the current
Master Track stage has ended.
If the selected track does not belong to the Master Track
Group, pushing Play/Pause while holding Shift All will play
or pause all the tracks which are unlocked from the Mas-
ter Track. In case at least one track is paused, this combo
will pause all the other ones outside the Master Track
Group. Hold Set All to set all the non-Master tracks like the
one currently selected, as described above for the Master
Track group. Each modification will happen according to
the reset setting of the track currently selected: if Local, it
will happen after the current stage of the selected track
has ended; if Instant, it will happen instantaneously.
The Play/Pause LED (C.1) will display the current state
of the selected track: red if paused, green if playing.
5.1.3 Reset
The Reset button (B.12) restores the playhead at the be-
ginning of a pattern, i.e. at stage 1. It is possible to set
whether the playhead returns to the first stage of the cur-
rent pattern (Reset Stage) or to the first stage of the first pat-
tern (Reset Stage&Pattern). To change this parameter, enter
the Track Menu (see above, §3.2), scroll until the Reset What
option, and select either Stage or Stage&Pa. It is also pos-
sible to select the option Nothing, thus disabling the Reset
button.
Each track can respond to the Reset command in four
different ways. The first two depend on the track’s rela-
tionship with the Master track:
· If the selected track is the Master track, the Reset button
will reset it once the current stage has ended;
· if the selected track is a Slave track, the Reset button will
reset it once the current stage of the Master track has
ended: both these options are achieved by entering the
Track Menu, scrolling to the Reset On option and setting it
on Master. This option is useful if you need to force several
tracks to reset at the same time (for instance, if you are
playing with different tempos or ratios).
If you want to reset a track independently, you have two
more settings of the Reset On option, called Local and In-
stant:
· Local resets the selected track once its current stage has
ended, without resetting any of the Master/Slave tracks;
· Instant resets the current track instantly, without
waiting for it to end the current stage.
The Reset function can be executed through external
trigs, see below §7.2.
When Pattern Shift is enabled for a track (see below, §), the
Reset button will set the sequence back to the rst pattern
plus the pattern shift number determined by the CV offset.
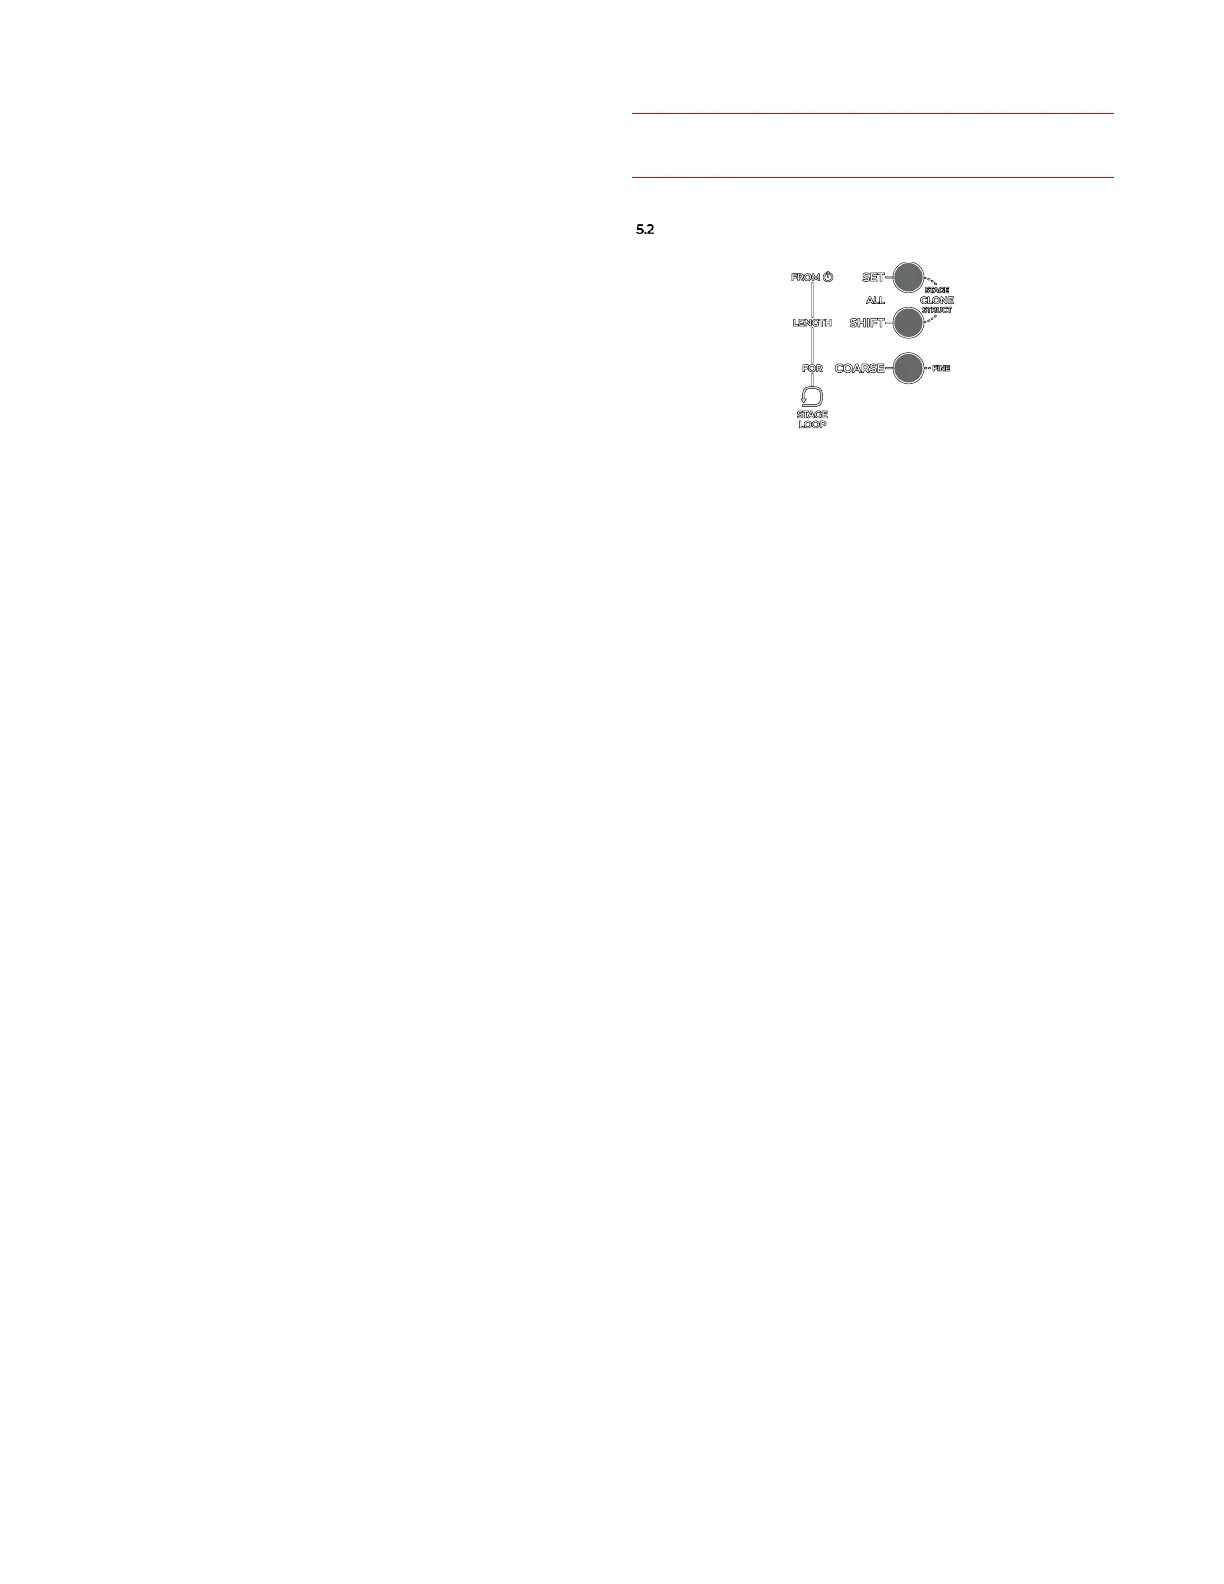
STAGE LOOP
Figure 52: The Stage Loop section and controls (on the left).
In addition to the options above, USTA gives the
chance to loop a specific portion of your pattern structure
independently for each track through the Stage Loop op-
tion. Such a loop is nested within the main play mode and
can work across different patterns. The looping function
works only in Pattern Mode, and it interacts both with Full
Pattern Recall and Pattern Mix (see below, §5.4). Once Song
Mode is activated, the Stage Loop function will be automat-
ically disabled.
Three variables are used to control the loop behavior:
FROM, or the stage/pattern from where the loop starts; LEN
(Length), how many stages are involved in this loop, and
FOR, how many times it loops. These variables are shown
in the bottom line of the Dashboard (F.17, F.18, F.19).
To define the Stage Loop FROM, hold the Set All button (B.1)
and rotate the navigation encoder. The first number is
the stage number, and the second one the patter number.
To define the Stage Loop LENGTH, hold the Shift All but-
ton and rotate the navigation encoder – length is ex-
pressed stages, so the resulting length depends on each
stage length. Values go from 1 to 16.
To define the Stage Loop FOR, hold the Coarse button
and rotate the navigation encoder − the FOR parameter
express how many times these stages are looped until ex-
iting this loop. Values go from 0 to 16 where 0 is no loop
at all.
The only anchor point of the Stage Loop is the FROM pa-
rameter: it does not have a specific endpoint, but it is in-
stead defined by a length which is expressed in number
of stages.
To enable or disable the Stage Loop, double click the Set
All button (B.1). When Stage Loop is active, the Stage Loop
LED (C.6) will light up: if the playhead has not yet
reached the Stage Loop Section, it will be red; if the playhead
is already within the loop section, it will be green.