OPERATION
OPERATION
41
41
3.5e Parts of Line
The load sensor often shares the weight with
multiple parts of line. For accurate load indication
the GS550 must be programmed for the number of
parts of line.
1. Go to menu 1) PARTS OF LINE.
2. Use Next and Back to select the load sensor;
typically sensor number one is associated with
sheave one (the main hoist) and sensor number
two is associated with sheave two (the auxiliary
hoist) etc.
3. Use Up and Down to adjust the number of parts
of line.
4. Press Enter to save any changes and then press
Exit twice to return to the operation display.
3.6
3.6
Rated Capacity
Rated Capacity
Indicators
Indicators
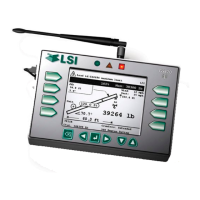
The GS550 can be programmed to assist the
operator by indicating the working load limit (WLL)
from the crane specific rated capacity charts
according to the angle and radius information
received from the boom mounted sensors.
3.6a Display Programming
In order to indicate WLL the GS550 must be
programmed with a valid rated capacity chart specific
to the crane. The capacity chart programmed can be
verified on the chart number page of the Information
menu: press Info and Next twice (press Exit to return
to the operation display).
3.6b Crane Rigging
Under no circumstances is the GS550 a substitute
for safe operating practices. The operator must fully
understand the crane rigging and the crane rated
capacity chart to be able to correctly set the GS550
for rated capacity indication. The GS550 will not
take into account critical variables such as weather,
ground and crane conditions that will reduce the
safe working capacity of the crane.
3.6c Chart Wizard
Rated capacity indication is based on interpretation
of a selected capacity chart using boom angle and
load radius. The chart must be selected by “rigging”
the working hoist in the GS550; this is done by
following the chart wizard in menu 2) CRANE
RIGGING.
1. Go to menu 2) CRANE RIGGING and press Enter
to start the chart wizard.
2. The first page of the chart wizard is generally
“select hoist”. Use Up and Down to select the
hoist. If there is only one load sensor in the
system select “MAIN”. With two or more load
sensors in the system the main hoist is
associated with the first load sensor in the
sensor list; the auxiliary hoist is associated with
the second sensor in the sensor list etc.
3. Press Next to advance to the next step of the
chart wizard.
4. The steps that follow will depend on the size
and complexity of the rated capacity chart itself.
Typical steps include chart selection, outrigger
/ on rubber selection and boom length selection
(lattice cranes only). Use Up and Down to
select from the list of choices and then press
Next to advance to the next step. For accurate
rated capacity indication the rigging
configuration selected in the chart wizard must
reflect the actual rigging of the working sheave.
5. After the last step has been completed, the
GS550 displays “RIGGING OK” and then returns
to menu 2). Press Exit to return to the operation
display or press Enter to rig another hoist. If a
sensor required by the selected capacity chart
is not a part of the system or has not
established communication with the GS550,
then the GS550 will display “SENSOR INVALID”.
IMPORTANT!
It is possible to leave the
chart wizard at any time by pressing
BYPASS; the GS550 will display the message
“RIGGING ABORTED”. Current capacity chart
selection may have changed, possibly changing
the rated capacity indicated by the GS550.
Always complete the chart wizard all the way
to the “Rigging ok” message before
operating the crane.
!
!
IMPORTANT!
If the chart number
information screen says “CHART NOT LOADED”
the GS550 has not been programmed to
function as a rated capacity indicator. If rated
capacity indication is required contact the person
responsible for the GS550 system installation
and maintenance. If in doubt, contact
LSI
LSI.
!
!
 Loading...