Installation and Operation Manual Page 51 of 104
(PVI-3.8/4.6-I-OUTD-US Rev.: 1.1)
After the ELECTRICAL DISCONNECTION OF THE INVERTER FROM THE
SWITCH BOX PROCEDURE has been completed, remove the 2 front panels from
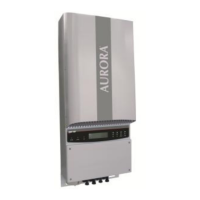
the AURORA inverter as shown in section 3.3.3.
Disconnect the DC cable from the inverter board (remove the 4 screws from the
terminal block + and – IN1 and + and – IN2 in Fig. 16)
Disconnect the 3 AC cables (“1", "2" and "3") from the inverter pos "A", "B" and C in
Fig. 18.
Remove signal cables disconnecting from inverter.
Place the DC cable inside the Switch Box; close the hole in the upper side of Switch
Box using the following water-tight caps.
Quantity Size Alternative
2 G1” M32
2 G1/2” PG16, M20
Close the Switch Box cover using the 4 screws.
3.5 CR2032 Lithium Battery Replacement
WARNING: Before performing any operation on the Switch Box power
input or on the Inverter, ALWAYS perform the disconnection procedure as
explained in section 3.3.1 or 3.3.2 of this manual.
Inside the Aurora inverter there is a CR2032 lithium battery. When this battery is at
end-of-life, a message will be shown in the display informing that the battery needs to
be replaced.
The battery is visible after removing the Aurora inverter's front panel. Refer to section
3.3.3 for the procedures to remove the front panel.