EasyManua.ls Logo

Shinko FCD-13A - User Manual

Shinko FCD-13A
64 pages
Print Icon
To Next Page IconTo Next Page
Loading...
DIGITAL INDICATING CONTROLLER
FCD-13A
INSTRUCTION MANUAL

Table of Contents

Questions and Answers

  • P
    pagekylieAug 18, 2025
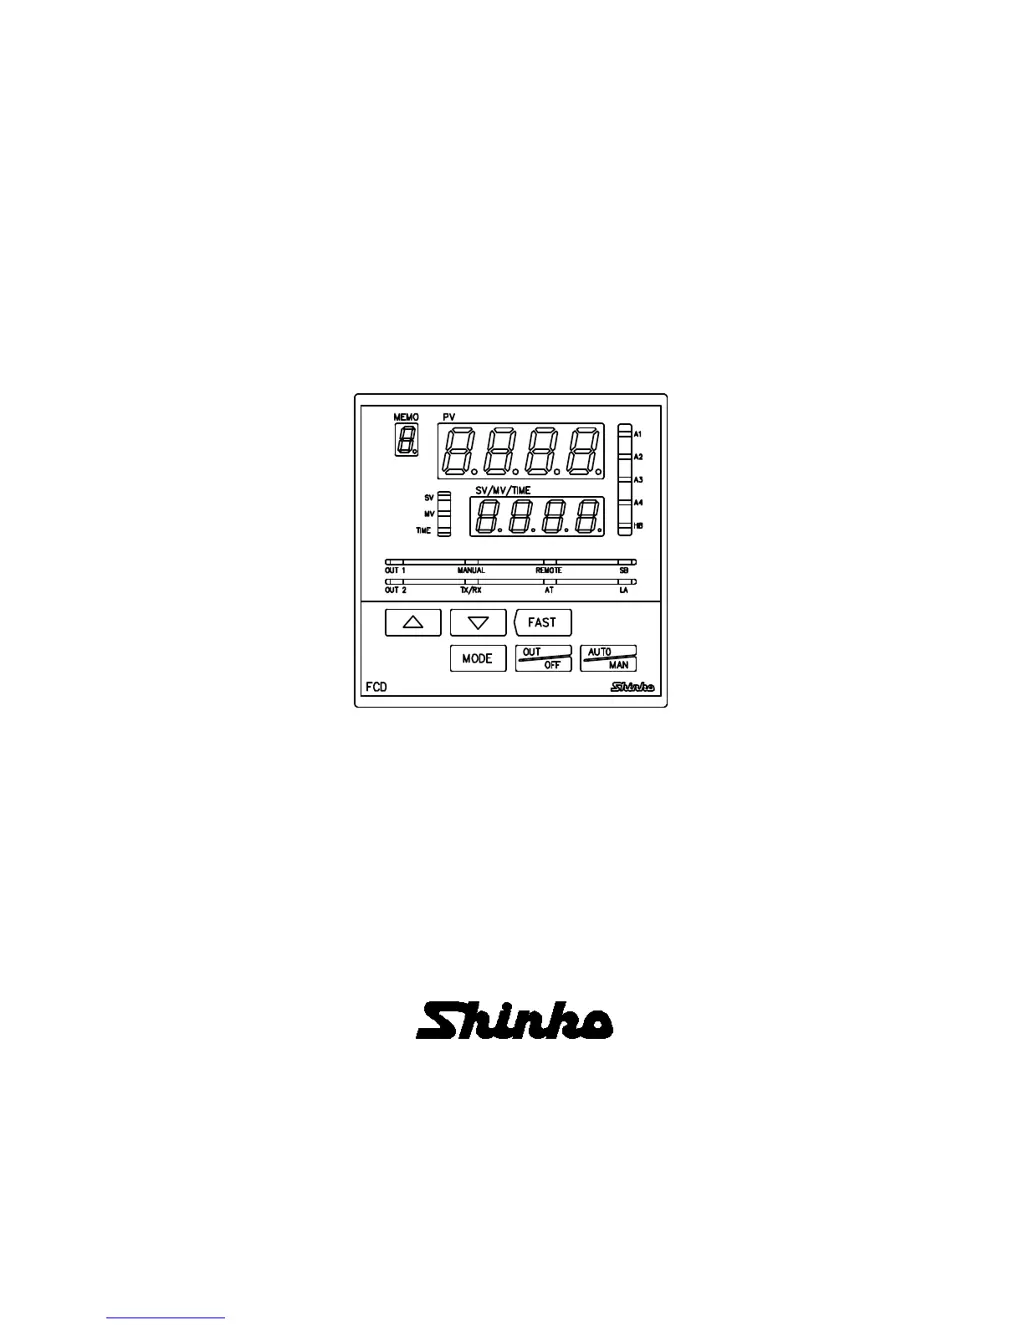
    Why can't I set SV, P, I, D, OUT1, alarm value on my Shinko FCD-13A Controller?
    • G
      George ThompsonAug 18, 2025
      If you are unable to set the SV, P, I, D, OUT1 proportional cycle, or alarm value, check if a set value lock (Lock 1 or Lock 2) is selected. If so, release the lock selection. Also, check if AT (Auto-tuning) is in progress, and if it is, cancel AT.
  • M
    Michael SchmidtAug 20, 2025
    Why is the PV display indication irregular or unstable on my Shinko Controller?
    • R
      Roberto SchmittAug 20, 2025
      An irregular or unstable PV display indication can occur for several reasons: * The sensor input selection may be incorrect; set the sensor input properly using the rotary switch (SW303) and the DIP switch (SW304). * The temperature unit may be incorrect; set it to a suitable unit with the DIP switch. * The sensor correction value may be unsuitable; set it to a suitable value. * AC might be leaking into the thermocouple or RTD circuit; use an ungrounded type sensor. Also, ensure that equipment that interferes with or makes noise is kept away from the controller, and that the thermocouple or RTD specification is appropriate.
  • K
    Kellie PayneAug 23, 2025
    What to do if the PV does not rise on my Shinko FCD-13A?
    • D
      Dr. David Parker DVMAug 23, 2025
      If the PV is not rising, there are a few things to check: * The thermocouple or RTD may be out of order; replace the sensor. * Check whether the sensor or control output terminals are securely connected to the input or output terminals of the instrument. * Ensure that the wiring of sensor and control output terminals are correct.
  • M
    Michael AndersonAug 26, 2025
    Why is the PV display flashing on my Shinko Controller?
    • F
      frank58Aug 26, 2025
      A flashing PV display can indicate a problem with the thermocouple or RTD. Check the following: * The thermocouple or RTD may be burnt out; change the sensor. * Ensure the lead wire of the thermocouple or RTD is securely mounted to the instrument input terminals. * Check if polarity of thermocouple or compensating lead wire is correct. * Check whether codes (A, B, B) of RTD match with the instrument terminals.
  • E
    evanskristinAug 28, 2025
    Why is the Shinko FCD-13A Controller not performing control, and only the PV display is indicated?
    • R
      Richard ParkerAug 28, 2025
      If the controller is not performing control and only the PV display is indicated, it could be due to the following: * The Control output OFF function is active; cancel the function by pressing the key for approximately 1 second. * The Program mode is selected; to start Program control, press the key. To perform Fixed value control, select the Fixed value control mode by pressing the key for approximately 3 seconds while holding down the key.
  • A
    ambergonzalesAug 31, 2025
    What to do if the setting indications do not change on my Shinko Controller?
    • R
      rwalkerAug 31, 2025
      If the setting indications do not change within the input range even when the keys are pressed, and new values cannot be set, the SV high limit or SV low limit in [Auxiliary function setting mode 1] may be set at the point where the value does not change. Set it to a suitable value during Auxiliary function setting mode 1.
  • R
    Richard Owens DDSSep 2, 2025
    Why can't I select the setting mode on my Shinko Controller?
    • C
      Carrie MeyerSep 2, 2025
      If the setting mode cannot be selected, it may be because Manual control is selected. Change the mode to Automatic control.
  • C
    Cody MillerSep 4, 2025
    What to do if program control does not start on my Shinko Controller?
    • S
      Susan JacksonSep 4, 2025
      If program control does not start even when the key is pressed in the Program mode, it may be because the step time has not been set. Set the step time.
  • C
    chad19Sep 7, 2025
    Why can't I change from Manual to Automatic control on my Shinko FCD-13A Controller?
    • D
      Daniel BellSep 7, 2025
      If the mode cannot be changed from Manual control to Automatic control by keypad, the mode may have been set to “Manual control” by External operation. External operation has priority.
  • A
    Alexander SmithSep 9, 2025
    Why can't I change from Remote to Local setting on my Shinko Controller?
    • M
      Michael GarciaSep 9, 2025
      If the mode cannot be changed from Remote setting to Local setting by keypad, the mode may have been set to “Remote setting” by External operation. External operation has priority.

Summary

1 Model

1.1 Model

Defines alphanumeric characters for model designation (output, input, options).

1.2 How to read the model label

Explains interpretation of model labels on the case and inner assembly.

2 Name and functions of sections

2.1 Name of sections

Identifies and describes displays, indicators, and components on the controller's front panel.

2.2 Keys

Details main functions of each controller key, noting mode-dependent variations.

3. Setup

3.1 Taking the internal assembly out

Provides instructions for safely removing the internal assembly from the case before power-on.

3.2 Switch setting (multi-function)

Guides setting DIP and Rotary switches for input, control action, alarms, and unit selection.

3.3 Insertion of the internal assembly

Instructs on properly reinserting the internal assembly into the controller case after setup.

4. Mounting to the control panel

4.1 Site selection

Specifies environmental and location conditions for safe and optimal controller installation.

4.2 External dimensions (Scale: mm)

Displays physical dimensions of the controller unit in millimeters for panel mounting.

4.3 Panel cutout (Scale: mm)

Provides necessary panel cutout dimensions and mounting hole patterns for installation.

4.4 Current transformer (CT) dimensions (Scale: mm)

Shows dimensions of optional current transformers (CTs) used for current measurement.

4.5 Mounting

Details the procedure for attaching mounting brackets and securing the controller to the panel.

5. Wiring

5.1 Terminal arrangement

Illustrates the layout and function of each terminal for correct electrical connections.

5.2 Wiring examples

Provides practical examples of wiring configurations for different applications (e.g., 3-phase, single-phase).

6. Settings

6.1 Operation flowchart

Presents a visual flowchart detailing operation sequence and navigation through setting modes.

6.2.1 Main setting mode

Explains access and setting of primary parameters like SV in the main configuration menu.

6.2.2 Sub setting mode

Describes configuration of secondary parameters like memory numbers, AT, proportional band, and integral time.

6.2.3 Auxiliary function setting mode 1

Covers settings for value lock, SV limits, sensor correction, and communication parameters.

6.2.4 Auxiliary function setting mode 2

Details advanced settings including scaling limits, decimal points, filter constants, and output limits.

6.2.5 Program mode

Explains setup and management of program control sequences, including step times and values.

6.2.6 Auto;Manual control switching

Describes switching between automatic and manual control modes for the controller's output.

6.2.7 Control output OFF function

Details the function to temporarily disable the control output, even when power is on.

6.2.8 MV, Remaining step time indication

Explains how to display Manipulated Variable (MV) and remaining step time during operation.

7. Set value memory function (SM option)

Operation procedures for Set value memory function

Outlines steps to select, set, and register set values using the memory function via external terminals.

8. Operation

8.1 When using the FCD-13 A as a Temperature controller

Guides on initial power-on and basic operation as a temperature controller.

8.2 When using the FCD-13 A as a Simplified programmable controller

Details procedures for operating as a simplified programmable controller, including program start.

9 Action explanations

9.1 OUT1 action

Explains heating/cooling actions and output behavior for Control Output 1 (OUT1) based on deviation.

9.2 Heater burnout alarm action (option)

Describes the functionality and indication of the optional heater burnout alarm.

9.3 ON;OFF control

Illustrates ON/OFF control operation for heating and cooling actions, including hysteresis.

9.4 Pattern end action

Explains the pattern end action and its output behavior when program control is completed.

9.5 OUT2 (Heating;Cooling control) action (DR, DS, DA option)

Details heating/cooling control actions for Control Output 2 (OUT2) with various options.

9.6 Alarm 1 (A1) to Alarm 4 (A4) action

Explains different alarm types (high limit, low limit) and their actions, including standby functions.

10 Control actions

10.1 Fuzzy self-tuning

Describes the Fuzzy self-tuning feature for automatic PID value adjustment and stable control.

10.2 PID

Explains PID control principles: Proportional band (P), Integral time (I), and Derivative time (D).

10.3 AT (auto-tuning) of this controller

Details the Auto-Tuning (AT) process for automatically obtaining optimal PID values by fluctuating the process.

11 Attached functions

Burnout Function

Explains controller indication for input burnout (thermocouple, RTD, DC input).

Input Abnormality Indication

Describes output status indications for overscale and underscale conditions of input signals.

12 Specifications

12.1 Standard specifications

Lists standard technical specifications for mounting, display, accuracy, and input types.

12.2 Optional specifications

Details specifications for optional features like alarms, heating/cooling control, and communication.

13 Troubleshooting

Common Problems and Solutions

Lists common problems (display, key, control) with causes and solutions.

14 Character table

Main Setting Mode Characters

Lists characters, items, defaults, and data for main setting mode parameters.

Sub Setting Mode Characters

Lists characters, items, defaults, and data for sub setting mode parameters.

Auxiliary Function Setting Mode 1 Characters

Lists characters, items, defaults, and data for auxiliary function setting mode 1.

Auxiliary Function Setting Mode 2 Characters

Lists characters, items, defaults, and data for auxiliary function setting mode 2.

Program Mode Characters

Lists characters, items, and defaults for program mode parameters.

Shinko FCD-13A Specifications

General IconGeneral
Control MethodPID control
DimensionsUnknown
Frequency Range50/60 Hz
Input TypeThermocouple, RTD, Voltage, Current
Output TypeDC current
Power Supply100 to 240 VAC 50/60 Hz

Related product manuals