W A S H S E L E C T I I
Document Number: WS21002 59
Document Title: WSII Operations Manual
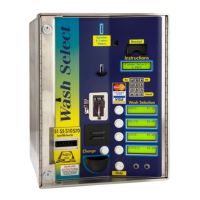
2. Using the (3) key to scroll forward and the (1) key to scroll back, scroll through the
main menu until the ”Cust. Interface” option is displayed. Press the (*) key to
enter.
3. Scroll through this menu until the “Forced Selection” option is displayed, and then
press the (*) key to enter.
4. Press the (1) button for “YES” (Enabled) or the (3) button for “NO” (Disabled).
Default: Enabled
2.9.3 Allow Upgrades
With the “Allow Upgrades“ feature, you may enable or disable customers’ ability to upgrade to
a more expensive wash after the initial wash purchase. This feature is included because
some car wash equipment will not accept changes to the wash after it has been purchased.
ENABLED – With this feature enabled, the customer may upgrade a purchased wash by
inserting additional cash, tokens, VIP wash coupons, or, in some cases (see note below),
credit/debit and Speedpass. The upgrade process may also be started if the customer
presses a wash button corresponding to a more expensive wash.
DISABLED – This is the default setting. No wash purchase may be upgraded. Once the
wash has been purchased, the Wash Select II will not accept money entered in any form.
Regardless of the “Allow Upgrades” setting, once credit, debit, or Speedpass has been
used to purchase a wash, an upgrade is not possible under any circumstances.
However, if a purchase has been made using a payment method other than
credit/debit/Speedpass, and “Allow Upgrades” is enabled, and the credit mode is ‘4’,
the purchase can be upgraded using credit, debit, or Speedpass in addition to the
normal upgrade methods.
The following steps will assist you in setting this feature.
1. Using the toggle switch at the top of the CPU board, place the Wash Select II in
setup mode by moving the switch toward the back of the Wash Select II case.
(The CPU board is located on the inside right wall of the Wash Select II case.)
2. Using the (3) key to scroll forward and the (1) key to scroll back, scroll through the
main menu until the ”Cust. Interface” option is displayed. Press the (*) key to
enter.
3. Scroll through this menu until the “Allow Upgrades” option is displayed, and then
press the (*) key to enter.
4. Press the (1) button for “YES” (Enabled) or the (3) button for “NO” (Disabled).
2.9.4 Enabling and Setting Automatic Selection Timer
This setting is disabled by default, but if enabled it will allow the Wash Select II to make a
wash selection if the customer has not done so within a specified time. This helps
compensate for a customer that deposits cash, but drives into the wash without making a
 Loading...