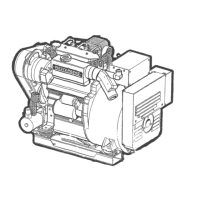
DISASSEMBLY
PROCEDURES
REMOVE
EXTERIOR
COMPONENTS
With the transmission/generator/radiator separated from the
engine. begin the following step by step procedure to
disassemble the exterior parts.
NOTE:
Mount the engine securely
on
a suitable engine
stand.
1.
Remove
the
start
motor, drive belt,
and
the alternator.
Label the wires
and
cables.
2 Witb the hoses disconnected, remove the thermostat
housing
and
housing gasket, leaving the
temperature
sender
and
switch in place if applicable.
3. Remove
the
magnetic pick-up from the bell housing
(Generators
only).
4.
Remove
the
Hywheel
heD
housing
and
the circuit
hreaker/pre-heat solenoid mounting
bracket
Remove
the
engIne
back
plate.
S.
Remove
the
oU
filter,
oU
cooler,
oU
hoses
and
mounting
bracket. Make note
of
the hose arrangements.
6. Remove
the
transmission
damper
plate from the
engIne Hywheel
(Marine
Engines).
7. Remove the engIne mounted
raw
water
pump,
complete with its
adapter
mounting plate. See
RAW
WATER
PUMP for parts breakdown.
(Marine
Engines
and
Generators
only)
8. Remove
the
engine
heat
exchanger.
If
possible. leave
one end
of
each hose connected to the part being
removed
(Marine
Engines
and
Generators
only)
.
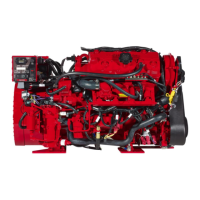
9.
Remove the exhaust components from the exhaust
manifold
a) Remove the exhaust elbow (if applicable) from the
lower surface of the manifold. Clean
and
inspect for
cracks
and
defects. Replace as needed.
b) Remove the exhaust nipples, elbows
and
plugs from
the manifold.
c)
Remove the water connectors from the ends of the
manifold. Be
sure
to note the
proper
location
and
arrangement
of
each for
proper
alignment.
d) Examine
aU
parts
for defects, corrosion
and
wear
and
replace as needed.
e) Flush
out
the coolant recovery tank
and
clear its hose
passage. Set aside
to
re-instaD on the boat.
10. Remove the coolant circulating pump. Refer
to
COOlANT PUMP ASSEMBLY.
11.
Remove the
air
intake silencer
and
the intake
manifold.
12.
Prepare
to disassemble the main engine.
....
WESTERBEKE
Engines & Generators
11a