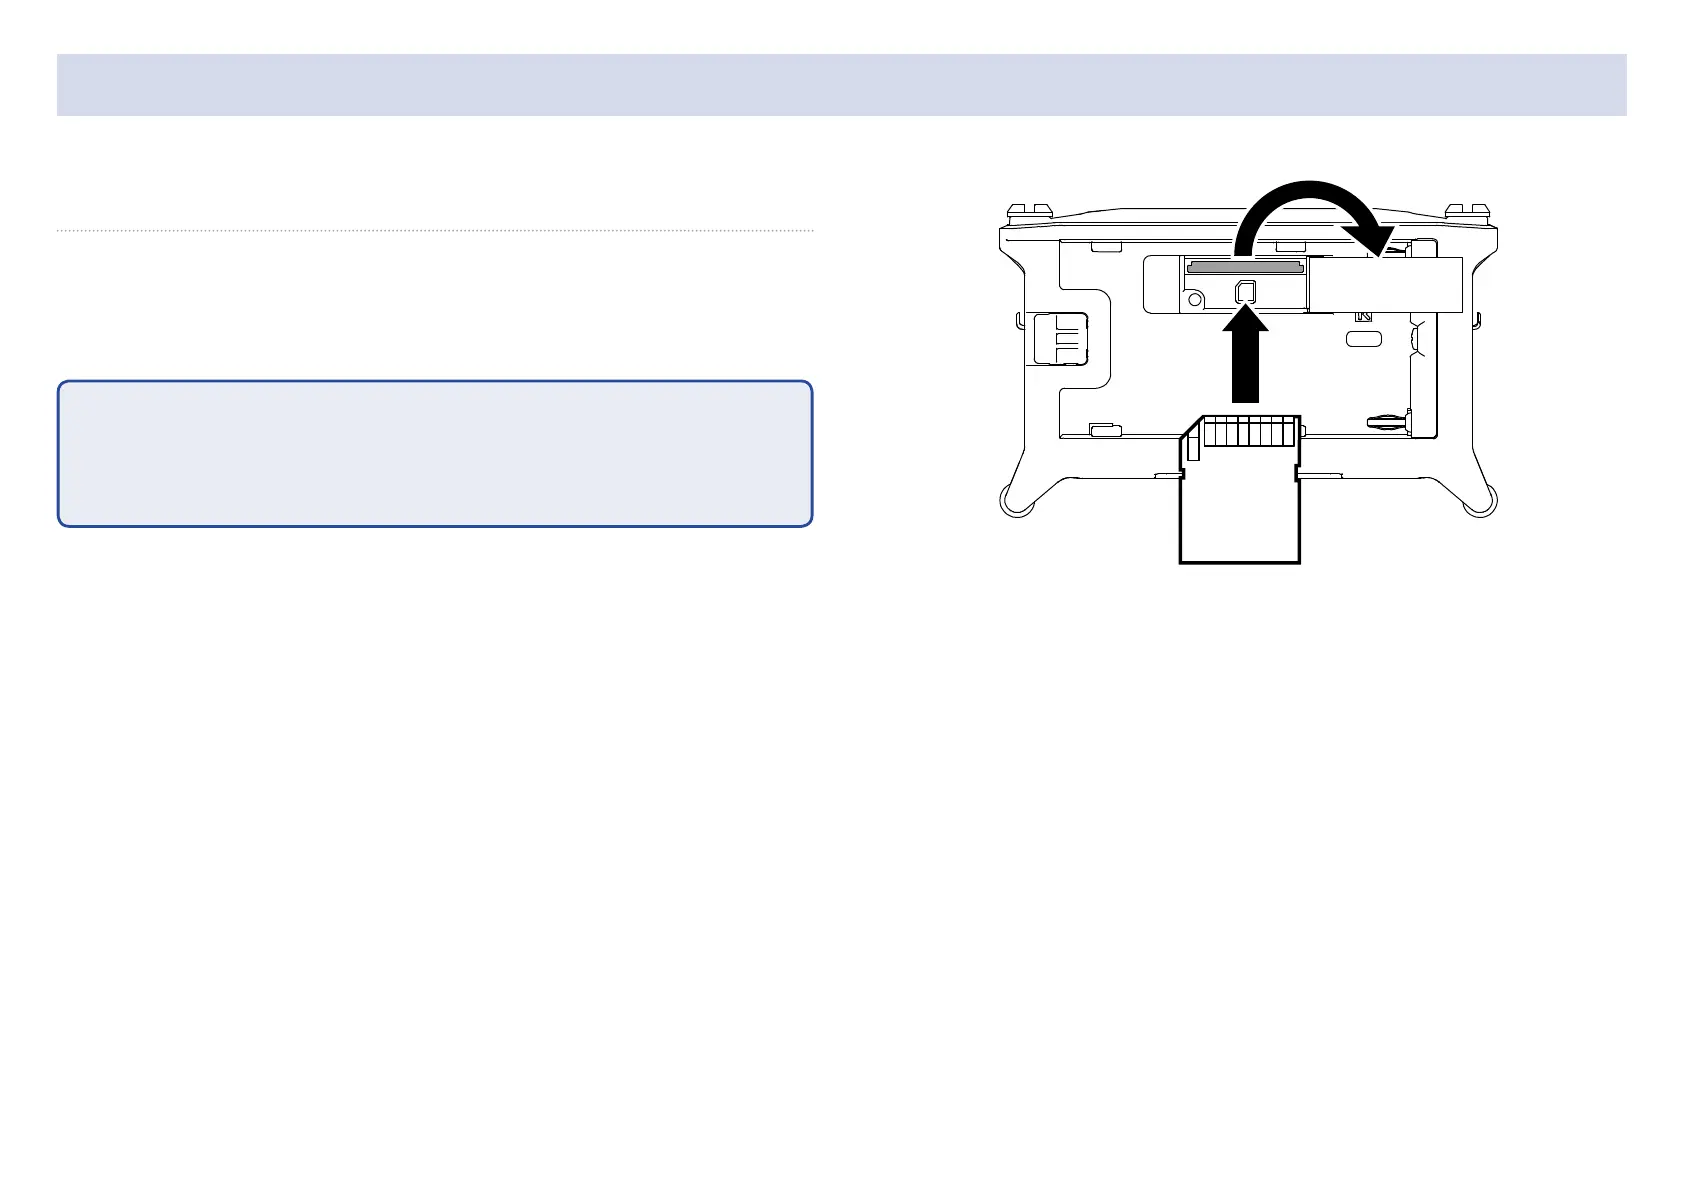
Home
Zoom
Voice Recorder
F6
Zoom F6 User Manual
4
of 1
of 1 rating
199 pages
Give review
Manual
Specs
To Next Page
To Next Page
To Previous Page
To Previous Page
Loading...
15
Loading SD cards
1.
Open the SD card slot cov
er
, and inser
t an SD card.
2.
T
o remov
e the card: push it fur
ther into the slot and
then pull it out.
NO
TE
Before using SD cards that
have just been purchased or that ha
ve been for
-
matted on a computer
, they must be formatted. T
o format an SD card, use
Menu
>
SYSTEM
>
SD Card
>
F
ormat
.
14
16
Table of Contents
Table of Contents
4
Notes about this Operation Manual
2
Introduction
3
Table of Contents
4
Contents
4
Names of Parts
6
Connecting Mics/Other Devices to Inputs 1-6
8
Equipment Connection Examples
9
Display Overview
10
Preparations
13
Supplying Power
13
Loading SD Cards
15
Turning the Power on and off
16
Setting the Language
17
Setting the Date and Time
18
Setting the Power Supply Used
20
Recording
22
Recording Process
22
Setting the Recording File Format
23
Selecting Inputs and Adjusting Levels
24
Recording
26
Setting the Sampling Rate
27
Setting the Recording Mode (Bit Depth)
29
Setting MP3 File Bit Rate (MP3)
31
Setting the LR Track
33
Capturing Audio before Recording Starts
35
Setting the Recording Time Display
36
Setting the Playback Time Display
38
Folder and File Structure
40
Move the Previously Recorded Take to the FALSE TAKE Folder
42
Recorded Take Settings
43
Changing the Note for the Next Take Recorded
43
Setting and Managing Recorded Scene Names
45
Changing the Track Name of the Next Take Recorded (Track Name)
48
Changing the Number of the Next Take Recorded
50
Playback
51
Playing Recordings
51
Mixing Takes
52
Monitoring the Playback Signals of Specific Tracks During Playback
54
Changing the Repeat Playback Setting
56
Take and Folder Operations
57
Working with Takes and Folders
57
Creating Folders
58
Selecting the Take Recording/Playback Folder
58
Changing Folder and Take Names
59
Checking Take Marks and Using Them for Playback
59
Deleting Folders and Takes
60
Emptying the TRASH/FALSE TAKE Folders
62
Overview of Metadata (Take Information) Stored in Files
63
Checking and Editing Take Metadata
64
Table of Contents
65
Checking and Editing Scene Names
66
Selecting Notes from the History List
66
Selecting a Scene Name from the History List
67
Checking and Editing Take Names
68
Changing Tape Names
69
Circling Takes
69
Changing Project Names
70
Checking and Editing Track Names
70
Selecting a Track Name from the History List
71
Writing a Sound Report
73
Input Settings
76
Adjusting the Input Signal Monitoring Balance
76
Monitoring the Input Signals of Specified Tracks
77
Setting the Input Source
78
Setting the Monitoring Volume on the PFL Screen
80
Cutting Low-Frequency Noise
82
Input Limiter
84
Table of Contents
85
Setting the Threshold
87
Setting the Type
87
Setting the Attack Time
88
Setting the Release Time
88
Setting the Target Level
89
Inverting the Input Phase
90
Changing the Phantom Power Settings
92
Applying Delay to Input Signals
94
Linking Inputs as a Stereo Pair
96
Adjusting Multiple Track Input Levels Together
98
Changing the Automatic Mixing Setting
99
Setting the Ambisonic Format
101
Setting the MIC Position Used for Ambisonic Recording
104
Output Settings
106
Setting Signals Sent to the Headphone Output
106
Outputting Alerts through Headphones
109
Setting the Headphone Output Volume Curve
110
Boosting Headphone Output to Alleviate Interference from Recorded Sound
111
Setting the Output Level
113
Applying Delay to the Output
115
Output Limiter
116
Setting the Type
117
Using the Limiter
117
Setting the Attack Time
118
Setting the Threshold
118
Linking the Limiter
119
Setting the Release Time
119
Selecting Signals Sent to the Line Outputs
120
Timecode
122
Timecode Overview
122
Setting Timecode 1.
124
Setting Timecode
124
Setting the Mode
125
Automatically Enabling Internal Timecode When no
127
External Timecode Is Input
127
Synchronizing Audio Clock with External Timecode
127
Setting the User Bits for Internal Timecode
128
Setting the Frame Rate for Internal Timecode
130
Jamming Internal Timecode
131
Restarting Internal Timecode with a Specified Value
131
Setting the Automatic Timecode Recording Delay
133
Setting Timecode Initialization Used at Startup
134
Using USB Functions
136
Exchanging Data with a Computer
136
Using as an Audio Interface
138
Using SD Card Recording and Audio Interface Functions at the same Time
140
Audio Interface Settings
142
Using an FRC-8 as a Controller
143
Setting the Type of Keyboard Connected to the FRC-8
145
Setting User Keys for the FRC-8
147
Setting the FRC-8 LED Brightness
149
Updating the FRC-8 Firmware
151
Operating with an Ios Device
154
Other Settings
161
Setting the Level Meter Peak Hold Time
161
Setting the LED Brightness
162
Making Display Settings
164
Setting How Marks Are Added Manually
167
Setting the Buttons Held
169
Other Functions
171
Checking SD Card Information
171
Testing SD Card Performance
172
Formatting SD Cards
175
Checking the Shortcut List
176
Backing up and Loading Settings
177
Restoring Default Setting Values
180
Checking the Firmware Version
181
Updating the Firmware
182
Appendix
183
Troubleshooting
183
Metadata List
185
List of Shortcuts
189
Block Diagrams
190
Specifications
197
Other manuals for Zoom F6
Quick Guide
16 pages
Supplementary Manual
16 pages
Firmware Update Guide
6 pages
4
Based on 1 rating
Ask a question
Give review
Questions and Answers:
Need help?
Do you have a question about the Zoom F6 and is the answer not in the manual?
Ask a question
Zoom F6 Specifications
General
Audio quality
32 bit
XLR in
Yes
Headphone outputs
1
USB 2.0 ports quantity
2
Product color
Black
Related product manuals
Zoom F1
73 pages
Zoom F4
160 pages
Zoom F8n
198 pages
Zoom Handy recorder H2
94 pages
Zoom Handy REcorder H1
2 pages
Zoom H3-VR
119 pages
Zoom H1
14 pages
Zoom H8
136 pages