10 11
1
OPTIONAL 3M ATTEST AUTOREADER 490 WEB APP
Web Browser Requirements
The Web Interface is designed to be viewed using an HTML5 compliant browser with
JavaScript enabled (e.g., Google Chrome).
Ethernet Connection:
Connection switch/router with autonegotiation capability to identify the Autoreader as
operating at 10 Mbps and halfduplex, or able to be manually configured as 10 Mbps and
halfduplex.
Connecting to the 3M Attest Autoreader490 Web App
To use the 3M™ Attest™ Autoreader 490 Web App, the 3M™ Attest™ 490 Autoreader
must be connected to the facility network using the supplied Ethernet cable. Consult
with your facility IT personnel for assistance with network connectivity. Each 3M™
Attest™ Autoreader 490 has a unique MAC Address which is presented on the units
LCD Display when the user depresses the Info button three times. The MAC Address is
also provided at the bottom of the 3M™ Attest™ Autoreader 490 Web App Configuration
page. Communication occurs using the http protocol over Port 80. Users may connect to
the 3M™ Attest™ Autoreader 490 Web App using a URL based upon either the 3M™
Attest™ Autoreader 490 serial number or the IP Address. To view the 3M™ Attest™
Autoreader 490 Web App from a computer on a subnet different from that to which the
3M™ Attest™ Autoreader 490 is connected, use the IP Address URL.
Note: To access the 3M™ Attest™ Autoreader 490 Web App within a secure network,
the PC must have access to the secure network; options include connecting via a network
Ethernet cable, signing in to the facilitys wireless network, or connecting via a virtual
private network (VPN).
A. Serial number URL
1. Connect the supplied Ethernet cable from the 3M™ Attest™ Autoreader 490 to an
Ethernet jack.
2. Depress the button once to display the 3M™ Attest™ Autoreader 490 6digit
serial number on the left side of the top row of text on the LCD display.
3. Enter http://attestxxxxxx where xxxxxx represents the units serial number (e.g. http://
attest101127) from Step 2 in PC web browser address bar and press Enter.
4. 3M™ Attest™ Autoreader 490 Web App Status page will display on PC. For future
ease of use, add this page to your web browser Favorites.
B. IP Address URL
The 3M™ Attest™ Autoreader 490 Web App may also be accessed using either a
dynamic or static IP address.
1. Dynamic IP Address
A dynamic IP address is assigned when the Ethernet cable is connected from the 3M™
Attest™ Autoreader 490 to a live Ethernet jack.
Press and release the
button twice to display the 3M™ Attest™ Autoreader 490s
dynamic IP address. Enter http://IPaddress (e.g. http://xxx.xxx.xxx.xxx) in the PCs web
browser address bar and press Enter. The 3M™ Attest™ Autoreader 490 Web App Status
page will display.
2. Static IP address
Some facility IT personnel may require devices connecting to the network to use a Static
IP address. If this is the case at your facility, contact the IT department to request a Static
IP address.
Record the static IP address provided by your facility IT department here: ___________.
You may wish to label the Ethernet jack with the assigned address. Enter http://
StaticIPaddress (e.g. http://xxx.xxx.xxx.xxx) in the PCs web browser address bar and
press Enter. The 3M™ Attest™ Autoreader 490 Web App Status page will display.
About the 3M Attest Autoreader490 Web App Pages
The 3M™ Attest™ Autoreader 490 Web App includes four pages:
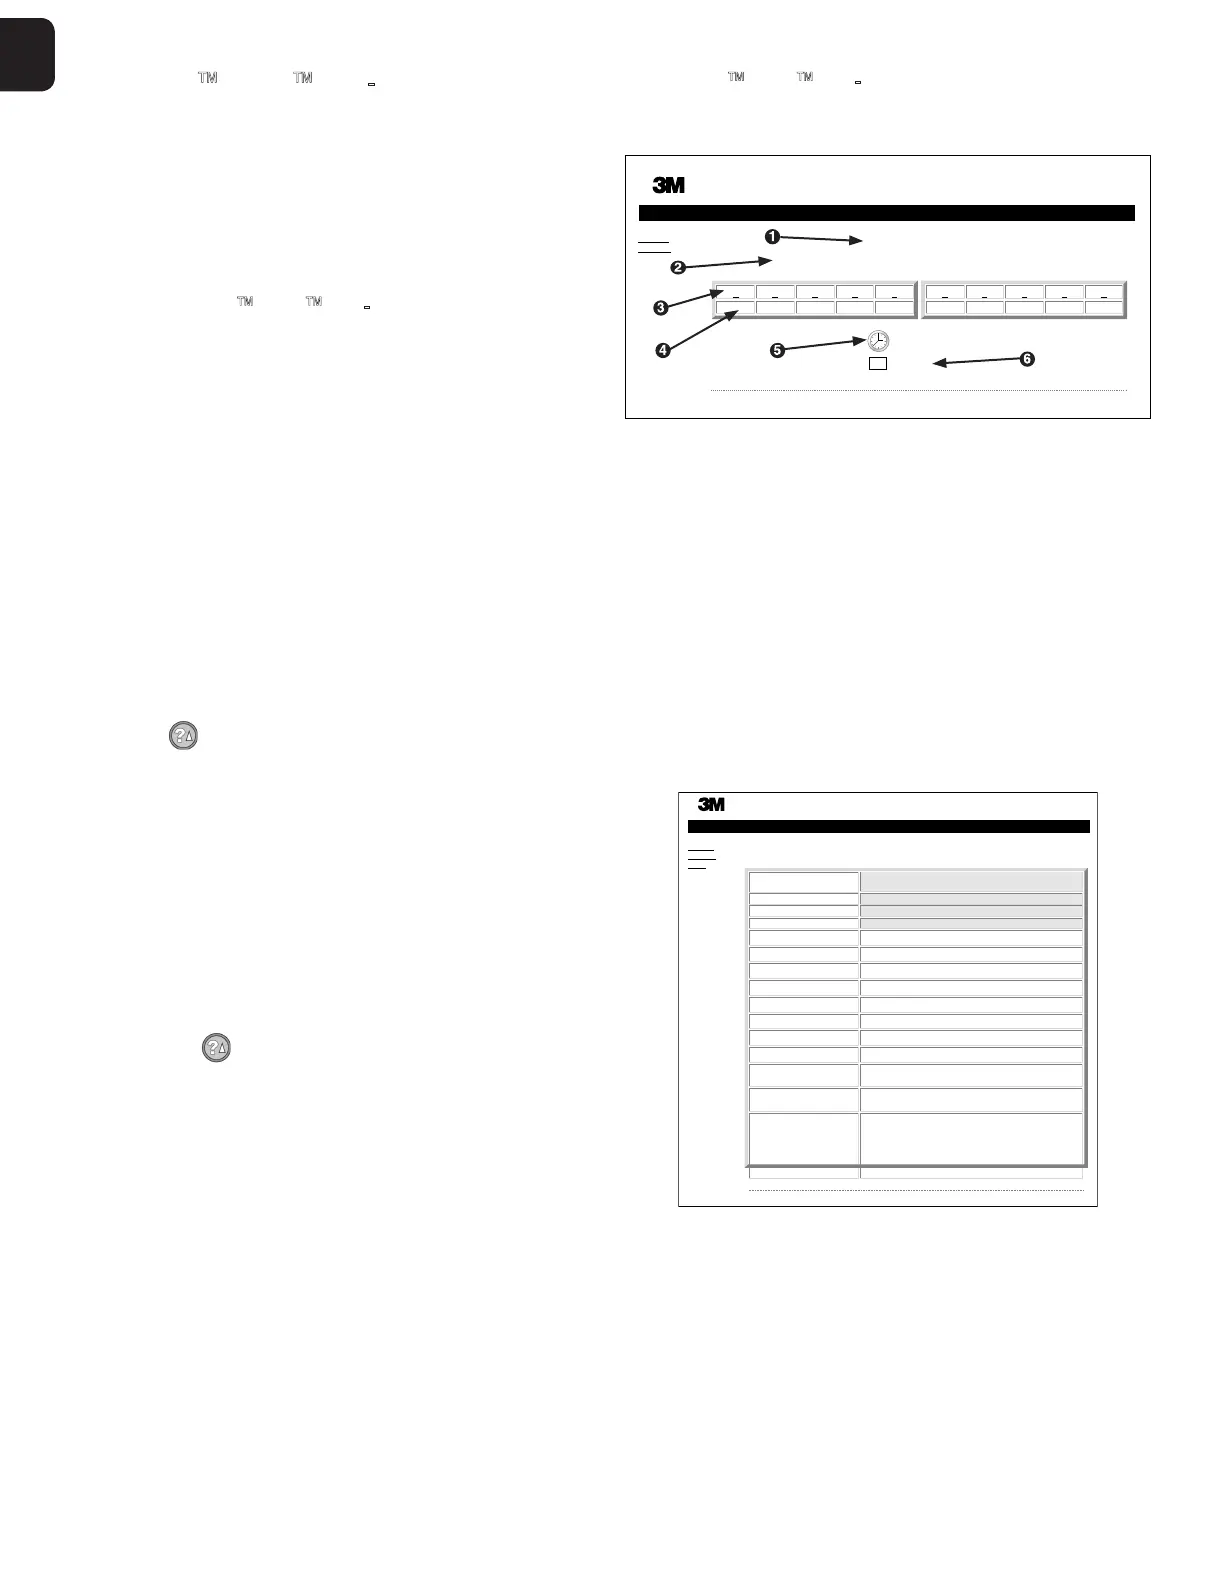
a) Status page
Status
History
3M™ Attest™ Auto-reader
Copyright © 2017 3M, Inc.
ATTEST ATTEST
1 2 3 4 5
+– 24
67 8 910
+–
SN
100157
2017-09-16 08:31
1. Userentered nickname (optional)
2. Well Configuration
3. Well Number
4. BI Result/Remaining Incubation Time
5. Date and Time
6. 3M™ Attest™ Autoreader490 Serial Number
The Status page provides a realtime representation of the 3M™ Attest™ Autoreader
490 configuration and LCD panel display. The current date and time and 3M™ Attest™
Autoreader 490 serial number are also indicated on this page. From this page, the user
may navigate to:
•
the History page by clicking on History on the left of the screen.
•
the Results Detail page by clicking on the well number of an occupied well (i.e. a well
that currently has an incubating BI). Clicking on an unoccupied well takes the user to
the History page.
b) Results Detail page
Copyright © 2017 3M, Inc.
3M™ Attest™ Auto-reader Results Detail
Status
History
Print
Result
Start Time
Well#
Serial Number
BI Type
Control?
BI Lot#
Sterilizer#
Load#
Implant?
Technician
Sterilizer Model
Cycle Type/Cycle
Parameters
Chemical
Integrator?/Indicator?
Notes
−
2012-09-16 07:04:41
#2
100157
This page provides an individual record for an incubated BI. For complete documentation,
the user may print a hard copy and/or save the record as an electronic file.
Note 1: The top four rows (highlighted in green) are populated automatically by the
3M™ Attest™ Autoreader 490 and cannot be changed by the user. The remaining rows
are completed by the user to satisfy the documentation requirements of their facility.
Note 2: The Results Detail page refreshes less frequently that the Status page. Until the BI
result is available, the Results Detail page displays remaining minutes of incubation in the
results field.
 Loading...