This section contains a brief description of the
installation procedure. See the detailed
instructions refered to on each step.
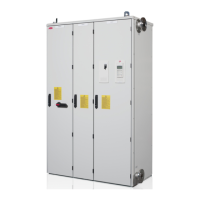
(1) The cabinet can be installed with its back
against a wall, or back-to-back with another unit.
Fasten the unit (or first shipping split) to the floor.
See Fastening the cabinet to the floor and wall
(non-marine units) on page 60, or Fastening the
unit to the floor and wall (marine units, option
+C121) on page 62.
Note: A minimum clearance of 400 mm above the
basic roof level of the cabinet is required to allow
pressure release lids to open at an arc fault.
Note: Leave some space at the side where the
cabinet outmost hinges are to allow the doors to
open sufficiently (1a). The doors must open 120°
to allow supply and inverter module replacement.
Note: Any height adjustment must be done before
fastening the units or shipping splits together.
Height adjustment can be done by using metal
shims between the bottom frame and floor.
(2) Remove the lifting bars. Use the original bolts
to block any unused holes. In marine units, use
the holes for fastening the cabinet from top.
(3) Slide Axilock connectors onto the liquid pipe
ends. One connector per pipe.
(4) If the line-up consists of shipping splits, fasten
the first split to the second, see Joining the
shipping splits on page 63. Each shipping split
includes a joining cubicle where the busbars
connect to the next split.
(5) Fasten the second shipping split to the floor.
(6) Join the DC busbars (a) and the PE
busbars (b), liquid pipes and the loose wire ends
in the joining cubicle, see Connecting the
DC busbars on page 65 and Connecting the liquid
pipes on page 64.
(7) Repeat steps (2) to (6) for the remaining
shipping splits.
1
5
4
2
> 400 mm (15.75”)
Top clearances
3
> 320 mm (12.3”) for units
with fan on roof (option
+E206)
6b
6a
1a
1a
 Loading...