57
HMG0600
A
B
C
D
E
F
2 3 4 5
12
6 7 8 9 10 11
G
F
1
标记 处数分区
更改文件号
签名
年月日
设计
审核
工艺
会签
标准化
数据审核
审定
批准
材料:
物料编码:
产品型号:
图样标记
重量
比例
S
共 张 第 张
家研
17
家用
201
试制
202
质控
22
采购
24
出口
29
商工
361
钣金
43
喷塑
44
两器
46
管一
47
模具
48
筛选
49
控制
50
空四
51
管二
55
重庆
62
小家电
79
巴西
61
是否属于客
户化物料
使 用 范 围
是
否
通用
出口
内销
地点 状态
管一
是否需
要加工
是否需
要加工
管二
借通用登记
物料状态
钣金
喷塑
两器
管路
机加件
采购
注塑
喷涂
丝印
控制
预装
下料
技术要求:
1.严格按照图幅比例,图文正确,画面优美。
2.图案为白底黑字,材料为0.05mm光白PET。
3.用沾水湿布擦15秒,再用沾汽油的布擦15秒,图文仍清晰明了。
4.检验要求符合QJ/GD 41.12.001。
5.打印按线框外框尺寸为350X250,内框尺寸为346X246,公差为±1.内圆角为R2,外圆角为R4。
A
B
C
D
E
F
G
H
1
2 3 4 5 6 7 8 9 10 11 12
李兵
LSQWRF65VM/NhA-M
0.05mm光白PET
线路图
11
2019/6/26
600007062104
LSQWRF65VMNhAM.XL
L1
XT1
L2
L3
N
CN4
CN8
CN14
CN9
CN38
CN13
CN34
CN43
CN44
CN54
CN35
CN36
CN1
CN2
AP1
CN300
CN63
CN62
CN26
CN23
CN21
CN5
CN53
CN42
CN52
CN7
CN3
CN37
CN19
CN24
SW
21
YV1
YV2
EKV1
1
2
3
4
5
EKV2
1
2
3
4
5
X3
X4
EH6
EH5
EH4
EH3
EH2
EH1
p
HP1
p
HP2
p
LP11
p
LP21
p
LP22
p
LP12
PE
HL2
HL1
KM1
A1
A2
K
21
L1
L2
L3
N
PE
Power
CN29
L5
1
4
3
5
6
7
8
9
10
13
14
KM2
A1
A2
KM3
A1
A2
KM4
A1
A2
2
XT2
RT1 20K
RT2 20K
RT3 20K
RT4 50K
RT5 20K
RT7 20K
RT8 50K
RT9 20K
RT10 20K
RT11 20K
RT12 20K
RT13 15K
AP2
CN1
AC-L1 AC-L2 AC-L3 N
L1-OUT L2-OUT L3-OUT
X9
AP3
CN1
AC-L1 AC-L2 AC-L3 N
L1-OUT L2-OUT L3-OUT
X9
AP4
CN101
L1(1) L2(2) L3(3)
+(4) -(5)
P1
G1
CN102CN103
CN501
CN302
U V W
AP5
CN101
L1(1) L2(2) L3(3)
+(4) -(5)
P1
G1
CN302
U V W
AP6
CN504
CN503
CN302
CN101
CN301
AP7
CN504
CN302
CN101
CN301
X500
X501
X502
X500
X501
X502
CN303
3~
COMP1
W
V
U
3~
COMP2
WVU
3~
M2
3~
M1
PE
PE
PE
PE
SP2
SP1
AP1
XT2
XT3
AP4
L1
AP6
AP2
XT1
L2
AP5
AP7
AP3
X1
X2
L8
W55
W17 W18 W19 W20
W21
W31
YE/GN
YE/GN
W22
W23
W24
W25
W26
W32
4
4
4
4
3
3
W34
W35
W36
W37
W38
W39
W33
W40
W41
W42
W56
W57
W59
W60
W61
W62
W63
W64
W65
W66
W67
W68
W58
W69
W70
PE
PE
PE
PE
W80
W73
W74
W75
W76
W81
W82
W83
W84
W85
W86
W95
W96
W97
W98
W93
L6 L7
L9
L10
L11
L12
L13
CN10
RT14 20K
RT15 20K
AP3-CN1
W77
CN41
AP1-CN29-1
AP1-CN29-3
W78
W79
PM
L1 L2 L3
PM
14(18) 11(15)
W106
PE
X3
W110
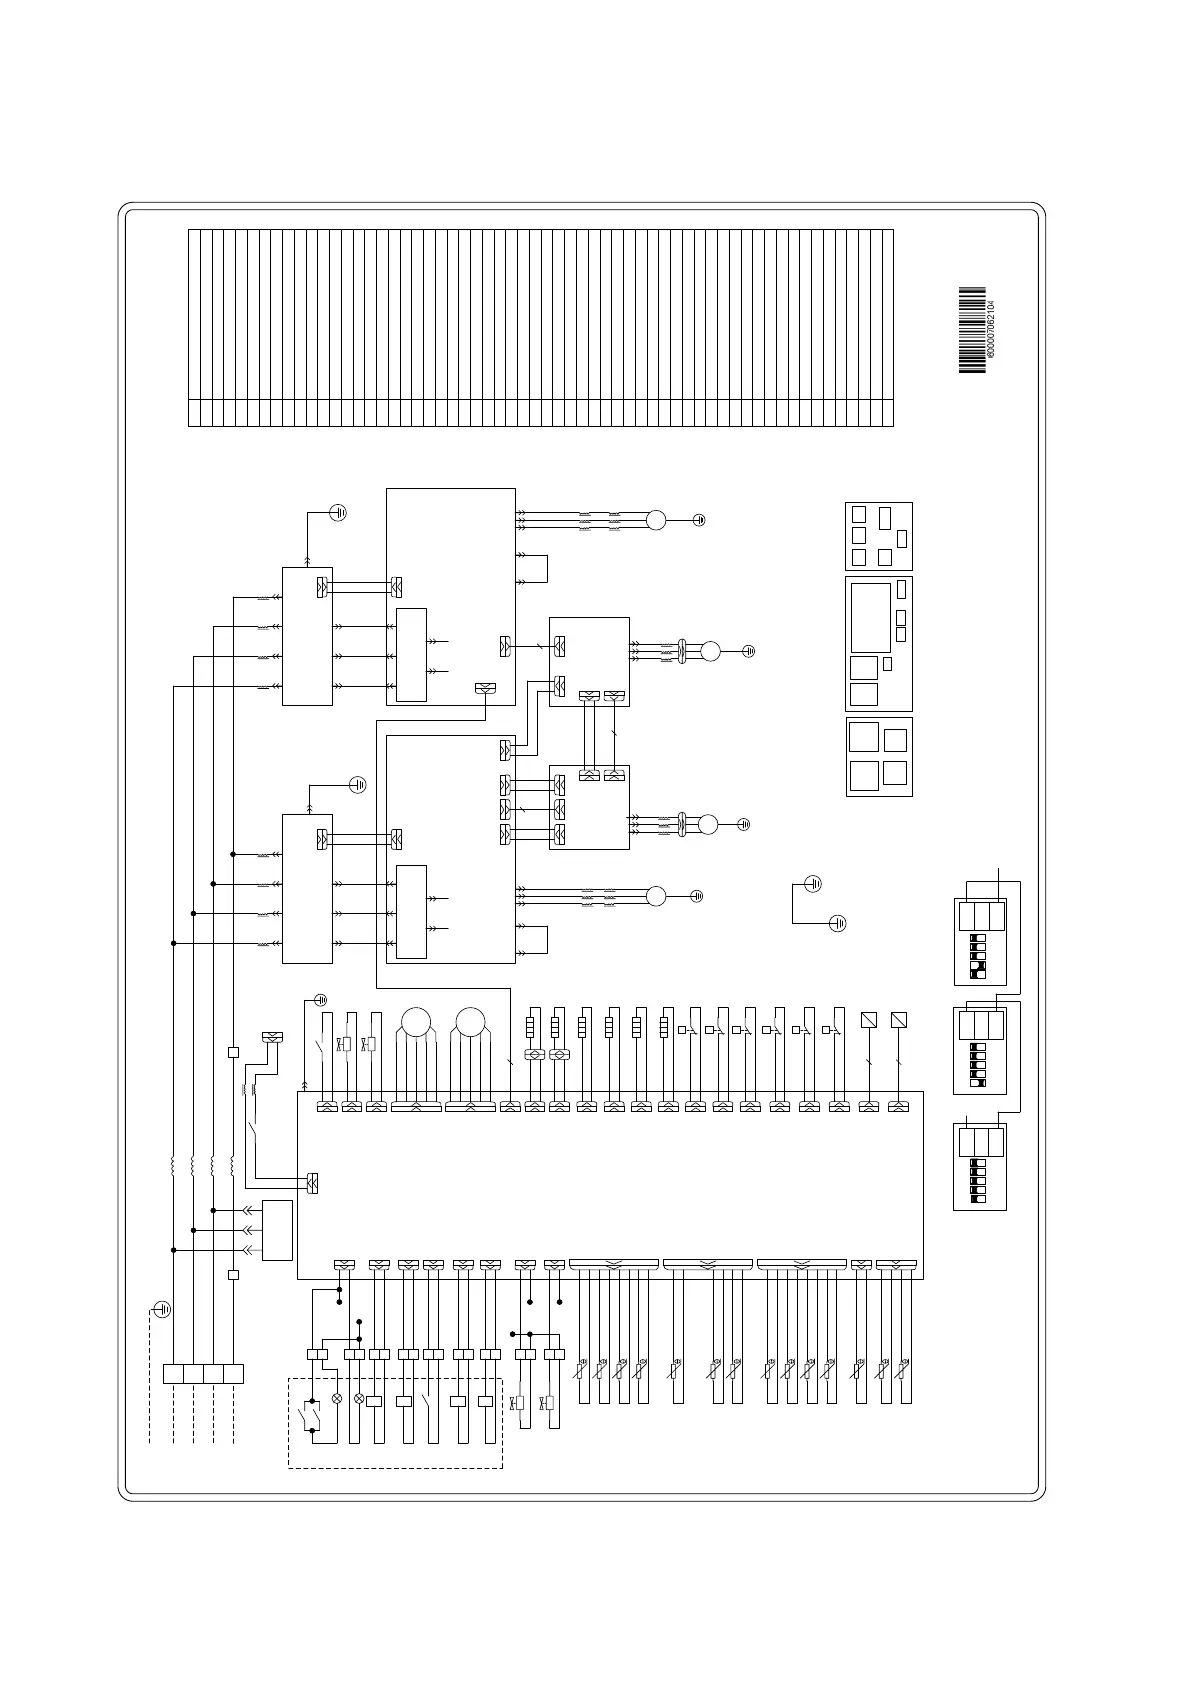
Code Name
AP1 Main board
AP2 Wave filter board 1
AP3 Wave filter board 2
AP4 Drive board of COMP1
AP5 Drive board of COMP2
AP6 Drive board of M1
AP7 Drive board of M2
COMP1 Inverter compressor 1
COMP2 Inverter compressor 2
EH1 COMP1 band heater 1
EH2 COMP1 band heater 2
EH3 COMP2 band heater 1
EH4 COMP2 band heater 2
EH5 Bottom band heater 1
EH6 Bottom band heater 2
EKV1 Electronic expansion valve 1
EKV2 Electronic expansion valve 2
HL1 Running indicating
HL2 Error indicating
HP1 System 1 high-pressure switch
HP2 System 2 high-pressure switch
K External passive contact switch
KM1 Water pump contact 1 (220V~)
KM2 Water pump contact 2 (220V~)
KM3 Auxiliary electric heater contact 1 (220V~)
KM4 Auxiliary electric heater contact 2 (220V~)
L Electric reactor(L1,L2,L3,L4)
LP11 System 1 low-pressure switch for heating
LP12 System 1 low-pressure switch for cooling
LP21 System 2 low-pressure switch for heating
LP22 System 2 low-pressure switch for cooling
M1 Fan motor 1
M2 Fan motor 2
PM Phase protector
RT1 Leaving water temp. sensor
RT2 Anti-freezing temp. sensor
RT3 System 1 defrosting temp. sensor
RT4 System 1 discharge temp. sensor
RT5 Inlet water temp. sensor
RT7 System 2 defrosting temp. sensor
RT8 System 2 discharge temp. sensor
RT9 System 1 shell-and-tube inlet temp. sensor
RT10 System 2 shell-and-tube inlet temp. sensor
RT11 System 1 suction temp. sensor
RT12 System 2 suction temp. sensor
RT13 Outdoor ambient temp. sensor
RT14 System 1 shell-and-tube outlet temp. sensor
RT15 System 2 shell-and-tube outlet temp. sensor
SP1 System 1 high pressure sensor
SP2 System 2 high pressure sensor
SW Water switch
XT1 Wiring board (L1,L2,L3,N)
XT2 Wiring board (1~10)
XT3 Wiring board (12~19)
XT4 Wiring board(1,2)
YV1 4-way valve 1
YV2 4-way valve 2
YV3 Solenoid valve 1
YV4 Solenoid valve 2
PM
L1
L2
L3
L4
1
XT4
2
XT4
W5
W6
N1
N2 N1
N2
W94
L3
L4
XT4
W111
W112
W113
W7
W8
W711
W712
W108
W107 W109
CN25
CN15
CN33
1 2
3
4
ON
CN25
CN15
CN33
1 2
3
4
ON
CN25
CN15
CN33
1
2
3
4
ON
5
5
5
GPRS
KM1
13 14
KM2
13 14
CN11
CN27
15
16
17
18
YV3
YV4
W87
W88
W89
W90
W91
W92
19
XT2-1
XT2-1
XT2-2
12
XT3
1、The address DIP switch for each control module
shall be already set properly. See the instruction
manual for more details;
2、The broken line indicates the wiring by the
users.
The modules are connected as follow
Control Module 1 Control Module 2 Control Module 3
Display
board
Address
DIP switch
Address
DIP switch
Address
DIP switch
To connect control module
4……until to the last
module. The number of
modules is no more than 16.
Electric parts
grounding
Upper parts
Down parts
Sketch of electric parts
Down layer
Upper layer
Electric part 1
Electric part 2
RB Rectifier bridge
RB
Rectifier bridge