lPage 91
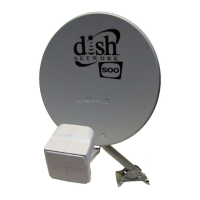
Installing a DISH 500 Antenna
23. After you select Yes, the receiver will begin taking a software upgrade.
You will see a
Warning that “Vital program information will now be
downloaded into your receiver.” You will also see a status bar showing
the progress of this upgrade.
24. Once the software upgrade is complete, you will see a message that your
receiver’s memory is being upgraded.
Do not disturb the receiver while the green light is blinking.
Note: If you are installing other DishPro receivers, be sure to run Check
Switch
on all of them, and allow them to take the necessary software upgrade.
If you will be installing a multi-dish system, follow the instructions that begin
below.
Installing a Multiple Dish DishPro system
Note: You cannot use DishPro LNBFs and switches (those marked with the
DishPro logo) with Legacy (non-DishPro) switches and LNBFs (those
without the DishPro logo). You mush install your dish antenna system with
either all DishPro LNBFs and switches or all Legacy LNBFs and switches. If
you mix the two, the system will not work.
Note: You can have as much as 200 feet of cable between the DishPro LNBF
receiver. However, you must use only RG-6 coaxial cables rated for 950-2150
MHz. Some cables may “Swept tested for 2150 MHz.” If you have any doubt
about this, ask your DISH Network retailer, or look on the container the cable
came in. Do not use cable company TV cables or cables from other satellite
TV systems not rated for 950-2150 MHz. these other cables may cause signal
loss. Do not use existing cables such as RG-59. Also, be sure that any outdoor
connections are made using waterproof F-connectors.
Once you have installed the DISH 500 with its DishPro Twin LNBF using the
preceding instructions, you can install a DISH 300 with a DishPro LNBF as
follows:
1. Turn on the television and the receiver if they are not already on. You
should see the
Point Dish/Signal screen. If not open the Main Menu and
press 6-1-1 on the remote.