LX-300+/1170 Revision C
Troubleshooting
roubleshooting 64
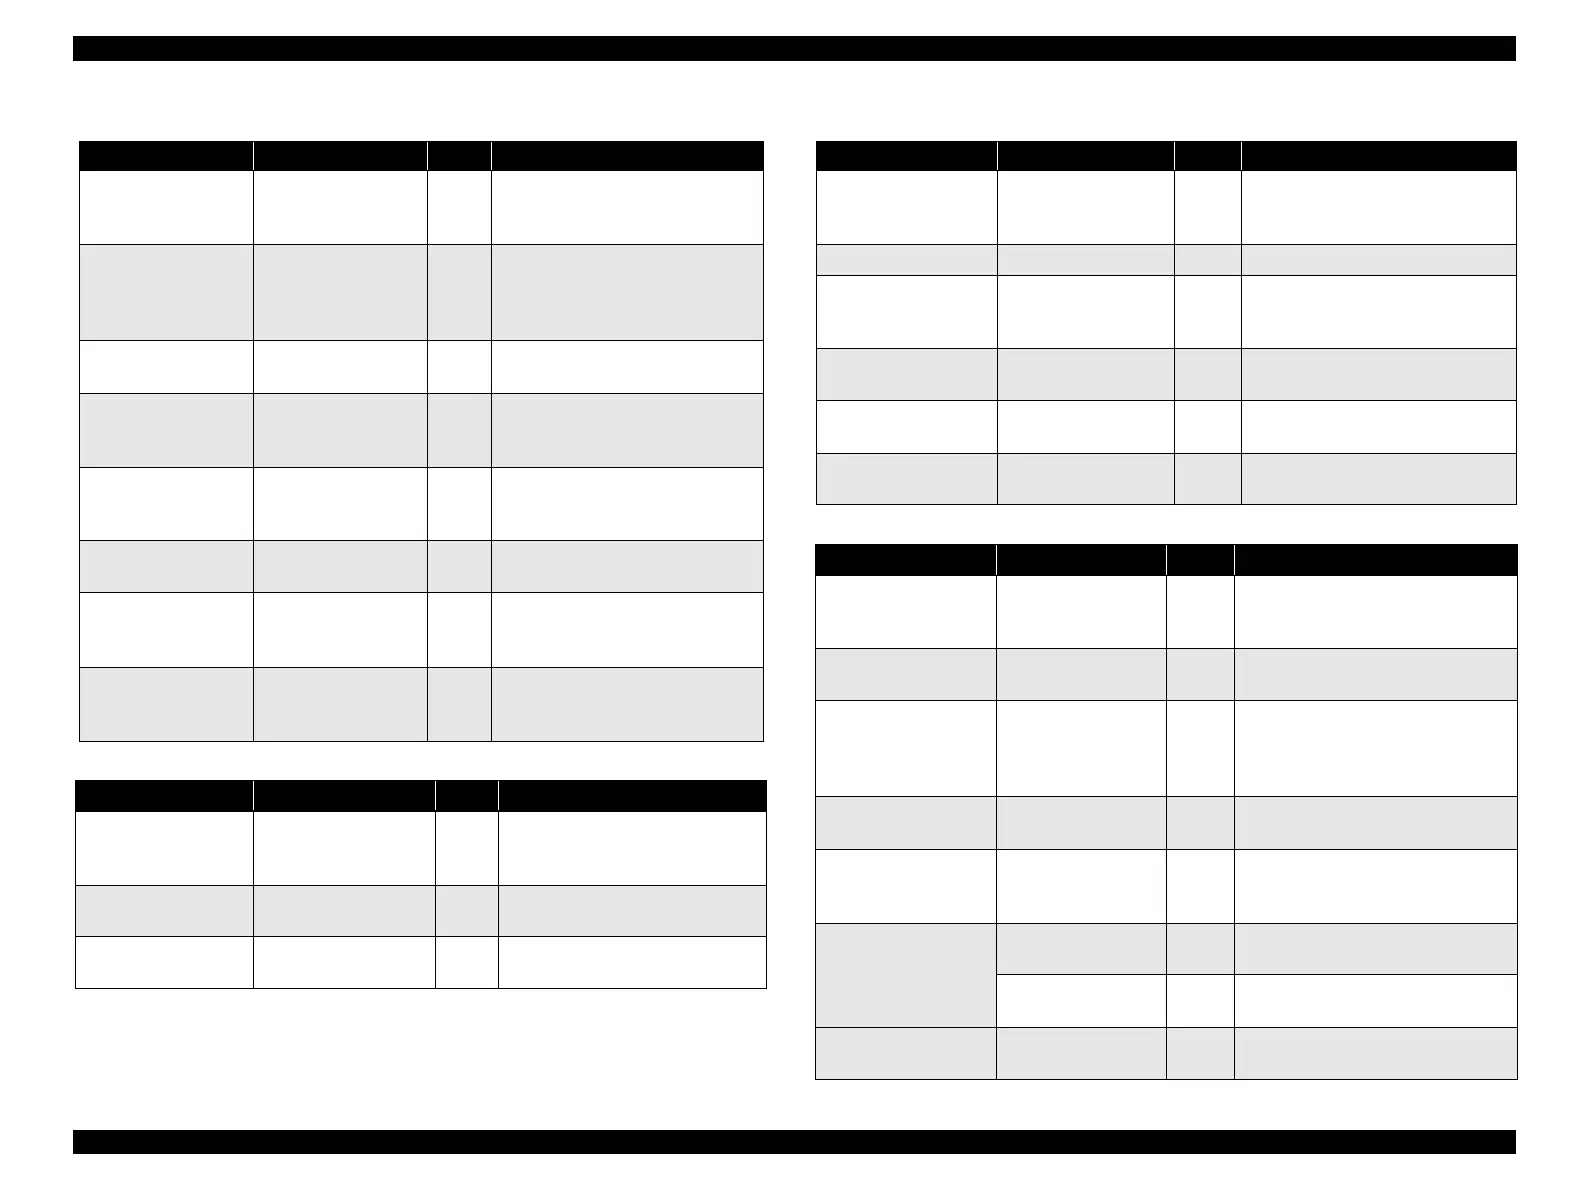
Table 3-3. Control Panel LED Does Not Light On.
Cause Check Point Y/N Solution
Blowout of a fuse on
the power board.
Isafuseonthepower
board blew out?
YES
Check the electric circuit and
printer mechanism. If there is no
short circuit, replace the fuse.
Connector is not
connected to the
power board.
Are connectors
connected to the
power board
properly?
NO Replace the power board.
Power switch is
defective.
Is conductivity of the
switch is OK?
YES Replace the power board.
Power board is
defective.
Are +5VDC and
+35VDC OK when
the power is on?
NO Replace the power board.
Power board and the
main board are not
connected properly.
Is CN8 connected
properly?
NO Connect CN8 properly.
Main board is
defective.
- - Replace the main board.
Control panel harness
is not connected
properly.
Is the harness of the
control panel
connected properly?
NO Connect the harness properly.
Control panel board
or harness is
defective.
- - Replace the control panel.
Table 3-4. Printer Mechanism Does Not Operate.
Cause Check Point Y/N Solution
Any of CN3 to CN12
is not connected to the
main board properly.
Are all connectors
connected properly?
NO Connect them properly.
Main board is
defective.
- - Replace the main board.
Printer mechanism is
defective.
- - Replace the printer mechanism.
Table 3-5. When Power is Applied, the Printer Becomes Fatal Error.
Cause Check Point Y/N Solution
CR motor harness is
not connected
properly.
Is CR motor harness
CN10 connected
properly?
NO Connect it properly.
CR motor is defective. - - Replace the CR motor.
HP detector harness is
not connected
properly
Is HP detector
harness CN3
connected properly?
NO Connect it properly.
HP detector is
defective.
- - Replace the HP detector.
Power board is
defective.
Is power voltage
normal?
NO Replace the power board.
- - -
Replace the main board and printer
mechanism.
Table 3-6. Self Test Print is Abnormal.
Cause Check Point Y/N Solution
Any of CN3 to CN12
is not connected to the
main board properly.
Are all connectors
connected properly?
NO Connect them properly.
Printhead driver is
defective.
- - Replace the main board.
Bi-d is not correct.
Are rows aligned
properly when bi-
directional printing
is proceeded?
NO Adjust Bi-D.
Printhead is defective.
Is there any dot
missing?
YES Replace the printhead.
Head FFC is not
connected properly or
broken.
- YES Replace the head FFC.
Platen gap is not
correct.
Is printing too light /
weak?
YES Adjust the platen gap.
Is there any dirt on
printed documents?
YES Adjust the platen gap.
Ribbon mask is
defective.
Is there any dirt on
printed documents?
YES Replace the ribbon mask.

 Loading...


