G100 Instruction Manual
Installing the G100
This chapter covers the installation of the G100 and initial power-on operations.
Before you install and operate the G100, read and follow the safety guidelines and instructions in Safety
precautions.
Installation
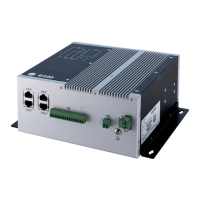
The G100 device can be installed as either wall / panel mounted, or DIN Rail mounted.
The G100 shall be installed in:
• Pollution Degree II, non-hazardous and restricted access location,
• Environment where the ambient temperature does not exceed the rating of the product,
• Air flow is not restricted
Wall / Panel Mounting instructions
Please see following instructions to mount it.
1. Mount the wall/panel mount bracket as shown below.
a. Locate and retrieve the wall/panel mount brackets from the G100 carton.
b. Locate and removed the 2x M3 screws on the left side of the chassis closest to the rear.
c. Position one of the wall/panel mount brackets to the chassis, aligning the mounting holes in the
bracket to the chassis.
d. Reinstall the 2 screws removed in the step above on the left side of the chassis to secure the
bracket to the chassis. The recommended torque setting for the M3 screws are 5.2 in-lb [0.59
Nm].
e. Repeat the above steps for the mounting the bracket to the right side of the chassis.
2. On the wall / panel, measure the exact place where you want to install the G100 and drill four holes that
match the four mounting holes on both brackets.