○○○○○○○○○○○○○○○○○○○○○○
Sample Translator 2•49
○○○○○○○○○○○○○○○○○○○○○○
Sample Translator 2•49
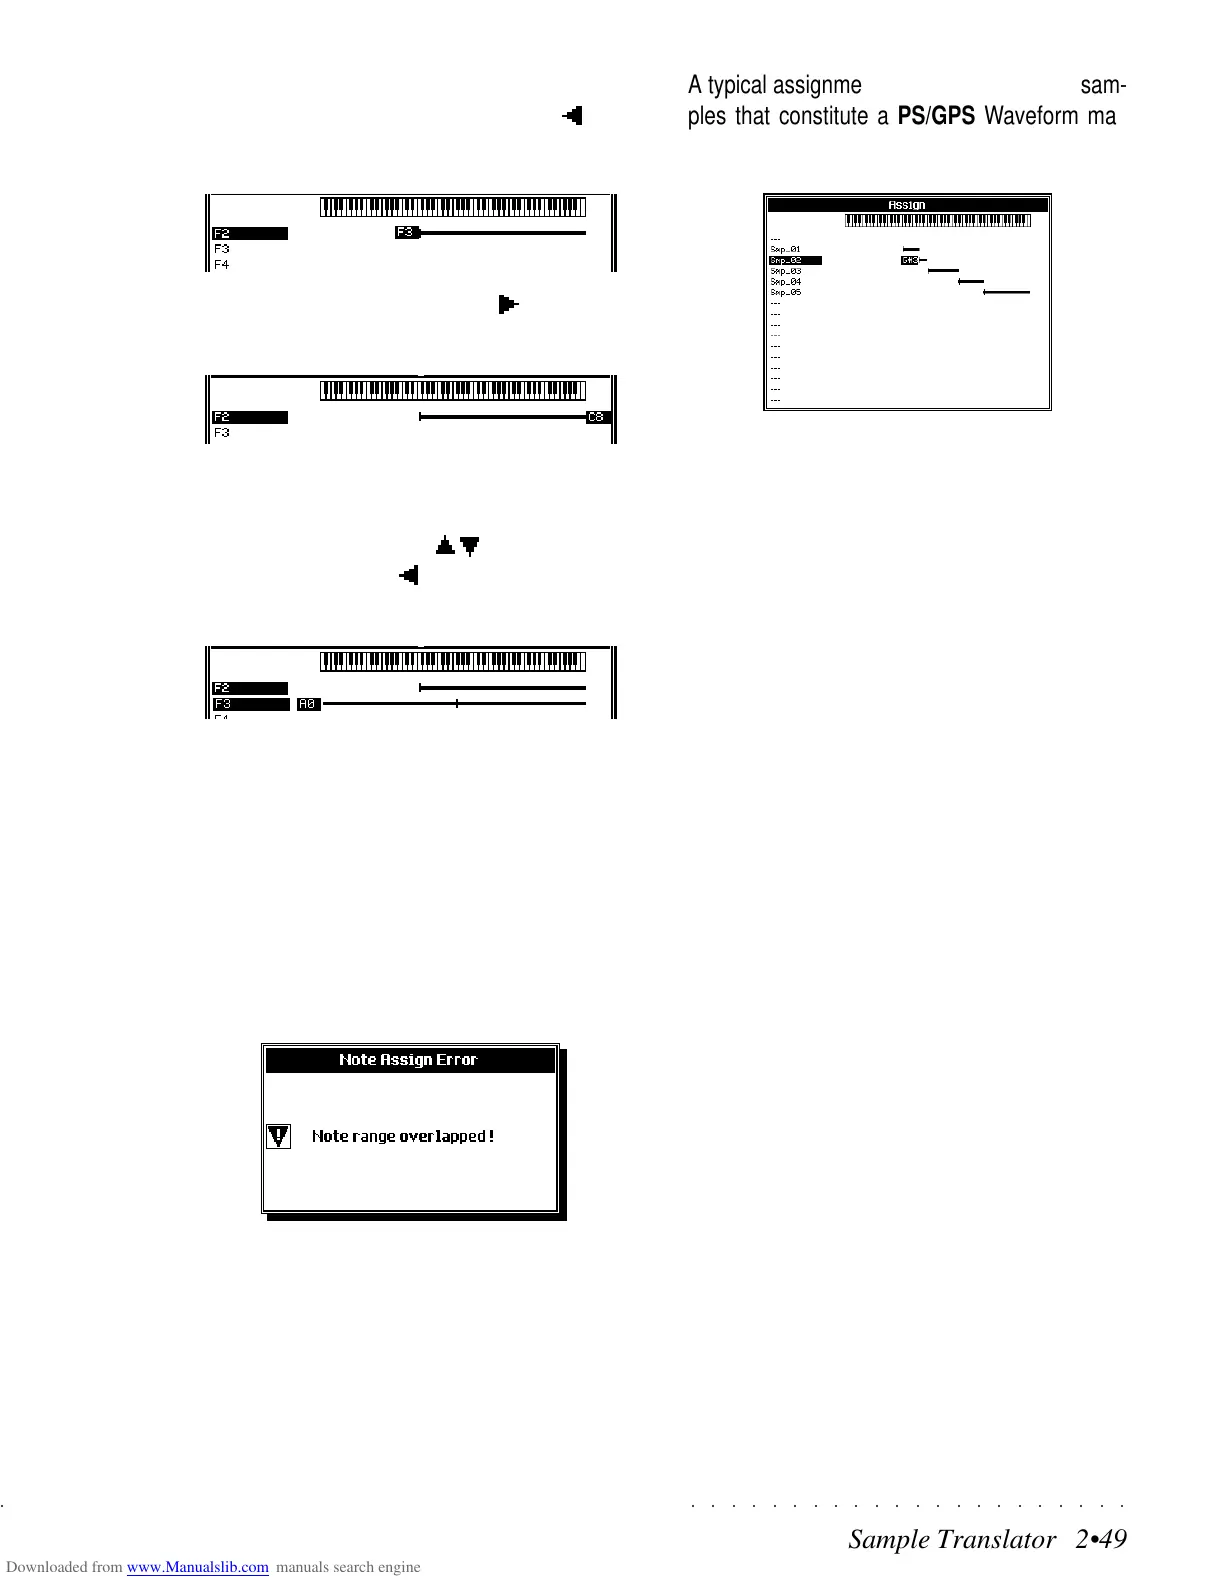
A typical assignment consisting of several sam-
ples that constitute a PS/GPS Waveform may
look like this:
Each sample covers a specified key range and
the “notch” at the beginning of each range corre-
sponds to the Root Key Number, also called the
Sample Pitch.
Once you have completed the sample key range
assignments, press ESCAPE to close the AS-
SIGN display and return to the Sample Transla-
tor.
At this point, unless you want to start editing your
sample, you can press SAVE, (F2) to store your
sample to the PS/GPS wave library. Follow the
section entitled, “Storing the sample” on page
2.55 at the end of this chapter.
If the selected Sample is not shown with a black
line, simply strike the left Cursor button ( ).
1. Rotate the Dial to assign the lowest key limit:
2. Strike the right cursor button ( ) and assign
the upper key limit with the Dial.
3. Press ENTER to confirm.
4. Select the next Sample to assign with the up/
down cursor buttons ( / ) then strike the
left cursor button ( ) to activate the lowest
key limit of the selected sample (A0).
Repeat the assignment procedure for all the
samples that are to be part of the new Wave-
form, and avoid overlapping.
OVERLAPPING SAMPLES
If you overlap the key range of two samples,
pressing ENTER will prompt a message indicat-
ing the presence of an overlap.
Press Escape to cancel the message and assign
the correct key range before confirming with
ENTER.
A typical assignment consisting of several sam-
ples that constitute a PS/GPS Waveform may
look like this:
Each sample covers a specified key range and
the “notch” at the beginning of each range corre-
sponds to the Root Key Number, also called the
Sample Pitch.
Once you have completed the sample key range
assignments, press ESCAPE to close the AS-
SIGN display and return to the Sample Transla-
tor.
At this point, unless you want to start editing your
sample, you can press SAVE, (F2) to store your
sample to the PS/GPS wave library. Follow the
section entitled, “Storing the sample” on page
2.55 at the end of this chapter.
If the selected Sample is not shown with a black
line, simply strike the left Cursor button ( ).
1. Rotate the Dial to assign the lowest key limit:
2. Strike the right cursor button (
) and assign
the upper key limit with the Dial.
3. Press ENTER to confirm.
4. Select the next Sample to assign with the up/
down cursor buttons (
/ ) then strike the
left cursor button ( ) to activate the lowest
key limit of the selected sample (A0).
Repeat the assignment procedure for all the
samples that are to be part of the new Wave-
form, and avoid overlapping.
OVERLAPPING SAMPLES
If you overlap the key range of two samples,
pressing ENTER will prompt a message indicat-
ing the presence of an overlap.
Press Escape to cancel the message and assign
the correct key range before confirming with
ENTER.
○○○○○○○○○○○○○○○○○○○○○○
Sample Translator 2•49
○○○○○○○○○○○○○○○○○○○○○○
Sample Translator 2•49
A typical assignment consisting of several sam-
ples that constitute a PS/GPS Waveform may
look like this:
Each sample covers a specified key range and
the “notch” at the beginning of each range corre-
sponds to the Root Key Number, also called the
Sample Pitch.
Once you have completed the sample key range
assignments, press ESCAPE to close the AS-
SIGN display and return to the Sample Transla-
tor.
At this point, unless you want to start editing your
sample, you can press SAVE, (F2) to store your
sample to the PS/GPS wave library. Follow the
section entitled, “Storing the sample” on page
2.55 at the end of this chapter.
If the selected Sample is not shown with a black
line, simply strike the left Cursor button ( ).
1. Rotate the Dial to assign the lowest key limit:
2. Strike the right cursor button ( ) and assign
the upper key limit with the Dial.
3. Press ENTER to confirm.
4. Select the next Sample to assign with the up/
down cursor buttons ( / ) then strike the
left cursor button ( ) to activate the lowest
key limit of the selected sample (A0).
Repeat the assignment procedure for all the
samples that are to be part of the new Wave-
form, and avoid overlapping.
OVERLAPPING SAMPLES
If you overlap the key range of two samples,
pressing ENTER will prompt a message indicat-
ing the presence of an overlap.
Press Escape to cancel the message and assign
the correct key range before confirming with
ENTER.
A typical assignment consisting of several sam-
ples that constitute a PS/GPS Waveform may
look like this:
Each sample covers a specified key range and
the “notch” at the beginning of each range corre-
sponds to the Root Key Number, also called the
Sample Pitch.
Once you have completed the sample key range
assignments, press ESCAPE to close the AS-
SIGN display and return to the Sample Transla-
tor.
At this point, unless you want to start editing your
sample, you can press SAVE, (F2) to store your
sample to the PS/GPS wave library. Follow the
section entitled, “Storing the sample” on page
2.55 at the end of this chapter.
If the selected Sample is not shown with a black
line, simply strike the left Cursor button ( ).
1. Rotate the Dial to assign the lowest key limit:
2. Strike the right cursor button (
) and assign
the upper key limit with the Dial.
3. Press ENTER to confirm.
4. Select the next Sample to assign with the up/
down cursor buttons (
/ ) then strike the
left cursor button ( ) to activate the lowest
key limit of the selected sample (A0).
Repeat the assignment procedure for all the
samples that are to be part of the new Wave-
form, and avoid overlapping.
OVERLAPPING SAMPLES
If you overlap the key range of two samples,
pressing ENTER will prompt a message indicat-
ing the presence of an overlap.
Press Escape to cancel the message and assign
the correct key range before confirming with
ENTER.

 Loading...

