○○○○○○○○○○○○○○○○○○○○○○
Disk 4•25
○○○○○○○○○○○○○○○○○○○○○○
Disk 4•25
HOW TO BACK UP YOUR HARD DISK DATA
1. Have some empty formatted data disks
ready.
As a general rule, 1000 Kb of Hard Disk data
are compressed to approx. 50% of the origi-
nal value in the case of Songs, and 30% in
the case of Sounds. Use this conversion
scale to calculate approximately how many
disks you will require to backup your data.
The size of each selected Block file is shown
at the bottom of the directory.
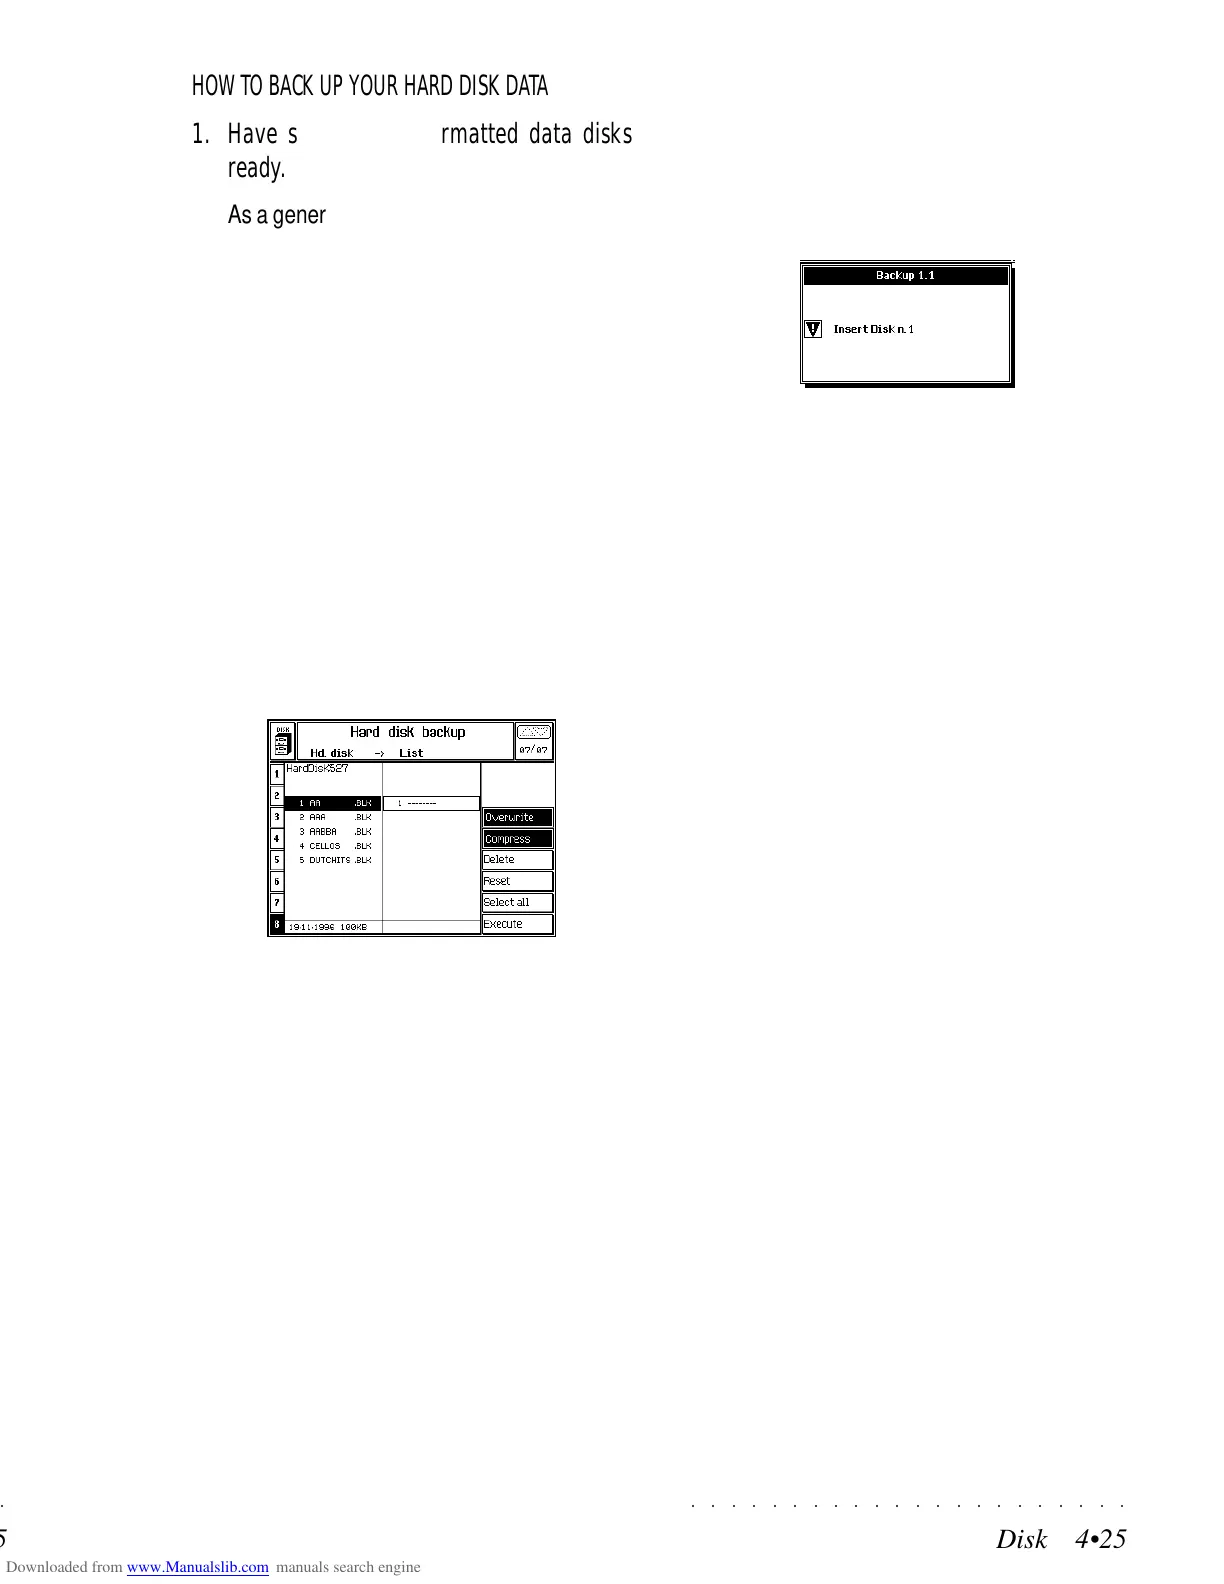
2. Select the Hard Disk Backup option and press
ENTER to activate the function.
Selecting this function opens a second level
display showing the Hard disk directory on
the left and a column on the right where you
can prepare a list of data to backup and com-
press.
The backup list can consist of Block files only,
not individual files normally found in a block.
3. Prepare a list of the block(s) to backup.
Select a Block and press ENTER to insert it
into the list. The cursor moves down to the
next empty location automatically. Repeat
the operation for other blocks.
If you attempt to insert a Block that has al-
ready been inserted, an appropriate warning
is displayed. Press ESCAPE to cancel the
warning and select a different Block.
4. Press EXECUTE (F1) to start the backup proc-
ess.
After a short period, the unit is ready to
backup the data and a dialog appears re-
questing you to insert Disk n. 1:
• Insert a disk into the drive and press ENTER
to start saving to the disk.
When the Backup has finished, a message
is displayed saying: “Operation completed”.
If the Backup procedure requires more than
one disk, a dialogue appears requesting the
insertion of disk n. 2 and so on.
THE BACKUP OPTIONS
Overwrite (F1)
Select OVERWRITE (F1) if you want to overwrite
data on disks previously used for other backups.
This option is selected by default.
Deselect this function if you want the backup
floppies to retain any data currently stored in
them.
Compress (F2)
Select COMPRESS (F2) to compress the files of
the backup list.
This function is selected by default.
Delete (F5)
Select DELETE (F5) to cancel a block from the
list.
The Delete option does not cancel a Block from
the Hard Disk directory.
Reset (F6)
Select RESET (F6) to cancel in a single step a
list containing two or more Blocks.
HOW TO BACK UP YOUR HARD DISK DATA
1. Have some empty formatted data disks
ready.
As a general rule, 1000 Kb of Hard Disk data
are compressed to approx. 50% of the origi-
nal value in the case of Songs, and 30% in
the case of Sounds. Use this conversion
scale to calculate approximately how many
disks you will require to backup your data.
The size of each selected Block file is shown
at the bottom of the directory.
2. Select the Hard Disk Backup option and press
ENTER to activate the function.
Selecting this function opens a second level
display showing the Hard disk directory on
the left and a column on the right where you
can prepare a list of data to backup and com-
press.
The backup list can consist of Block files only,
not individual files normally found in a block.
3. Prepare a list of the block(s) to backup.
Select a Block and press ENTER to insert it
into the list. The cursor moves down to the
next empty location automatically. Repeat
the operation for other blocks.
If you attempt to insert a Block that has al-
ready been inserted, an appropriate warning
is displayed. Press ESCAPE to cancel the
warning and select a different Block.
4. Press EXECUTE (F1) to start the backup proc-
ess.
After a short period, the unit is ready to
backup the data and a dialog appears re-
questing you to insert Disk n. 1:
• Insert a disk into the drive and press ENTER
to start saving to the disk.
When the Backup has finished, a message
is displayed saying: “Operation completed”.
If the Backup procedure requires more than
one disk, a dialogue appears requesting the
insertion of disk n. 2 and so on.
THE BACKUP OPTIONS
Overwrite (F1)
Select OVERWRITE (F1) if you want to overwrite
data on disks previously used for other backups.
This option is selected by default.
Deselect this function if you want the backup
floppies to retain any data currently stored in
them.
Compress (F2)
Select COMPRESS (F2) to compress the files of
the backup list.
This function is selected by default.
Delete (F5)
Select DELETE (F5) to cancel a block from the
list.
The Delete option does not cancel a Block from
the Hard Disk directory.
Reset (F6)
Select RESET (F6) to cancel in a single step a
list containing two or more Blocks.
○○○○○○○○○○○○○○○○○○○○○○
Disk 4•25
○○○○○○○○○○○○○○○○○○○○○○
Disk 4•25
HOW TO BACK UP YOUR HARD DISK DATA
1. Have some empty formatted data disks
ready.
As a general rule, 1000 Kb of Hard Disk data
are compressed to approx. 50% of the origi-
nal value in the case of Songs, and 30% in
the case of Sounds. Use this conversion
scale to calculate approximately how many
disks you will require to backup your data.
The size of each selected Block file is shown
at the bottom of the directory.
2. Select the Hard Disk Backup option and press
ENTER to activate the function.
Selecting this function opens a second level
display showing the Hard disk directory on
the left and a column on the right where you
can prepare a list of data to backup and com-
press.
The backup list can consist of Block files only,
not individual files normally found in a block.
3. Prepare a list of the block(s) to backup.
Select a Block and press ENTER to insert it
into the list. The cursor moves down to the
next empty location automatically. Repeat
the operation for other blocks.
If you attempt to insert a Block that has al-
ready been inserted, an appropriate warning
is displayed. Press ESCAPE to cancel the
warning and select a different Block.
4. Press EXECUTE (F1) to start the backup proc-
ess.
After a short period, the unit is ready to
backup the data and a dialog appears re-
questing you to insert Disk n. 1:
• Insert a disk into the drive and press ENTER
to start saving to the disk.
When the Backup has finished, a message
is displayed saying: “Operation completed”.
If the Backup procedure requires more than
one disk, a dialogue appears requesting the
insertion of disk n. 2 and so on.
THE BACKUP OPTIONS
Overwrite (F1)
Select OVERWRITE (F1) if you want to overwrite
data on disks previously used for other backups.
This option is selected by default.
Deselect this function if you want the backup
floppies to retain any data currently stored in
them.
Compress (F2)
Select COMPRESS (F2) to compress the files of
the backup list.
This function is selected by default.
Delete (F5)
Select DELETE (F5) to cancel a block from the
list.
The Delete option does not cancel a Block from
the Hard Disk directory.
Reset (F6)
Select RESET (F6) to cancel in a single step a
list containing two or more Blocks.

 Loading...

