96
GERBERplotter MP Series User Manual
English
6
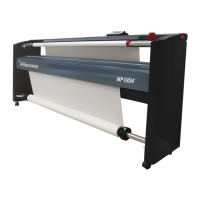
Angle (2)
It is necessary to change the angle of
the print using the screw situated on
the left of the print head carriage and
then repeat the print.
Screw correctly adjusted.
When prompted, select yes if changes were made in the previous steps, and then perform the previous steps again.
No.4 Allen key
A No.4 Allen key is required in order to
carry out the adjustments in this step.
PRINT
PAUSE
OK
PRINT
PAUSE
1
As with the rst step, this step does not allow you to enter an adjustment value. Instead, turn the adjusting screw
in the print head carriage to ensure that the printed lines are completely vertical.
All print heads (2 or 4) are used to produce test lines of greater length and resolution, resulting in greater adjust-
ment precision.
2
Use PRINT/PAUSE to start or stop printing the lines. If the lines are incorrect, go to step 3.
If the lines are correct, go to step 4.
3
Once the adjustments have been made, repeat step 2 using the screw.
4
Press OK to nish this step.