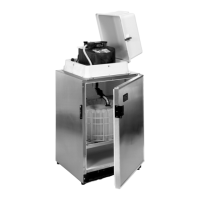
6700SR Refrigerated Sampler
20
The Quick View screens below shows you how to change the suction
line length. Begin by paging through the quick view screens until
you see the quick view screen containing the suction line setting.
When you change a setting, the sampler stores the new settings and
returns to the updated quick view screen. You can repeat this process
until all settings shown in the quick view screens have been changed.
When you are done, select the screen’s forward arrow to move to the
next quick view screen, or press Stop to return to the main menu.
Messages
The sampler has four sets of messages that supplement the program-
ming screens. The Information messages tell you about programming
status. Help Notes are brief comments associated with programming
screens describing the setting or offering assistance. Warning messag-
es tell you something is different than Isco’s standard. The Operation
messages report the sampler’s status as it runs a program.
Information Messages
These are brief messages about the programming status. Informa-
tion messages are displayed for four seconds, unless terminated by
pressing any key.
Help Notes
To see the help note:
1. Press the ? (Help) key.
2. When the note requires several screens, the word “more” ap-
pears in the lower-right corner. Press enter for the next note.
3. Move back and forth between screens by pressing the arrow
keys.
4. Press Stop at any time to return to the programming screen.
Most help notes refer to a related section in this manual. Screens
↑
24, 1000 ml BTLS
10 ft SUCTION LINE
↓
• Press Up-Left until 10 ft
SUCTION LINE blinks. Then
press
↵
(Enter).
SUCTION LINE LENGTH
IS 7 ft
(3-99)
• Type the new line length and
press enter.
PLEASE WAIT!
. . . GENERATING
PUMP TABLES
↑
24, 1000 ml BTLS
7 ft SUCTION LINE
↓
Using Help Notes
Although this example shows you
the help notes (
w
,
x, and y
) that
appear with the suction-line length
screen, you can use the same tech-
nique to see help notes with all pro-
gramming screens.
v
SUCTION LINE LENGTH
IS 7 ft
(3-99)
• Press ?
(
Help
)
.
w
Enter the length of
suction line only,
excluding strainer
and pump tube. <more>
• Press enter or Down-Left to
see the next screen.
• Press Stop to return to the
programming screen.
x
See “Installing
Suction Line” in
your manual.
<more>
• Press enter or Down-Left to
see the next screen.
• Press Up-Right to see the
previous screen.
• Press Stop to return to the
programming screen.
y
Press the red STOP
key to exit HELP.
• Press Up-Right to see the
previous notes.
• Press Stop to return to the
programming screen.