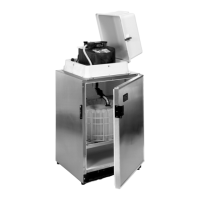
6700SR Refrigerated Sampler
36
Chapter 3 Operation
Installation and Operation Checklist
1. Prepare the sampler.
a. Adjust the distributor arm to fit the bottle kit. Then install
the distributor arm and the discharge tube. (See Installing
the Distributor Arm and Discharge Tube on page 38.) For
composite bottle kits, attach the discharge tube to the
bulkhead fitting and thread through the hole in the bottle
lid. (See Installing Composite Bottle on page 42.)
b. Install the bottle kit. (See Installing Bottle Kits on page
40.)
c. Check the pump tube. Replace it if necessary and reset the
pump tube warning. (See Replacing the Pump Tube on
page 70.)
d. Attach the suction line to the pump tube. (See Suction
Line on page 43.)
e. Attach a strainer to the suction line if necessary. (See
Strainers on page 43.)
2. Install the sampler at the monitoring site.
a. Install the strainer or end of the suction line in the flow
stream and route the suction line to the sampler. (See In-
take Placement on page 46; also See Tips for Routing Suc-
tion Line on page 46.)
b. Install a module, if desired. Refer to the module manual
for instructions on installing the module.
c. Place the sampler in position. (See Positioning a Sampler
on page 46.)
d. Connect any necessary external instruments to the sam-
pler. (See Connecting External Instruments on page 46.)
Read the
Safety Summary
posted at the front of this manual. It out-
lines the electrical requirements and provides instructions for safe
operation.
e. Plug the line cord into an AC power outlet. Be sure it is
connected to 120 volts AC (optional 230 volts AC).
3. Program the Sampler. Programming guidelines are in Chap-
ter 2 and in the module manual.
4. Run the sampling program. (See Running Programs on page
48.)
5. Service the sampler.
a. Recover the samples.
b. Collect the sampling data. (See Sampling Reports on page
54.)
c. Replace the sample bottles.
d. Run the sampling program.
Chapter Contents
• Installation and Operation
Checklist . . . . . . . . . . . . . . .36
• Preparing the Sampler . . . . . . .37
• Installing Bottle Kits . . . . . . . . .40
• Installing Composite Bottle. . . .42
• Suction Line . . . . . . . . . . . . . . .43
• Strainers. . . . . . . . . . . . . . . . . .43
• How Does the Sampler Work?.44
• Installing the Sampler. . . . . . . .46
• Running Programs . . . . . . . . . .48
• Run Time Screens . . . . . . . . . .48
• Interrupting a Running Program . 51
• Servicing the Sampler . . . . . . .54
• Sampling Reports. . . . . . . . . . .54
• Grab Samples . . . . . . . . . . . . .65
• Calibrating . . . . . . . . . . . . . . . .66
Note