– 20 –
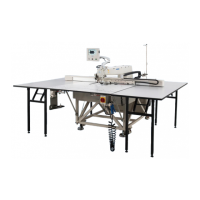
4-12. Adjusting the counter knife
(1) Adjusting the lateral position of
counter knife
1) Lower the needle bar.
2) Loosen setscrews
❸
. Adjust the lateral
position of counter knife
❷
so that a
distance of 3.5 ± 0.2 mm is provided
between the tip of counter knife
❷
and
the center of needle
❶
.
(2) Adjusting the counter knife pressure
1) Loosen nut
❺
. Adjust the pressure
between counter knife
❷
and moving
knife
❻
by turning the setscrew
❹
with
a at-blade screwdriver. The pressure
is increased by turning the nut in the
direction of arrow
A
, or decreased by
turning it in the direction of arrow
B
.
2) After the adjustment, tighten nut
❺
.
(3) Adjusting the longitudinal clearance
provided between the counter knife
and the moving knife
1) Loosen setscrews
❸
. Adjust the lon-
gitudinal position of counter knife
❷
so that a clearance of 0.3 to 1 mm is
provided between counter knife
❷
and
moving knife
❻
.
(4) Adjusting the longitudinal clearance
provided between the inner hook
holder and the inner hook
1) Loosen setscrews
❸
. Adjust the lon-
gitudinal position of inner hook holder
❼
so that a clearance 0.3 to 0.8 mm is
provided between projection portion
C
of inner hook holder
❼
and inner hook
❽
.
2) Finely adjusting the aforementioned
clearance according to the thread
thickness will allow the thread to pass
through the clearance smoothly.
(5) Adjusting the lateral position of in-
ner hook holder
1) Loosen setscrew
❾
. Adjust the lateral
position of inner hook holder
❼
so that
the center of projection portion
C
of
inner hook holder
❼
is aligned with the
center of needle
❶
.
❸
❷
❾❼
3.5 ± 0.2 mm
❷
❶
❷
❹
❺
B
A
❷❻
0.3 to 1 mm
❸
❽
❼
❸
❽ C
❼
0.3 to 0.8 mm
❶
C
Alignment
1)
2)
3)
4)
5)
WARNING :
Turn OFF the power before starting the work so as to prevent accidents caused by abrupt start of the
sewing machine.