EasyManua.ls Logo

KidKraft Cedar Summit DEVONSHIRE ELITE User Manual

KidKraft Cedar Summit DEVONSHIRE ELITE
100 pages
To Next Page IconTo Next Page
Page #1 background imageLoading...
Page #1 background image
INSTALLATION AND OPERATING INSTRUCTIONS
Table of Contents
Warnings and Safe Play Instructions .....pg. 2
Protective Surfacing Guidelines .........pg. 3
Instructions for Proper Maintenance ...... pg. 4
About Our Wood – Limited Warranty .....pg. 5
Keys to Assembly Success .............pg. 7
Part ID ...........................pg. 8-17
Step-By-Step Instructions .......... pg. 18-98
Installation of I.D./Warning Plaque ...Final Step
WARNING
Rev 10/20/2020
10 - 20 Hrs
FOR FORT & SWING
TWO PERSON
ASSEMBLY
2-4 Hrs
10 - 12 Hrs
FOR FORT & SWING
TWO PERSON
ASSEMBLY
10 - 12 Hrs
FOR FORT & SWING
2 - 4 Hrs
TUBE SLIDE
DEVONSHIRE ELITE PLAYSET FSC - F29365
9409365
Cedar Summit by KidKraft
4630 Olin Road
Dallas, TX 75244, United States
customerservice@kidkraft.com
Online Parts Replacement: parts.kidkraft.com
To warranty your product: kidkraft.com/warranty/
Customer Service:
1(800) 933-0771 or (972) 385-0100
KidKraft Netherlands BV
Olympisch Stadion 8
1076 DE Amsterdam, The Netherlands
Europe Customer Service: +31 (0)20 305 8620
europecustomerservice@kidkraft.com
EU Online Parts Replacement: parts.kidkraft.eu
Obstacle Free Safety Zone
Maximum Number of Users: 17
240.43"
6.11 m
136.12"
3.46 m
33' 2"
10.11 m
22' 5.7"
7.46 m
11'6 21/64"
351.35
cm
20'3 25/32"
619.22
cm
28'1 15/64"
856.56
cm
33'5 17/64"
1019.22
cm
F29005
10'11 1/16"
332.90
128.75"
3.27 m
To reduce the risk of serious injury or death, you must
read and follow these instrucons. Keep and refer to
these instrucons oen and give them to any future
owner of this play set. Manufacturer contact informaon provided below.
OBSTACLE FREE SAFETY ZONE - 33’ 2” x 22’ 5.7” (10.11 x 7.46 m) area requires Protecve Surfacing.
See page 3.
MAXIMUM VERTICAL FALL HEIGHT - 6’ 8.8” (2.052m)
CAPACITY - 17 Users Maximum, Ages 3 to 10; Weight Limit 110 lbs. (49.9 kg) per child.
RESIDENTIAL HOME USE ONLY. Not intended for public areas such as mul-unit residences,
schools, churches, nurseries, day cares or parks.
Warning. Only for domesc use.

Table of Contents

Question and Answer IconNeed help?

Do you have a question about the KidKraft Cedar Summit DEVONSHIRE ELITE and is the answer not in the manual?

KidKraft Cedar Summit DEVONSHIRE ELITE Specifications

General IconGeneral
BrandKidKraft
ModelCedar Summit DEVONSHIRE ELITE
CategoryPlay Sets & Playground Equipment
LanguageEnglish

Summary

Safety and Warnings

Continuous Adult Supervision

Emphasizes the necessity of constant adult oversight for child safety.

Critical Safety Hazards

Details head injury, collision, strangulation, and tip-over risks.

Protective Surfacing

Surfacing Material Guidelines

Covers loose-fill and alternative surfacing material requirements and placement.

Product Maintenance and Warranty

Maintenance Schedule

Outlines regular checks and maintenance tasks for safety and longevity.

Limited Warranty Information

Details the warranty coverage, exclusions, and owner responsibilities.

Assembly Preparation

Tools, Parts, and Symbols

Lists required tools, explains part identification, and defines assembly symbols.

Assembly Precautions and Hazards

Highlights critical warnings, proper hardware assembly, and common hazards.

Part and Hardware Identification

Wood Part Identification

Illustrates and lists all wood components with their specifications.

Hardware Identification

Provides actual-size illustrations and identifiers for all necessary hardware.

Initial Assembly Steps

Step 1: Inventory Parts

Guides users to inventory all parts and hardware before starting assembly.

Step 2: Front Wall Assembly

Instructions for assembling the initial sections of the front wall structure.

Major Structural Assemblies

Step 3: Back Wall Assembly

Instructions for assembling the initial sections of the back wall structure.

Step 4: Swing Wall Assembly

Attaching swing wall panels to the front and back wall assemblies.

Floor and Rockwall Integration

Step 8: Floor Assembly

Attaching floor boards, supports, and brackets to the main structure.

Step 11: Attach Rockwall

Attaching rock wall panels and individual rocks to the structure.

Roof and Swing Components

Step 15: Gable End Assembly

Assembling roof ends and gable boards to form the roof structure.

Step 29: Swing Beam Assembly

Assembling the swing beam with its supports and mounts.

Final Installation Steps

Step 51: Install Ground Stakes

Driving ground stakes into the ground for stability and safety.

Final Step: Attach I.D. Plaque

Mounting the warning and ID plaque for safety information and contact details.
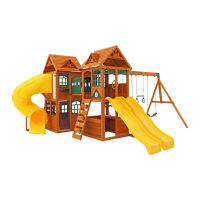
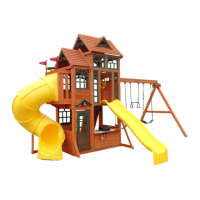
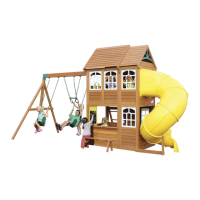
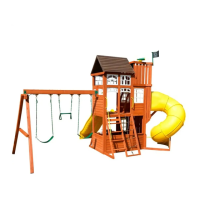
Related product manuals