Home
Olivetti
Printer
PR4 SR
Page 67 (Adjusting the Clearance of the Document Insertion Slot)
Olivetti PR4 SR - Adjusting the Clearance of the Document Insertion Slot
79 pages
Manual
Save Page as PDF
To Next Page
To Next Page
To Previous Page
To Previous Page
Loading...
XYAA6336 Service Manual
6-3
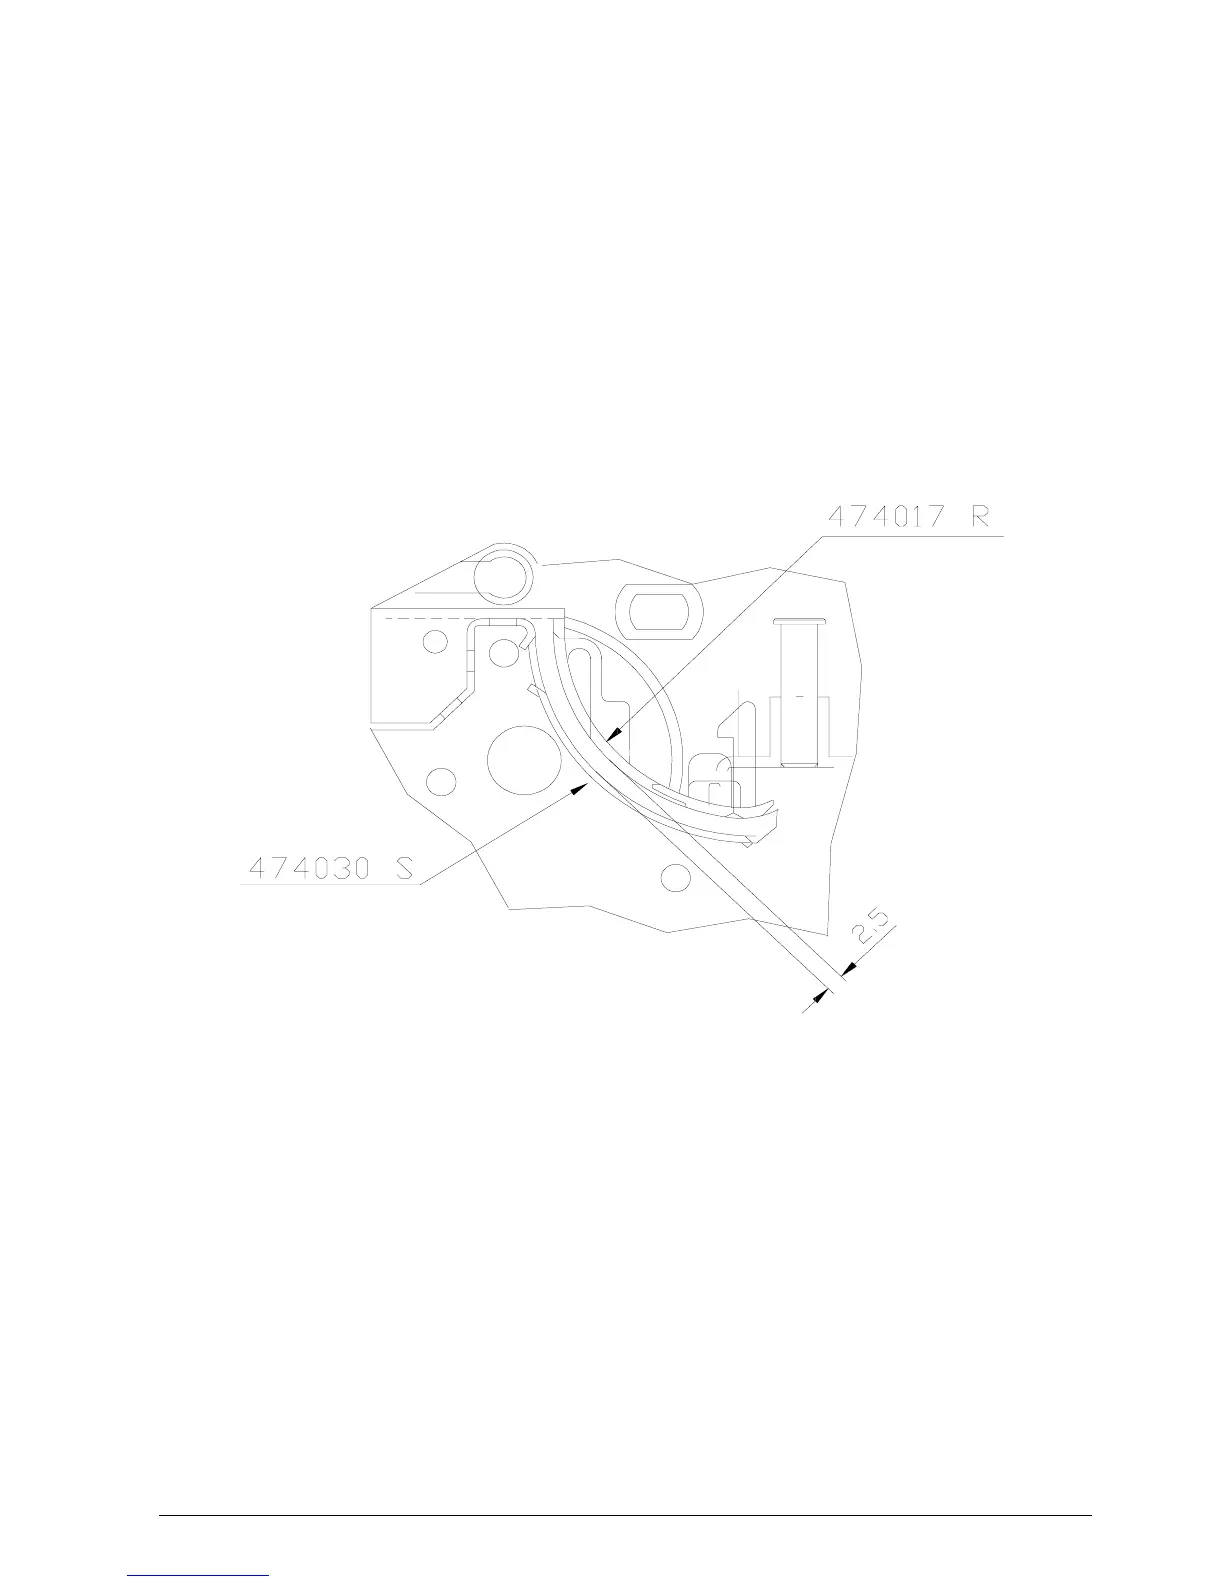
6.6
ADJUSTING THE CLEARANCE OF
THE DOCUMENT INSERTION SLOT
Using a specific probe, make sure that there is a
clearance of 2.5 mm between the frame shield code
474030S and the frame in zama code 474017R.
66
68
Table of Contents
Main Page
Default Chapter
4
Table of Contents
4
1 Overview
6
Introduction
6
Overall View of the Printer
7
PR4 Printer
7
PR4 SR Printer
8
Block Diagram
10
Internal Connections
11
Power Supply Characteristics
13
Layout of the Drawer and Display Connectors
14
Serial Interface Connector Layout
15
IEE 1284 Parallel Interface Connector Layout
16
2 Installation
17
Unpacking the Printer
17
Checking the Packing
18
Contents
18
Pr4
18
Pr4 Sr
19
Removing the Blockages Used for Transportation
20
Pr4
20
Pr4 Sr
21
Connections
22
Settings to be Made
23
According to the Paper
23
Rolls Used (Pr4 Sr)
23
Inserting the Rewinder for 76.2 MM Rolls
24
Inserting the Rewinder for an 82.5 MM Roll
25
Inserting the Rewinder for a 114.3 MM Roll
26
Inserting the Rewinder for a 139.7 MM Roll
27
Installing the Paper Guide
28
Writing Position
29
3 Functional Checks
30
Leds
30
Console Indications
31
Slip Test
33
Roll Test
33
4 Setup and Adjustments
34
Operator Test
35
Setup from the Console
35
Accessing this Setup Mode
35
Selecting the Parameters
35
Selecting the Parameters
36
SET-UP Diagram (Olivetti Emulation)
37
SET-UP Diagram (EPSON Emulation)
39
5 Disassembly/Reassembly Procedures
43
Overview
43
Removing the Case
43
Locating the Components on the Electronic Board (Serial Version)
49
Locating the Components on the Electronic Board (Parallel Version)
51
Removing the Print Assembly
53
Removing the Print Head
55
Cutter on the Pr4
56
Cutter on the PR4 SR
57
Removing the Platen
58
Removing the Carriage Motor
59
Removing the Ribbon Movement Pin
60
Out of Paper Microswitch Assembly
61
Removing the Rewind Clutch Assembly
63
Removing the Document Detection Photosensors
63
Removing the Slip Detection Photosensors
64
6 Adjustments
65
Adjusting the Platen on the Basic Structure
65
Adjusting the Parallelism and Print Head-Platen Distance
66
Adjusting the Tension of the Carriage Transport Belt
66
Adjusting the out of Journal and Receipt Paper Microswitch Support
66
Mounting the Snap Rings on the Carriage Transport Assembly
66
Adjusting the Clearance of the Document Insertion Slot
67
Adjusting the Paper Detection Photosensor
68
Adjusting the Micr Motor Assembly Mesh
69
Adjustment Menu
70
Photosensor Adjustments
71
Adjusting the Carriage
73
MICR Adjustment
75
7 Lubrification
78
8 Installing the Drawer and Display Card Option
79
Related product manuals
Olivetti PR2
179 pages
Olivetti PR 4
105 pages
Olivetti PR2 E
149 pages
Olivetti PR2 plus
24 pages
Olivetti PGL2540
242 pages
Olivetti PGL2545
355 pages
Olivetti PG L2130
112 pages
Olivetti PG L2140
313 pages
Olivetti PG L2555
293 pages
Olivetti d-Color P20W
95 pages
Olivetti d-COLOR P3100
115 pages
Olivetti PG L26 Special
93 pages