17
Performing
When you play the keyboard, you hear the sound of the part(s) that
you selected in ““Selecting the Parts to Perform” (p. 14).
The JUPITER-X lets you customize performance-related settings so that
you can perform in the way that’s best for you.
Performing Arpeggios
To start arpeggio performance, make the I-ARPEGGIO [ON/OFF] button
lit.
To stop arpeggio performance, press the button once again to make it
go dark.
& “I-ARPEGGIO” (p. 20)
Making Performance Settings
Using the Controllers
You can use the controllers of the controller section to quickly
operate the sound parameters or to modify the sound to create
excitement in your performance.
You can also assign functions to a footswitch or expression pedal,
and use it to switch scenes or turn the arpeggio on/o while you
perform.
To assign functions to controller, make settings in the system
parameters.
& “List of functions that can be assigned to the controllers”
(p. 47)
Specifying the Key Range
By specifying the key range, a sound that you play or an arpeggio
performance can be restricted to a specic region of keys.
For example, you could specify that the left-hand region of the
keyboard plays only the bass part, so that an arpeggiated bass
continues without being aected by what you play in the right-hand
region of the keyboard. Alternatively, you could specify fades between
multiple parts to create gradations between sounds.
1. Press the [MENU] button.
2. Use the [1] knob to select “KEY RANGE SETTINGS,”
and then press the [ENTER] button.
3. Use the [1] knob to select the parameter and use the
[2] knob to change the value.
Parameter
[1] knob
Value
[2] knob
Explanation
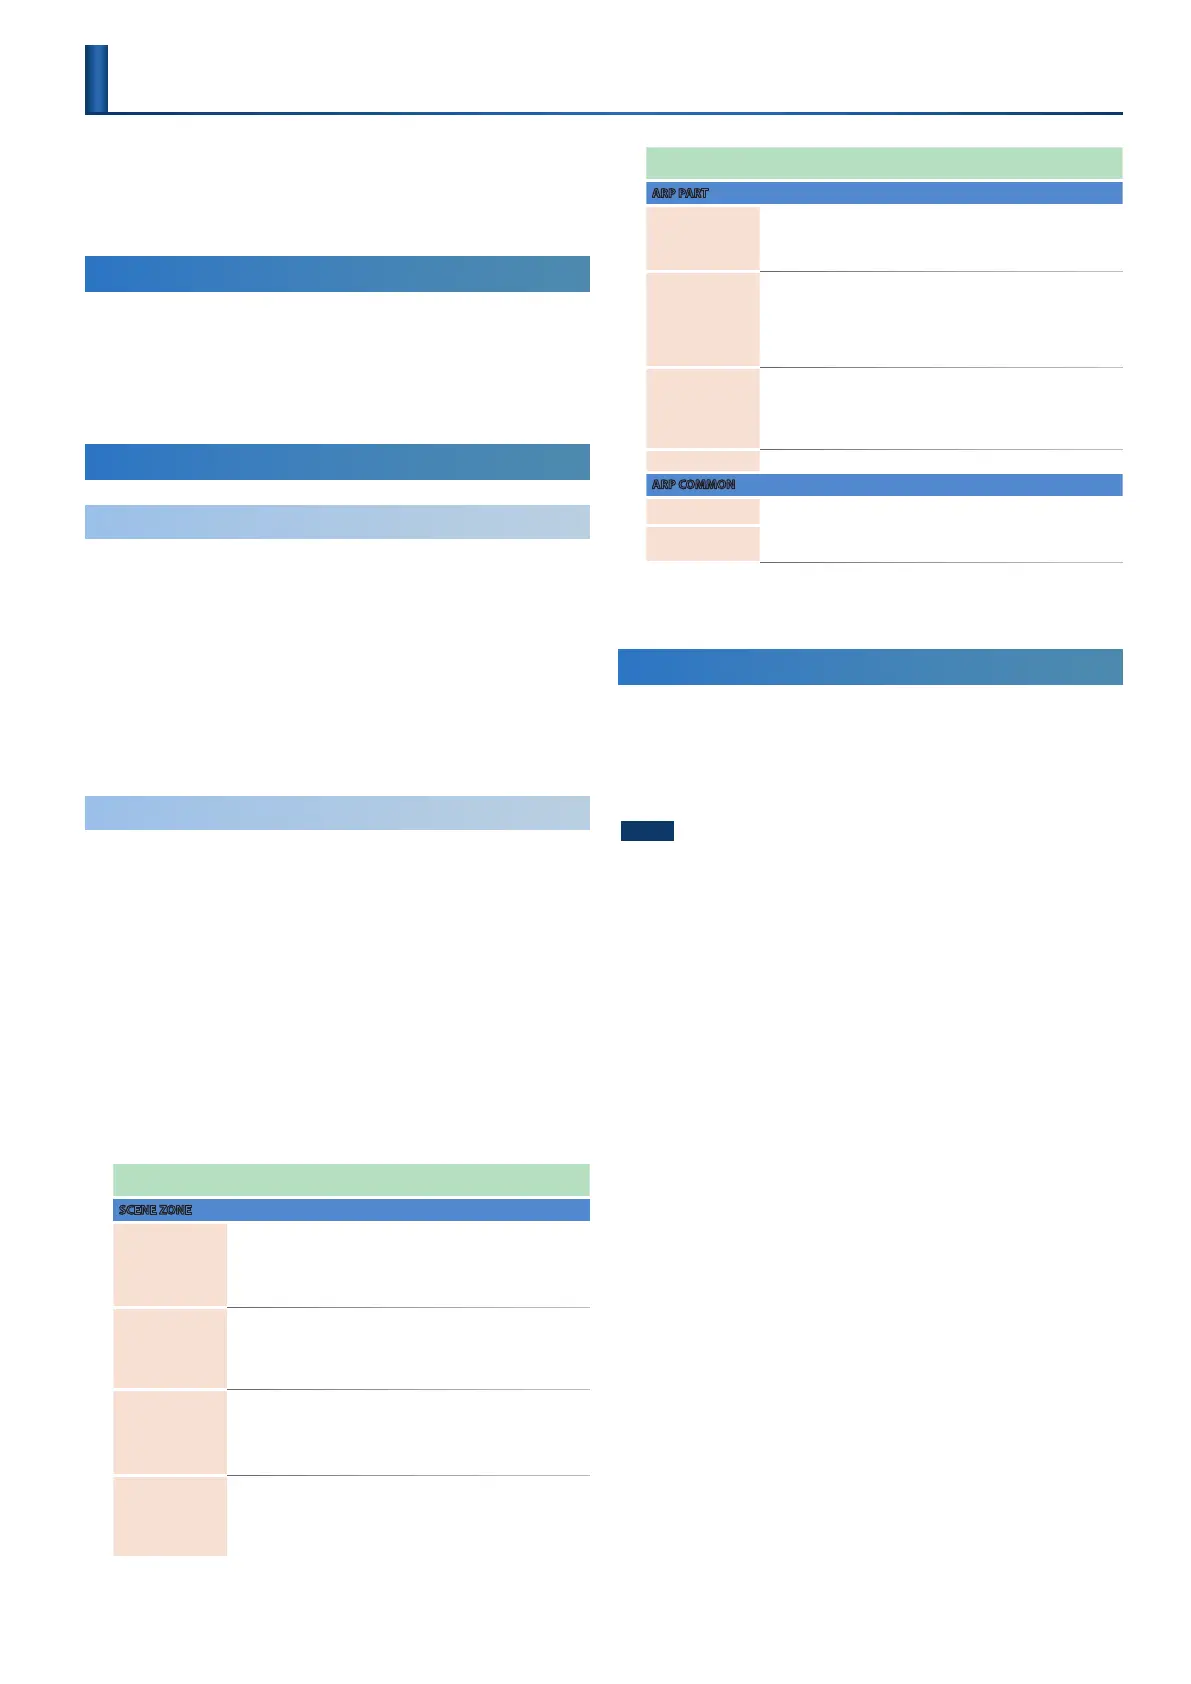
SCENE ZONE
Key Rng Low C-–G9
Set the keyboard range in which each part
will sound.
Make these settings when you want
dierent key ranges to play dierent tones.
Specify the lower limit of the key range.
Key Fade Low 0–127
Species the degree to which the part is
sounded by notes played below the Key
Rng Low.
If you don’t want the tone to sound at all,
set this parameter to “0.”
Key Rng Upp C-–G9
Set the keyboard range in which each part
will sound.
Make these settings when you want
dierent key ranges to play dierent tones.
Specify the upper limit of the key range.
Key Fade Upp 0–127
Species the degree to which the part is
sounded by notes played above the Key
Rng Upp.
If you don’t want the tone to sound at all,
set this parameter to “0.”
Parameter
[1] knob
Value
[2] knob
Explanation
ARP PART
K-Range Lo C-–G9
Species the lower pitch limit that is
sounded by the arpeggio. If the arpeggio
attempts to play a note that is lower than
this, the octave is raised.
K-Range Oct 0–12
Species the number of higher octaves in
which the arpeggio is sounded, relative to
K-Range Lo.
If the arpeggio attempts to play a note
that is higher than this range, the octave
is lowered.
Oct Range -3–+3
Species the range of octaves in which the
arpeggio is sounded.
You can specify whether the arpeggio is
sounded in the octave(s) above (+) or below
(-) the notes you play.
Transpose -36–+36 Shifts the arpeggio notes in semitone steps.
ARP COMMON
In Range Low
C-–G9
Species the range that is detected for
arpeggio performance. Pressing a key
outside the specied range does not aect
the arpeggio function.
In Range Upp
4. To save the settings, save as described in “Saving a
Scene” (p. 13).
Performing with a Connected Mic (Vocoder)
The “Vocoder” adds eects to a human voice. If you run your voice
through the vocoder, you can give it a toneless, robotic tone. Control
the pitch by playing the keyboard.
1. Connect a microphone to the rear panel MIC IN jack.
NOTE
The JUPITER-X supports dynamic microphones and electret
condenser microphone (plug-in power system). It does not
support condenser microphones.
2. Use the rear panel [MIC GAIN] knob to adjust the
volume.
Make detailed adjustments to the MIC IN volume after you
select the sound.
Initially, set the knob to approximately the center position.
3. Select part 1, and then press the [MODEL BANK]
button to make it light.
4. Press the [MODEL BANK] button and then press the
[15] button.
* With the factory settings, “VOCODER” is assigned to the model bank of
the [15] button.
You can change the model bank that is assigned.
& “Customizing the model bank” (p. 15)
5. Use the [1] knob to select a vocoder sound (two
types).
6. While playing the keyboard, vocalize into the
microphone.
Use the [MIC GAIN] knob to make ne adjustments to the
volume.

 Loading...


