21
I-ARPEGGIO
Varying the arpeggio automatically
(PLAY DETECTOR)
Play Detector is a function that detects your keyboard playing and
varies the arpeggio in real time.
* If both KEYS and BEAT are turned “OFF,” the current loop performance will
repeat. This is useful when you want to continue playing for a while with
the same accompaniment.
Varying the arpeggio according to the
harmony you play (KEYS)
You can specify whether the chord of the arpeggio will vary
according to the chords that you play on the keyboard.
* If you want to layer your keyboard performance without changing the
chord, turn KEYS o.
Varying the arpeggio according to the timing
of your performance (BEAT)
You can specify whether the pattern will change according to a
rhythm that is estimated from the interval between the notes you
play.
* Even if BEAT is o, the keyboard pitches are detected. If you want to
maintain the sense of beat while you play a chord progression, turn BEAT
o.
Using the Step Edit Function
The JUPITER-X lets you edit arpeggio performance data using the
TR-REC input method.
What is TR-REC?
TR-REC is a method in which you use the [1]–[16] buttons to
specify the timing at which each key plays a note.
You can use it while listening to a rhythm that you yourself created.
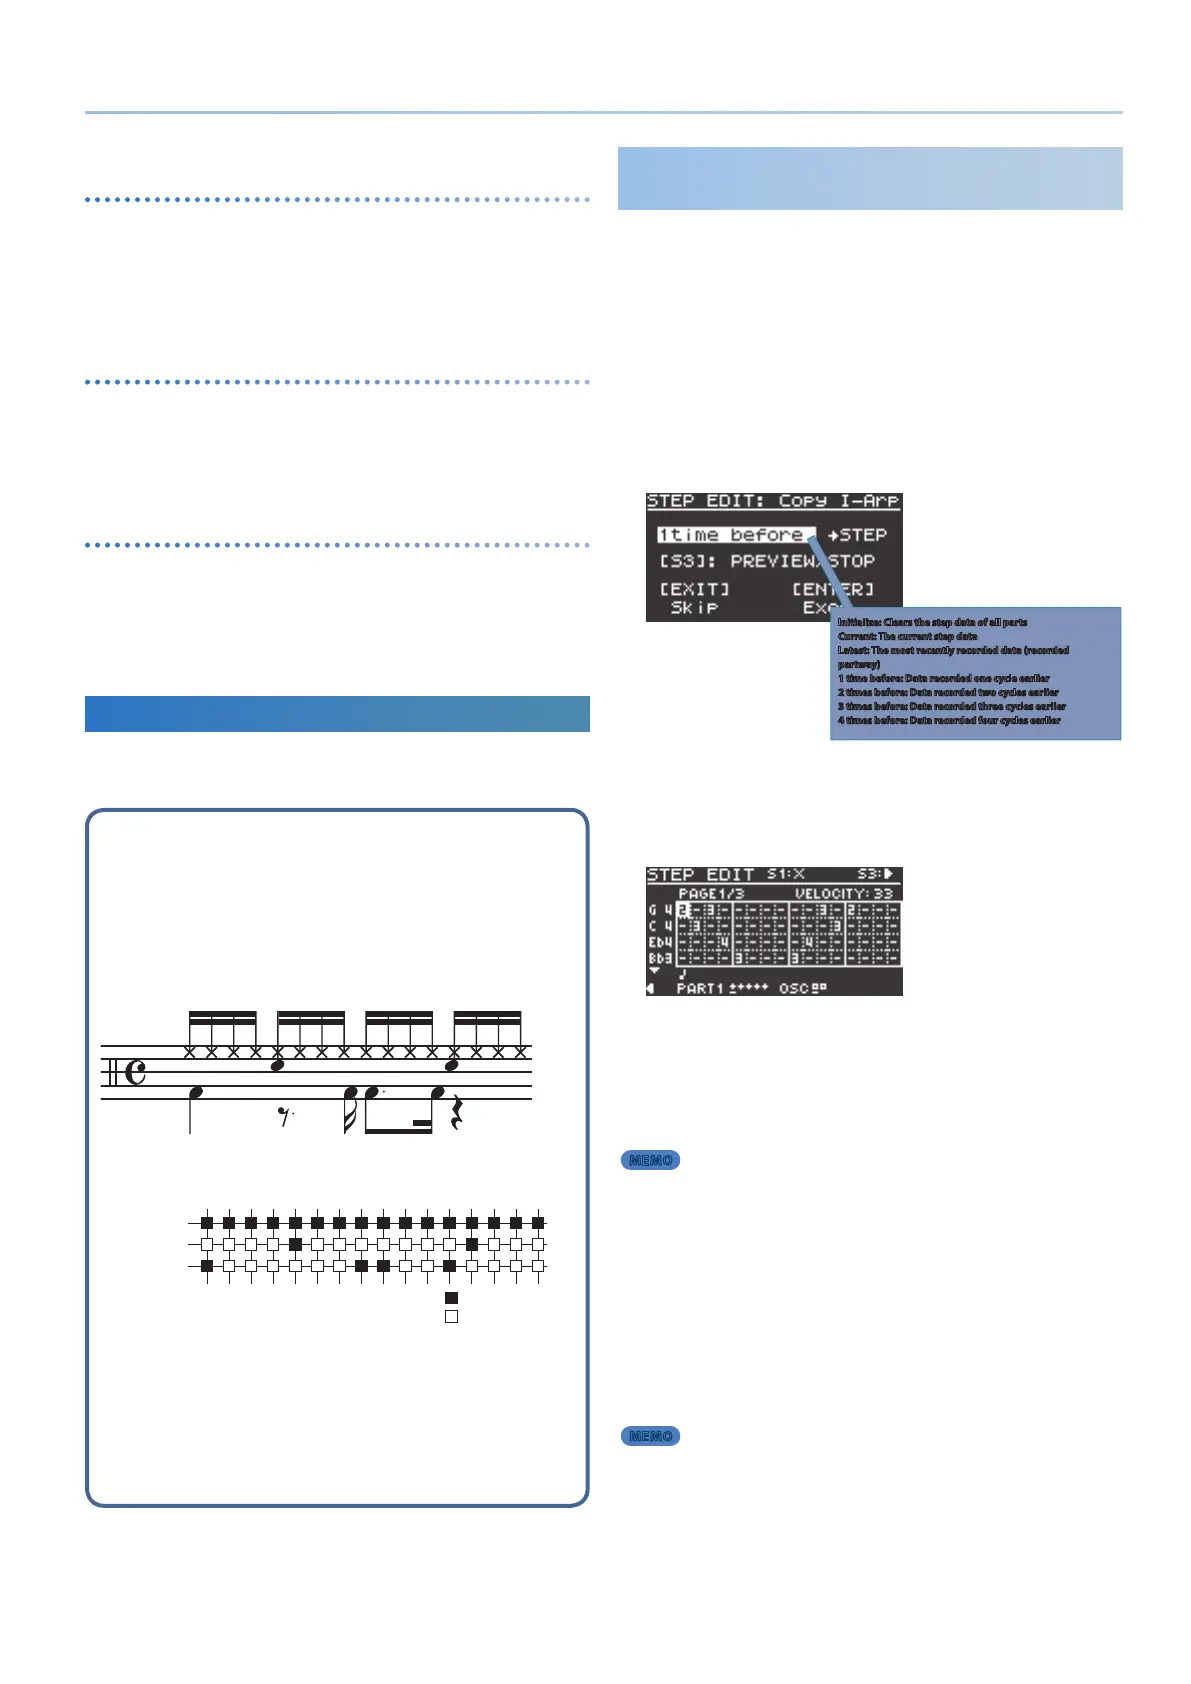
For example to create the drum pattern shown in gure 1, you
would make the settings shown in gure 2.
Closed Hi-Hat
Step Number
Snare Drum
Bass Drum
01 0905 1303 1107 1502 1006 1404 1208 16
Button lit
Button unlit
gure 1
gure 2
When pressing a key of its corresponding note that you want to
edit, the [1]–[16] buttons light or go dark to indicate the steps on
which that instrument will sound.
Pressing one of the [1]–[16] buttons switches it between lit and
unlit, changing whether the instrument will or will not sound on
that step.
Editing Each Step of the Arpeggio
Performance
(STEP EDIT)
The arpeggio performance is always recorded inside this unit. If you
like the performance, you can use the STEP EDIT function to extract
and edit it.
The edited pattern can be used as a user pattern for the arpeggiator, or
used in your computer as MIDI data.
You can also create a user pattern from a blank state without using
recorded data.
1. Press the [STEP EDIT] button.
The arpeggio performance stops, and the STEP EDIT - COPY
I-ARPEGGIO screen appears.
Initialize: Clears the step data of all parts
Current: The current step data
Latest: The most recently recorded data (recorded
partway)
1 time before: Data recorded one cycle earlier
2 times before: Data recorded two cycles earlier
3 times before: Data recorded three cycles earlier
4 times before: Data recorded four cycles earlier
You can use the [S3] button to preview the data.
2. Use the [2] knob to select the data that you want to
edit, and press the [ENTER] button.
The STEP EDIT screen appears.
3. Press the key of the note that you want to enter.
4. Press the [1]–[16] buttons so that the button is lit for
each step at which you want the note to play.
5. Use the [S3] button to play/stop, and listen to the
result.
MEMO
5 If you want to change settings for the number of steps, the grid, and shue,
press the PAGE [<] button several times, or exit STEP EDIT and edit the settings
in the ARP PART EDIT screen (p. 25).
5 If you want to change the tempo, use the [TEMPO] knob.
6. When you are nished editing, press the [EXIT]
button.
To save the pattern data that you created, save the scene.
& “Saving the Scene Settings
(SCENE WRITE)” (p. 25)
If you want to use the pattern on your computer as MIDI data,
use the export function.
& “Exporting a Step Edit Pattern
(USER PATTERN EXPORT)” (p. 49)
MEMO
For parts whose STEP was changed in STEP EDIT mode, the
ARP PART EDIT Switch and Step Mode automatically turn “ON”
when you exit STEP EDIT mode, and instead of an arpeggio,
the pattern data that you created in STEP EDIT mode will play
immediately.

 Loading...


