MAP-S1
13
Note: Follow the disassembly procedure in the numerical order given.
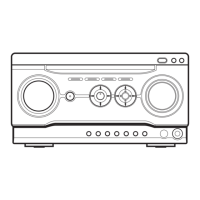
2-2. PANEL (SIDE L/R)
2-3. PANEL (FRONT) BLOCK-1
• Continued on 2-4 (page 14).
– Rear view –
1 two screws
(flat head)
3 two claws
2 Remove the panel (side R)
in the direction of the arrow.
2 Remove the panel (side L)
in the direction of the arrow.
4 panel (side R)
3 two claws
1 two screws
(flat head)
1 two screws
(flat head)
4 panel (side L)
1 two screws
(flat head)
4 claw
4 claw
4 claw
4 claw
2 three screws
(BV/ring)
1 two screws
(ornament)
1 screw
(ornament)
1 screw
(ornament)
– Rear bottom view –
– Rear view –
5 Remove the panel (front) block
in the direction of the arrow.
3 Remove the panel (front) block
in the direction of the arrow.
Note:
Please spread a sheet under a unit
not to upper surface of the panel (front).