P340 flexiprobe Operation Manual 17
Section 5: Controller and system set-up
This Section introduces the P340 controller and system set-up.
5.1 Overview
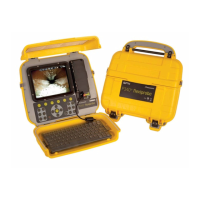
The P340 controller acts as the main control unit and digital video processor for the flexiprobe system. It is
compatible with the full range of P340 flexiprobe pushrod reels and cameras. It is also compatible with the
full range of P330+ and P340 flexiprobe pushrod reels and cameras.
The 8” (200mm) screen displays the on-screen system menu, the camera’s video feed or the selected
video and picture files stored on a Compact Flash card or a USB flash drive. You can command the P340
controller using the keypad or the keyboard; this manual will detail using both methods where applicable.
In addition to record, playback and control, the controller can connect to external video equipment using the
RCA composite video connectors, with the optional headset, or to a personal computer using the PC (USB
type-B) socket.
NOTE: The terms “controller” and “command module” are used interchangeably.
5.2 Powering up
When the system is correctly assembled, switch it on using the controller On/Off switch (Item 10 in Figure
2.3).
NOTE: The controller takes approximately 10 seconds to display the first screen.
Depending on the settings, the controller will display one or two splash screens followed by the welcome
screen (Section 5.4). The welcome screen displays important system information; check it and press OK to
continue.
CAUTION: When you power off the system, wait at least 5 seconds before switching it on again.
Failure to do so may cause the system to lock up.
NOTE: When the controller is switched ON with no camera connected, the screen will display vertical color
bars.
The caption CAL will flash on the top right-hand corner of the screen until the reel is calibrated by pressing
F10, or the ▲ and ▼ icons on the keypad (see Section 6.2).