33
4. Settings
Remote sensing
Before connecting a sensor, check its specifications and set
remote sensing on the LOAD CELL screen.
Set to “USED (6 wire)” when using 6-wire format (remote sens-
ing format). Set to “UNUSED (4 wire)” when using 4-wire format.
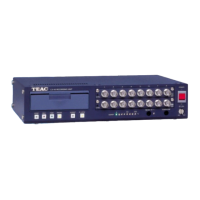
4-3-1. Equivalent input calibration
This method determines the calibration value by recording
rated output and rated capacity values from a test report.
Use this to calibrate easily when an actual load cannot be
applied.
An overview of the equivalent input calibration procedures is
shown below.
Bridge voltage
c
Rated output/rated capacity
c
Zero balancing
c
Unit shown
4-3-1-1. BRIDGE VOLTAGE
Select the bridge voltage to supply to the strain gauge
transducer.
o As a reference for setting the bridge voltage, consider that
the output from the sensor should be increased, and set
the maximum voltage in a range that does not exceed the
maximum safe excitation voltage on the sensor test report.
ATTENTION
A sensor could be damaged if this is set to a value that exceeds
its maximum safe excitation voltage.
NOTE
o The default value is 2.5V.
o In TEDS calibration, when TEDS data is read, if the bridge
voltage setting is greater than the maximum safe excitation
voltage recorded in the TEDS memory, the bridge voltage
will be changed to a value less than the maximum safe
excitation voltage.
4-3-1-2. RATED OUTPUT
Input range: 0.100–3.200 mV/V
Set the rated output of the strain gauge transducer being
used.
4-3-1-3. RATED CAPACITY
Set the rated capacity of the strain gauge transducer being
used.
NOTE
The decimal point position set here will be used as the indica-
tor value decimal point position.
4-3-1-4. ZERO BALANCING
With no load on the sensor, touch the EXECUTE button.
o If a calibration error appears, conduct countermeasures
according to the error message, and redo calibration.
4-3-1-5. UNIT SHOWN
Select the unit that corresponds to the indicator value from
the list, and touch the OK button.
NOTE
The unit shown is next to the indicator value, but it has no
effect on internal calculations.
For example, the calibration value will not change even if the
unit shown is changed from “N” to “kN”.