4-9
Model 3550 LCR Meter Instruction Manual Operating Instructions
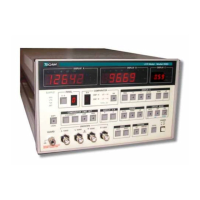
Front Panel Description cont’d:
4 “ZERO” Panel – [OPEN] [SHORT]
Performing OPEN and SHORT corrections before making an impedance reading greatly improves
measurement accuracy. Refer to page 4-4, “Zero Correction of Parasitic Impedance” for
connection diagrams and other details regarding these procedures.
x [OPEN] - The OPEN circuit zero correction procedure compensates for stray capacitance
and conductance between test leads/fixture. Pressing the [OPEN] key initiates the open
circuit zero correction procedure. Make sure that the test fixture is in the open state before
performing the OPEN circuit zero correction procedure.
x [SHORT] – The SHORT circuit zero correction procedure compensates for residual
resistance and inductance in the test leads/fixture. Pressing the [SHORT] key initiates this
procedure. Make sure that the test fixture is shorted before performing the SHORT circuit
zero correction procedure.
There are three variations of zero correction procedures:
1) Standard Zero Correction: corrects all frequencies. This process requires several
minutes to step through all of the test frequencies. See 4 (p. 4-9) for details.
2) Spot Zero Correction, allows up to three user-defined frequencies to be corrected: see
[SHIFT]ĺ[8] (p. 4-14) to define spot frequencies; [SHIFT] ĺ[OPEN] (p. 4-16) for Open
circuit spot correction; & [SHIFT] ĺ[SHORT] (p. 4-16) for short circuit spot correction.
3) Correction Frequency Limit Mode: allows the user to define a range of test frequencies
to be zero corrected during a standard zero correction.
Refer to [SHIFT] ĺ[ - ] (p. 4-16) and 4 (p. 4-9) for more details.
5 "RANGE" Selection Panel – [AUTO] [DOWN] [UP]
The Range panel is used to select either automatic or manual measurement ranges. If AUTO range
is used to find the correct measurement range and the 3550 is then switched to MANUAL range,
the 3550 will retain the current measurement range.
x [AUTO] – Pressing the [AUTO] key will toggle between Auto and Manual Range Modes.
When the 3550 is in the AUTO mode, the pushbutton will be illuminated. When the
instrument is in the manual mode the AUTO pushbutton is not illuminated.
x [DOWN] – In the manual mode, pressing the [DOWN] key will lower the range of the
instrument. The [DOWN] key will flash to indicate when the current range is under ranged
and needs to be lowered for a reading to take place. When the [DOWN] key is pressed,
then an audible beeper will sound to indicate that the range has been lowered.
x [UP] - In the manual mode, pressing the [UP] key will raise the current range of the 3550.
The [UP] key will flash to indicate when the current range is over ranged and needs to be
raised in order for a reading to take place. When the [UP] key is pressed, then an audible
beeper will sound to indicate that the range has been raised.