4-10
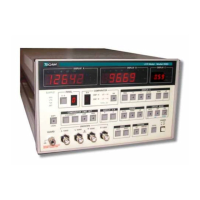
Model 3550 LCR Meter Instruction Manual Operating Instructions
Front Panel Description cont’d:
6 [SHIFT] Key
The [SHIFT] key has dual functionality. Its primary purpose is to allow access to the secondary
functions of the numeric keys. Its secondary function allows the user to switch from Remote
communications Mode (GPIB or RS-232C Operation) to Local (Front Panel) Operation.
Below is a summary of the secondary functions accessible by pressing the [SHIFT] key and then a
corresponding function key. The secondary function keys are [0]~[9], [OPEN], [SHORT] and [-].
For descriptive convenience, notation such as [SHIFT] ĺ [0] etc will be used to indicate that first
the [SHIFT] Key should be pushed, and then the [0]" Key.
[SHIFT] ĺ [0]: Frequency Set Mode
The 3550 test frequency settings may be programmed from 42.0Hz to 5.00 MHz with a
resolution of three significant digits. If DISPLAY C is set to indicate test frequency and the
3550 is in the Measurement mode, the frequency can be adjusted changed by pressing the
[UP] and [DOWN] keys in the DISPLAY C panel.
Pressing [SHIFT] ĺ [0] will cause the 3550 to enter the frequency set mode.
Entering the Frequency Values
The most significant digit in DISPLAY C will flash indicating that a new value must be
entered. Press a key from [0]~[9] to set the value of the first digit and to proceed to set
the next digit value. Once again, press a key from [0]~[9] and proceed to the next digit.
Set the Decimal Point Location
Once values for all of the three digits have been defined, the decimal point will start to
blink indicating that the decimal point needs to be positioned. Press the [DP] key and
notice that the position of the decimal point will change. Continue to press the [DP] key
until the decimal point is positioned correctly.
Select the Frequency Units
Press either the [CURSOR Ź] or [CURSOR Ż] keys repeatedly until one of the frequency
units annunciators (Hz, kHz, or MHz) begins to blink. This indicates that the frequency units
mode is now active. Press the [UNIT] key until the desired frequency units annunciator
starts to blink.
Verify and Set the Frequency
The user can go back and edit any of the previous settings by pressing the [CURSOR Ź] or
[CURSOR Ż] keys to access the settings. Verify that all frequency settings are correct and
then press the [ENTER] key. This will store the new frequency settings and return the
instrument back to measurement mode.