Connecting the control cables
Frame R1i…R4i, R6i and R7i inverter modules use a ZCU-14 control unit, frame R5i modules
use a ZCU-12 control unit, and frame R8i modules (and multiples) use a BCU control unit.
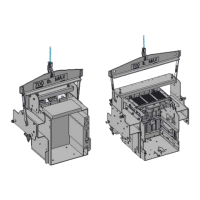
The cabinet has a control cable entry that consist of grommets and two conductive grounding
cushions that press against the exposed cable shields. Refer to the drawings below.
1. In the cabinet, remove shrouding wherever necessary to allow access to the cable entry
and trunking inside the cubicle.
2. Slacken the locking screws of the entry and open it wide. Thread the cables through
the grommets below the cable entry, then into the cubicle between the cushions.
3. (Top entry units only) Sort the cables so that the thinnest and thickest cables are at the
opposite ends of the opening as shown below. If several cables are run through one
grommet, seal the entry using Loctite 5221 or equivalent.
4. Run the cables to their eventual connection points using existing trunking wherever
possible. Protect the cables against any sharp edges or hot surfaces.
5. Remove the outer jacket at the entry so that the cushions can press on the bare shield.
If the outer surface of the shield is non-conductive, turn the shield inside out and wrap
copper tape around the cable to keep the shielding continuous. Do not cut the grounding
wire (if any).
6. Push the cushions firmly together so that they press on the exposed cable shields.
Tighten the locking screws.
7. When connecting to the inverter control unit, remove the outer sheathing of the cable
at one of the grounding clamps near the terminals. Tighten the clamp onto the bare
cable shield.
In case no clamp plate is available at the connection point, twist the outer shield strands
into a bundle, crimp a ring terminal onto it and connect it to the nearest suitable grounding
point.
8. Strip the ends of the conductors. Try to keep the unshielded portion of the conductors
as short as possible. Use tape or shrink tubing to contain any stray strands.
Connect the conductors to the appropriate terminals. Connect the shields of twisted
pairs to a “shield” terminal if provided; otherwise twist the shields into a bundle, crimp
a ring terminal onto it and connect it to the nearest chassis grounding point.
9. Refit any shrouds removed earlier.
10. At the other end of the cables, leave the shields unconnected or ground them via a
capacitor (eg. 3.3 nF / 630 V).
Electrical installation 85
 Loading...