Note: The +H366 option only interconnects the outputs of inverter modules within the same
cubicle, not modules installed in different cubicles. Therefore, when the drive has more than
three inverter modules, make sure that the load is distributed evenly between the modules:
• In case of two inverter cubicles of two modules, connect the same number of cables to
each cubicle.
• In case of one inverter cubicle with three modules and another with two, each cubicle
requires a number of cables proportional to the number of modules within. For example,
connect three out of five (or six out of ten, etc.) cables to the cubicle with three modules,
the remaining two out of five (four out of ten) cables to the cubicle with two modules.
■ Procedure
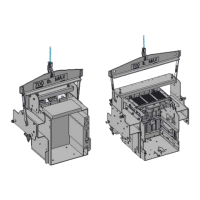
Removing the inverter module(s)
To allow more room for cabling work, the inverter modules can be removed completely
instead of only the fan carriages.
Refer to the drawings below.
Note: As an alternative to using the extraction/installation ramp, a lifter is available from
ABB Service. See Lifter for air-cooled drive modules user's guide (3AXD50000332588
[English]).
WARNING!
Read the safety instructions given in Safety instructions for ACS880
multidrive cabinets and modules (3AUA0000102301 [English]). If you
ignore them, injury or death, or damage to the equipment can occur.
Note: The illustrations represent a frame 2×R8i inverter cubicle with option +F286 (DC
switch-disconnector). On units without +F286, the DC busbars are oriented differently, but
the procedure is otherwise the same.
1.
Do the steps in section Electrical safety precautions (page 57) before you start the work.
2. Open the inverter module cubicle door.
3. Remove the shroud at the top of the cubicle.
4. Detach the terminal block [X50] at the top of the module.
5. Detach the DC busbars from the module. Make note of the order and position of the
screws and washers.
6. Detach the wiring connected to the terminals on the front of the module (including fiber
optic cabling). Move the disconnected wiring aside.
7. Drives with option +C121 (Marine construction) or +C180 (Seismic design):
a. Loosen the bolts holding the transverse retaining bracket both on the left and the
right. (During reassembly, tighten these screws to 9 N·m [6.6 lbf·ft].)
b. Remove the bolts holding the retaining bracket to the module.
c. Remove the retaining bracket.
d. Reinstall the bolts to the module. Tighten to 22 N·m (16 lbf·ft).
WARNING! Do not proceed before the bolts are securely in place.
Otherwise, the parts of the module can become separated and cause
injury or damage.
Electrical installation 67
 Loading...