Do you have a question about the ABB COMMANDER C355 and is the answer not in the manual?
Decide on the application template and the required output configuration for operation.
Connect the process inputs, outputs, and power supplies according to the instrument labels.
Power up the instrument and set the template number and output configuration details.
Details on front panel displays, function keys, and LED indicators.
Describes operator facilities available based on control template and output type.
Covers tuning, set points, alarm trip points, and valve setup.
Details basic configuration, inputs, alarms, set points, control, outputs, and serial comms.
Covers profile states, control, and program setup for ramp/soak functions.
Information on siting, mounting, and electrical connections for the instrument.
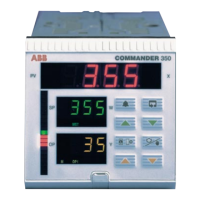
Overview of the COMMANDER 350 front panel displays and function keys.
Detailed explanation of how to use the Raise, Lower, Up, Down, and Parameter Advance keys.
Explanation of indicator lights on the upper and lower displays and the character set used.
Description of display errors, their actions, and how to clear them.
Information on watchdog functions, loop break monitoring, and a glossary of abbreviations.
Overview of the normal day-to-day mode and available operator facilities.
Details for Single Loop Controller (Templates 1 and 2) operations.
Explanation of Auto/Manual Station (Templates 3 and 4) for master controller backup.
Details for Analog Backup (Templates 5 and 6) as a master controller backup.
Functionality for Indicator/Manual Loader Station (Templates 7 and 8).
Details for Single Loop with Feedforward (Templates 9 and 10).
Explanation of Cascade Control (Templates 11 and 12) using linked PID controllers.
Details for Cascade Control with Feedforward (Template 13).
Functionality for Ratio Controller (Templates 14 and 15).
Details for Ratio Station (Templates 16 and 17).
Explanation of Reverse/Direct or Direct/Reverse and Reverse/Reverse or Direct/Direct control actions.
Details on Motorized Valve with Feedback and without Feedback (Boundless) types.
Explanation of Auto-tune feature, including start-up and at-set-point tuning.
Guide to using the monitor for PID tuning and assessing control performance.
Overview of Ramp/Soak facility, programs, segments, ramps, and soaks.
Managing program selection, run/hold actions, profile reset, and segment skipping.
Configuration of time units, ramp types, program select sources, and run/hold sources.
Setting up program begin/end segments, and programming individual segments.
Accessing Set Up mode via security code and overview of levels 2 to 5.
Configuration of cycle times, hysteresis, proportional bands, and integral/derivative times.
Setting local, cascade, remote set points, ratio, bias, and ramp rate.
Configuration of alarm numbers, types, trip values, and hysteresis.
Configuration for motorized valve setup, including ratio, bias, deadband, and travel time.
Accessing Configuration mode via security code and overview of levels 6 to E.
Setting template application, control output type, control action, and mains rejection frequency.
Configuration of analog input types, electrical ranges, units, and sensor settings.
Setting alarm types, trip values, hysteresis, and global acknowledge sources.
Configuration of set point tracking, limits, and fault actions.
Configuration of power fail recovery, process variable fail action, and output limits.
Setting front panel key enables, operator adjustments, ratio/bias display, and passwords.
Assigning sources and polarity for digital, analog, and relay outputs.
Configuration of serial communication parameters like baud rate, parity, and Modbus address.
Calibration procedures for analog inputs, position feedback, and motorized valves.
Compliance with EC directives, cleaning instructions, and end-of-life disposal.
Guidelines for selecting a suitable location and general installation requirements.
Instructions for panel mounting, including overall dimensions and cut-out details.
Warnings, cautions, and notes regarding electrical connections and safety.
Details on connecting relays, digital outputs, and analog outputs.
Instructions for connecting motorized valves and various input types.
Details on output connections, power supply requirements, and RTD/Thermocouple inputs.
Overview of application templates, control strategies, output types, and parameters.
Details on control strategies, output types, parameters, and basic operation.
Information on universal and non-universal analog input types and ranges.
Details on control/retransmission outputs, relay outputs, and digital inputs.
Overview of maths blocks, delay timers, custom linearizers, and PC configurator.
Details on linearizer functions, input impedance, sensor protection, and filters.
Compliance with EMC directives and design/manufacturing standards.
Specifications for relay outputs, digital inputs, serial communications, physical size, and environment.
Detailed ranges and accuracies for thermocouple, RTD, and linear inputs.
Diagram and description of the Single Loop Control function.
Diagrams for Series and Parallel Operation of Auto/Manual and Analog Backup.
Diagram and explanation of the Indicator/Manual Loader Station functionality.
Diagram and description of Single Loop Control with Feedforward.
Diagram and explanation of Cascade Controller operation.
Diagram and description of Cascade Control with Feedforward.
Diagram and explanation of the Ratio Controller function.
Diagram and explanation of the Ratio Station function.
Overview of the Commander Configurator for programming the device.
Features for customizing analog input ranges, linearizers, and fault detection.
Details on math blocks, logic equations, and process alarm customization.
Configuration of real-time alarms, delay timers, and custom linearizers.
Customizing templates and connecting the device to the PC Configurator.
Contact information for ABB Customer Support worldwide.
Requirements for warranty claims, including documentation and storage conditions.
Mapping of configuration display codes to template titles and input assignments.
Details on output types and their corresponding relay, analog, and digital assignments.
| Model | Commander C355 |
|---|---|
| Type | Controller |
| Communication Protocols | Modbus RTU |
| Mounting | Panel Mount |
| Input Voltage | 100 to 240 VAC |
| Control Method | PID |
| Inputs | Digital Inputs |
| Outputs | Relay Outputs |
| Number of Relays | Up to 3 |