30 Agilent SPS 4 Autosampler User’s Guide
3 Installation
Installation Procedure
Carry out the assembly and test instructions as listed in the order below.
1 Inspection and Unpacking
2 Installing the Cover Kit
3 Fitting the Spill Tray
4 Installing the Rack Location Mat
5 Installing the Wash Reservoir
6 Installing the Standards Rack
7 Installing the Sample Racks
8 Fitting the Sample Probe
9 Fitting the Wash Pump Tubing
10 Connecting the Power and the Communications Cable
11 Confirming the Operation
12 Setting up the Instrument Controlling Software for SPS 4
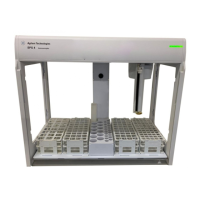
Orientation
Any references to “Front”, “Left”, “Right” or “Rear”, and 3 axes of
movement for the sample probe
— longitudinal (X- axis), rotary or theta
(T- axis) and up and down (Z- axis) are as shown in Figure 3.
WARNING
Position the autosampler so that it is easy to access the mains power switch on the
wall outlet or to remove the power cord from the autosampler or wall outlet.