Do you have a question about the Agilent Technologies SPS 4 and is the answer not in the manual?
Defines hazard symbols (WARNING, CAUTION, NOTE) and their meanings for safe operation.
Details electrical safety precautions, grounding requirements, and potential hazards.
Provides precautions for safe handling and use with flammable liquids.
Outlines general precautions for safe operation and potential hazards from materials.
Explains the meaning of various safety symbols used on the equipment and in manuals.
Lists and describes warning symbols indicating potential hazards like electrical shock or fire.
Explains CE marking and compliance with EU directives for electromagnetic compatibility and machinery.
Specifies IEC classifications for environmental conditions like pollution degree and installation category.
Details EMC standards and compliance requirements for the autosampler's operation.
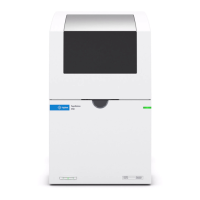
Provides a general description of the Agilent SPS 4 autosampler, its features, and options.
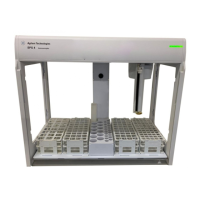
Illustrates and labels the front and rear views of the Agilent SPS 4 autosampler.
Describes the intended purpose and application of the Agilent SPS 4 autosampler for automated sample presentation.
Lists environmental, power, weight, and key technical specifications for the autosampler.
Details the available options and accessories for the Agilent SPS 4 autosampler.
Outlines the sequential steps required for the assembly and testing of the autosampler.
Describes the correct orientation and axes of movement for the autosampler and its components.
Specifies the required bench height, footprint, and flatness for optimal autosampler placement.
Provides instructions for inspecting and safely unpacking the autosampler from its shipping carton.
Details the process for installing the optional protective cover kit for the autosampler.
Guides the user through fitting the spill tray to contain accidental liquid spills.
Explains how to correctly fit and position the rack location mat within the autosampler.
Provides instructions for mounting and connecting the fixed wash reservoir to the autosampler.
Details how to install the standards rack into the rack location mat.
Guides the user on installing various types of sample racks into the autosampler.
Provides step-by-step instructions for securely fitting the sample probe onto the autosampler.
Details the procedure for fitting and routing the wash pump tubing for system operation.
Explains the two drain arrangements: gravity drain and pumped drain for waste solution.
Describes the process of loading and securing the pump tubing onto the wash pump mechanism.
Details how to adjust the pressure plate tension for optimal wash pump tubing performance.
Guides the user through connecting the power supply and communication cables to the autosampler.
Explains how to verify the autosampler is operating correctly after initial setup and power-on.
Provides guidance on installing and configuring the instrument control software for the autosampler.
Offers important safety notes and recommendations for lifting and moving the autosampler.
Details the procedure for powering on and initiating the autosampler's startup sequence.
Provides instructions on how to properly shut down the autosampler and its associated systems.
Explains the process for flushing the wash reservoir and flow path for maintenance and cleaning.
Describes how to control the autosampler's operations using the instrument control software.
Outlines daily and weekly tasks for maintaining the autosampler's performance and longevity.
Provides detailed instructions for cleaning the exterior surfaces and components of the autosampler.
Details the procedure for replacing the wash pump tubing, a frequently maintained component.
States that the autosampler is self-lubricating and does not require user intervention.
Explains that authorized Agilent customer support is required for all servicing tasks.
Provides information on ordering consumable spare parts and the recommendation to use Agilent parts.
Guides users on using diagnostic tools like indicators and sequences to identify autosampler problems.
Addresses issues related to the autosampler not powering on or the indicator not illuminating.
Explains how to interpret the power/error indicator lights for different operating states and errors.
Lists and explains binary error codes indicated by LEDs and their corresponding actions.
Covers common problems encountered during the autosampler's initialization sequence.
Addresses issues related to the probe arm jamming or the sample probe hitting an object.
Details steps to diagnose and resolve communication issues between the autosampler and the control computer.
Lists essential checks and conditions to meet before performing user calibration on the autosampler.
Provides an overview of the Calibration Wizard software and its interface for probe centering.
Step-by-step instructions for performing user calibration using the Calibration Wizard software.
Lists common errors encountered during the calibration wizard and their potential solutions.
Provides detailed instructions for assembling and installing the optional autosampler protective cover kit.
Offers guidance on using seismic brackets to secure the autosampler and prevent earthquake damage.
Lists materials used in standard supplied rinse lines and their chemical resistance considerations.
| Brand | Agilent Technologies |
|---|---|
| Model | SPS 4 |
| Category | Laboratory Equipment |
| Language | English |