Hardware Installation Manual 6. Hardware Maintenance
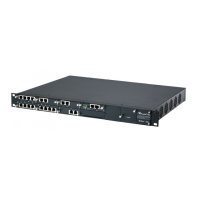
Media Gateways & SBCs 65 Mediant 1000B Gateway & E-SBC
For all other I/O module replacements, the device must be powered down before removing
the module and then powered up again once the new module has been installed. This
enables the device to reset in order to apply the new hardware configuration. This cold-
reset replacement procedure applies to the following modules and hardware configurations:
CRMX module
SWX LAN Expansion module
Replacement of a module with a module that supports a different number of ports
and/or a different interface (e.g., replacing a 2-port FXS with a 4-port FXS module)
Replacement of an FXS, FXO, BRI, TRUNKS or MPM module if it is the only module
of these five module types installed in the chassis (e.g., a chassis that houses only an
FXS module and a CRMX module)
Warnings:
• Only a single module can be replaced per hot-swappable module replacement
process.
• For hot-swappable module replacement, make sure that the module is replaced with
a module of the same interface type and same number of ports, and in the same
chassis slot. For example, a 2-port FXS module in Slot #1 must be replaced with a
new 2-port FXS module and inserted in Slot #1.
Avertissement:
• Remplacez le module par le même type de module et dans la même fente du châssis.
Par exemple, un module TRUNKS endommagé avec deux portées numériques dans
la Fente 1 doit être remplacé par un module TRUNKS avec deux portées numériques
dans la Fente 1.
Note: If you are replacing a module with a module that supports a different interface
(e.g., FXO instead of FXS) and provides a different number of ports, make sure that the
Software Feature Key installed on the device provides support for this added hardware
interface. For more information, contact your AudioCodes sales representative.
To replace a front-panel I/O module:
1. For non-hot swappable module replacement, power down the device, and then skip
the next step and continue to Step 3; otherwise, for hot-swappable module
replacement, keep the device powered on and continue to Step 2.
2. (Hot-Swap Only) Software-remove the module, using the device's Web interface:
a. Access the device's Web interface.
b. Open the page with the graphical display of the device:
♦ Version 7.2 and later: Monitor page (Monitor menu > Monitor tab >
Monitor)
♦ Pre Version 7.2: Home page

 Loading...